

Top
Author
Updated
16 Apr 2026Form Number
LP1260PDF size
73 pages, 3.5 MBSubscribed to LP1260.
Thank you for your feedback.
Table of Contents
Abstract
This paper provides guidance to securely deploy Lenovo® servers and management applications within an organization. For servers, it focuses on security hardening of ThinkSystem™ servers, but the guidance can be applied to other servers as well. It also focuses on the primary applications used to manage Lenovo ThinkSystem servers such as Lenovo XClarity™ Controller and Lenovo XClarity Administrator. The paper provides guidance and recommendations for configuring the servers and applications, so they are secure and hardened.
This paper is targeted at individuals responsible for the security of servers and applications used to manage them. Readers should be familiar with ThinkSystem Server configuration using the F1-System Setup menus or OneCLI and the Lenovo management software used to manage the ThinkSystem server.
Change History
Changes in the April 16, 2026 update:
- Reformatted the document to be a web page with an available PDF download
- New sections:
- Updated all OneCLI commands to include the syntax needed for ThinkSystem V4 servers
Introduction
The attack surface of a server or application is the sum of the different points of entry where an unauthorized user can attempt to enter data or extract data from a server or an application. Security hardening is the process of configuring a system in order to reduce its attack surface to the smallest possible based on the needs and requirements of an organization.
When deploying servers and applications it is important to reduce the attack surface to the smallest possible amount so that the systems are harder to attack or breach. Hardening systems and software is an important step in deploying them in to a production environment.
This paper provides the recommended security best practices for hardening Lenovo ThinkSystem servers and the software that is frequently used to manage them. The recommendations provided may require some adaptation by an organization in order for the systems and software to work properly after hardening.
The systems and software covered in this document include:
- Unified Extensible Firmware Interface (UEFI)
- Lenovo XClarity Controller (XCC), including XCC2 and XCC3
- Lenovo XClarity Administrator (LXCA)
- Lenovo Chassis Management Module (CMM) in the Flex System Enterprise Chassis
- Lenovo System Management Module (SMM) in the ThinkSystem D2 enclosure
- Lenovo Fan and Power Controller (FPC) for the NeXtScale™ n1200 enclosure
It is important to note that ultimately you are responsible for the evaluation, selection and implementation of the security features, administrative procedures and appropriate security controls for your environment. Implementing the recommendations in this guide does not harden your environment completely. It is not possible to reduce the attack surface of any system or application to zero.
Hardening UEFI
Note: This section does not apply to the the following servers as the UEFI menus are different:
- ThinkSystem ST50
- ThinkSystem SR635
- ThinkSystem SR655
- ThinkSystem ST50 V2
- ThinkSystem HX350X V3
Unified Extensible Firmware Interface (UEFI) is the software that interfaces between the operating system and the platform firmware and hardware. UEFI has replaced the legacy Basic Input/Output System (BIOS) on all modern systems. UEFI is a standard interface that simplifies and secures platform initialization and firmware bootstrap operations.
This section provides the configuration settings to review and adjust to harden the UEFI configuration of a ThinkSystem Server. We provide the method for changing settings in two ways:
- Using the System Setup menu that is accessed by pressing F1 the keyboard during the boot process
- Using Lenovo XClarity Essentials OneCLI
The following topics are covered in this section:
- Configure the Physical Presence Policy
- Enable Secure Boot
- Configure the Secure Boot Policy and Custom Policy
- Configure the Trusted Platform Module
- Set Boot Mode to UEFI
- Review and update boot order
- Review and remove unnecessary boot options
- Review and update boot priority for each device type
- Disable booting using the network stack
- Disable PXE Boot
- Disable HTTPS Boot
- Review and update the password rules and policies
- Set an administrator password
- Set a Power-On Password
- Enable Execute Disable Bit
- Enable Intel TXT
- Enable Total Memory Encryption (TME)
- Enable Multi-Key Total Memory Encryption (MKTME)
- Enable Intel Software Guard Extensions (SGX)
- Enable AMD Secure Memory Encryption (SME)
- Enable AMD Transparent Secure Memory Encryption (TSME)
- Enable AMD Secure Memory Encryption Mulitple Keys (SME-MK)
- Configure Security for Intel Optane Persistent Memory
Configure the Physical Presence Policy
Physical Presence must be asserted in order to change certain UEFI settings such as Secure Boot. The Physical Presence Policy is used to control how Physical Presence is asserted. The most secure setting is to require Hardware Physical Presence in order to change any setting that requires Physical Presence be asserted.
There are two possible values for the Physical Presence Policy. Choose the one that best fits your organizational needs and security policies:
- Enabled means that Remote Physical Presence can be asserted without the need for Hardware Physical Presence. This means that Physical Presence can be asserted remotely through the UEFI configuration interfaces like the F1 Setup menu or OneCLI.
For systems that are managed remotely, this should be set to Enabled. When Enabled is selected set the value of Minutes to Asset to the number of minutes in the range of 1-100 to have Remote Physical Presence asserted.
- Disabled means that Hardware Physical Presence is required to assert physical presence. Disabled is the most secure setting. It is important to understand that when this setting is disabled a person must be physically present at the device in order to assert physical presence.
Hardware Physical presence is asserted on some servers by pressing some combination of buttons on the server. Another method is to adjust the hardware physical presence jumper or switch on the system board so that physical presence is asserted. Consult your server’s documentation for instructions on how to assert hardware physical presence on your server.
The parameters can be set in the following ways:
F1 menu:
System Settings → Security → Physical Presence Configuration
OneCLI (ThinkSystem V1 Servers):
PhysicalPresencePolicyConfiguration.PhysicalPresencePolicy= Enable | Disable
PhysicalPresencePolicyConfiguration.MinutesToAssert "minutes" min=1, max=100
3rd Gen Intel Scalable processors: The Physical Presence Policy setting was removed starting in the 3rd Gen Intel Scalable (Whitley) generation servers. It was replaced by a new privilege in XCC called "Configuration - UEFI Security". Only XCC users with the "Configuration - UEFI Security privilege" are able to modify sensitive UEFI settings and sensitive TPM settings. You can change both types of settings using either the UEFI configuration screen or by using an XCC account that has the "Configuration - UEFI Security" privilege.
Enable Secure Boot
Secure boot is functionality built in to UEFI’s specification. When Secure Boot is enabled and properly configured, it protects computers against attacks and infections from malware that installs rootkits and boot kits.
Secure Boot detects when software like the boot loader and key operating system files and other things like option ROMs have been tampered with. It does this by validating each component’s digital signature. Any component whose digital signature verification fails is not loaded during the boot process. Depending upon the OS and drivers you are using on the server it may not always be possible to enable secure boot.
The parameter can be set in the following ways:
F1 menu:
System Settings → Security → Secure Boot Configuration
OneCLI (ThinkSystem V1-V3 Servers):
SecureBootConfiguration.SecureBootSetting "Enabled"
OneCli (ThinkSystem V4 Servers):
UEFI.SecureBootConfiguration_SecureBootSetting "Enabled"
Configure the Secure Boot Policy and Custom Policy
Under most circumstances, it is not necessary to change the Secure Boot Policy from its default settings. The most common case when this might be necessary is when the OS is Linux and there are drivers that are not part of the distribution being installed. This is sometimes called an out-of-box driver, vs in-the-box drivers that are part of standard Linux distributions. In these cases, it may be necessary to customize the secure boot policy.
The parameter can be set in the following ways:
F1 Menu:
System Settings → Security → Secure Boot Configuration
OneCLI (ThinkSystem V1-V3 Servers):
SecureBootConfiguration.SecureBootPolicy "Factory Policy" | "Custom Policy"
OneCLI (ThinkSystem V4 Servers and newer):
UEFI.SecureBootConfiguration_SecureBootPolicy "FactoryPolicy" | "CustomPolicy"
Add Secure Boot Keys for Secure Boot Custom Policy
As described above, if you are using an “out-of-box driver” you likely will need to add your own keys to the Secure Boot database using a Secure Boot Custom Policy. The keys that you need are usually required include the Platform Key (PK), the Key Exchange Key (KEK), the Authorized Signature Database and the Forbidden Signature Database (DBX). These keys are used by the UEFI firmware to validate the components of the system being loaded during the boot process.
The parameter can be set in the following ways:
F1 Menu:
System Settings → Security → Secure Boot Configuration → Secure Boot Custom Policy
OneCLI:
Not Available
Delete Unnecessary Secure Boot Keys for Secure Boot Custom Policy
When the secure boot policy is set to “Custom Policy” you can delete secure boot keys that are stored in the database if you do not require the existing key. You can also reset all keys back to the factory defaults if required.
The parameter can be set in the following ways:
F1 Menu:
System Settings → Security → Secure Boot Configuration
OneCLI (ThinkSystem V1-V3 Servers):
SecureBootConfiguration.SecureBootPolicy "DeleteAllKeys" | "Delete PK"
OneCLI (ThinkSystem V4 Servers and newer):
UEFI.SecureBootConfiguration_SecureBootPolicy "DeleteAllKeys" | "DeletePK"
Configure the Trusted Platform Module
The Trusted Platform Module (TPM) is a component of most modern computer systems. It is classified as a secure crypto processor. It is used to help assure the integrity of the platform. It is used as part of the secure boot process to store and report on certain security metrics during the boot process. On some systems it is also used to securely store a full-disk encryption key.
The Trusted Computing Group continues to revise the TPM specifications. There are currently two versions of the specification deployed; 1.2 and 2.0. When possible, update to TPM 2.0 compliance. TPM 2.0 supports newer cryptographic algorithms. It also is more flexible when cryptographic algorithms need to change.
Only systems that support UEFI can updated to TPM 2.0 compliance so only change to TPM 2.0 if your system supports UEFI.
The parameter can be set in the following ways:
F1 Menu:
System Settings → Security → Trusted Platform Module
OneCLI (ThinkSystem V1-V3 Servers):
TrustedComputingGroup.DeviceOperation "Update to TPM2.0 compliant"
OneCLI (ThinkSystem V4 Servers and newer):
UEFI.TrustedComputingGroup_DeviceOperation "Update to TPM2.0 compliant"
Set Boot Mode to UEFI
Boot Mode determines which mode the system used to boot. Setting boot mode to UEFI is the most secure value for Boot Mode. When set to UEFI the system runs UEFI drivers and boots a UEFI OS loader. This setting is automatically set to UEFI mode if Legacy BIOS is disabled in System Settings > Legacy BIOS. You should set this to UEFI unless you are not able to do so because of the hardware or operating system that you are using does not support it.
The parameter can be set in the following ways:
F1 Menu:
Setup → Boot Manager → Boot Modes
OneCLI (ThinkSystem V1-V3 Servers):
BootModes.SystemBootMode "UEFI"
OneCLI (ThinkSystem V4 Servers and newer):
UEFI.BootModes_SystemBootMode "UEFI"
Review and update boot order
The boot order determines the order the system searches for bootable media as part of the boot process. The system follows the order specified until it finds a device that is bootable. Once it does it boots the system from that device.
Check that the boot order only includes necessary boot options for your environment. Remove any unnecessary boot options that are not required. Systems normally will contain a network boot option such as PXE boot or HTTPS boot as part of the boot order.
Network boot is typically used for initial deployment of the host operating system. After initial deployment of the host operating system, network boot options should be removed from the boot order. If at a later time, there is a need to boot from a network device use the Boot Options Page in Lenovo XClarity Controller to configure a One Time Boot Device.
The parameter can be set in the following ways:
F1 Menu:
Setup → Boot Manager → Change Boot Order
OneCLI (ThinkSystem V1-V3 Servers):
BootOrder.BootOrder "comma delimited list"
OneCLI (ThinkSystem V4 Servers and newer):
UEFI.BootOrder_BootOrder "comma delimited list"
Review and remove unnecessary boot options
Verify the boot options and that all are required and remove the boot options that are not necessary. Carefully consider removing USB Storage from BootOrder if you do not need to boot from a USB device.
The parameter can be set in the following ways:
F1 Menu:
Setup → Boot Manager → Delete Boot Option
OneCLI (ThinkSystem V1-V3 Servers):
BootOrder.BootOrder "comma delimited device list"
OneCLI (ThinkSystem V4 Servers and newer):
UEFI.BootOrder_BootOrder "comma delimited device list"
Review and update boot priority for each device type
Verify the priority/order for each type of boot device to ensure the correct device of each type receives the highest priority.
The parameters can be set in the following ways:
F1 Menu:
Setup → Boot Manager → Set Boot Priority
OneCLI (ThinkSystem V1-V3 Servers):
BootOrder.HardDiskBootOrder "comma delimited device list"
BootOrder.USBBootOrder "comma delimited device list"
BootOrder.NetworkBootOrder "comma delimited device list"
OneCLI (ThinkSystem V4 Servers and newer):
UEFI.BootOrder.DVDROMPriority_1-8 "device name"
UEFI.BootOrder.NetworkPriority_1-8 "device name"
UEFI.BootOrder.USBPriority_1-8 "device name"
Disable booting using the network stack
The Network Stack controls whether the system uses any network option for booting. If you do not require any network boot setting, then disable the entire network stack. This is not only the most secure setting it also helps speed up the boot process.
The parameter can be set in the following ways:
F1 Menu:
Setup → System Settings → Network Settings → Network Stack Settings → Network Stack
OneCLI (ThinkSystem V1-V3 Servers):
NetworkStackSettings.NetworkStack "Disable"
OneCLI (ThinkSystem V4 Servers and newer):
UEFI.NetworkStackSettings_NetworkStack "Disable"
Disable PXE Boot
PXE boot allows a system to boot from a server on a network that supports PXE booting instead of from a local hard drive. If you are not able to disable booting using the network stack, disable PXE boot if you do not need it.
The parameters can be set in the following ways:
F1 Menu:
Setup → System Settings → Network Settings → Network Stack Settings → Disable IPv4 PXE Support
Setup → System Settings → Network Settings → Network Stack Settings → Disable IPv6 PXE Support
OneCLI (ThinkSystem V1-V3 Servers):
NetworkStackSettings.IPv4PXESupport "Disable"
NetworkStackSettings.IPv6PXESupport "Disable"
OneCLI (ThinkSystem V4 Servers and newer):
UEFI.NetworkStackSettings_IPv4PXESupport "Disable"
UEFI.NetworkStackSettings_IPv6PXESupport "Disable"
Disable HTTPS Boot
HTTPS boot allows a system to boot from a server on a network that supports HTTPS booting instead of from a local hard drive. If you are not able to disable booting using the network stack, disable HTTPS boot if you do not need it.
The parameters can be set in the following ways:
F1 Menu:
Setup → System Settings → Network Settings → Network Stack Settings → Disable IPv4 HTTP Support
Setup → System Settings → Network Settings → Network Stack Settings → Disable IPv6 HTTP Support
OneCLI (ThinkSystem V1-V3 Servers):
NetworkStackSettings.IPv4HTTPSupport "Disable"
NetworkStackSettings.IPv6HTTPSupport "Disable"
OneCLI (ThinkSystem V4 Servers and newer):
UEFI.NetworkStackSettings_IPv4HTTPSupport "Disable"
UEFI.NetworkStackSettings_IPv6HTTPSupport "Disable"
Review and update the password rules and policies
Review and modify the Password Rules and Policy to specify the rules for things like password length, password expiration period and other related settings. These should be set to values defined in your organization’s password policy. These settings actually define values for IMM that are documented below. They can be set in the UEFI startup menu if necessary.
The parameter can be set in the following ways:
F1 Menu:
User Security → Password Rule and Policy
OneCLI (ThinkSystem V1-V3 Servers):
See the Configure Account Security policy to your security policy section.
OneCLI (ThinkSystem V4 Servers and newer):
UEFI.PasswordRuleandPolicy_LockoutPeriodAfterMaximumLoginFailures
UEFI.PasswordRuleandPolicy_MinimumPasswordChangeInterval
UEFI.PasswordRuleandPolicy_MinimumPasswordLength
UEFI.PasswordRuleandPolicy_MinimumPasswordReuseCycle
UEFI.PasswordRuleandPolicy_PasswordExpirationPeriod
UEFI.PasswordRuleandPolicy_PasswordExpirationWarningPeriod
Set an administrator password
Setting an administrator password deters unauthorized users from changing configuration settings. If you are responsible for maintaining the configuration settings of several servers, you might want to set an administrator password.
When an administrator password is set, you are prompted to enter a valid password each time you try to access the Setup Utility program. The Setup Utility program cannot be accessed until a valid password is entered.
If both the power-on password and administrator password are set, you can enter either password. However, you must use your administrator password to change any configuration settings.
Tip: It is important that the administrator password be stored safely, preferably in an enterprise password management system. If the password is lost, it is difficult to reset it.
The parameter can be set in the following ways:
F1 Menu:
User Security → Set Administrator Password
OneCLI (ThinkSystem V1-V3 Servers):
IMM.UefiAdminPassword "Uefi Admin Password"
OneCLI (ThinkSystem V4 Servers and newer):
Not Available
Set a Power-On Password
When a power-on password is set, you are prompted to enter a valid password each time the server is turned on. The server cannot be used until the valid password is entered. You can use a power-on password to add another layer of security to your server.
Tip: It is important that the power-on password be stored safely, preferably in an enterprise password management system. If the password is lost, it is difficult to reset it.
The parameter can be set in the following ways:
F1 Menu:
User Security → Set Power-On Password
OneCLI (ThinkSystem V1-V3 Servers):
IMM.UefiPowerOnPassword "Uefi PowerOn Password"
OneCLI (ThinkSystem V4 Servers and newer):
Not Available
Enable Execute Disable Bit
The execute disable bit (if the processor in your system supports it) allows memory to be marked as executable or non-executable when used with operating systems that support it. Enable this setting if the operating system and processor support it.
When enabled the processor will raise an error to the operating system if code attempts to run in memory that is marked as non-executable. Enabling this feature helps to protect the system from certain types of malware and worms.
Note: New versions of UEFI firmware enable the Execute Disable Bit by default when possible. When enabled by default, this option is not available either in the F1 Menu or in OneCLI.
The parameter can be set in the following ways:
F1 Menu:
System Settings → Processors → Execute Disable Bit
OneCLI (ThinkSystem V1-V3 Servers):
Processors.ExecuteDisableBit "Enable"
OneCLI (ThinkSystem V4 Servers and newer):
Not Available
Enable Intel TXT
Note: This setting does not apply to servers based on AMD processors.
Intel Trusted Execution Technology (Intel TXT) ensures that the launch of the system is measured against a known good state. Any deviation from the known good state during launch time will be detected and reported. This is used to protect against attacks that threaten the security of the system. Enable this setting if it is available for your system.
Tip: If you do not see this setting in the F1 Menu then either your operating system or processor does not support Intel TXT.
The parameter can be set in the following ways:
F1 Menu:
System Settings → Processors → Intel Trusted Execution Technology
OneCLI (ThinkSystem V1-V3 Servers):
Processors.TrustedExecutionTechnology "Enable"
OneCLI (ThinkSystem V4 Servers and newer):
UEFI.Processors_TrustedExecutionTechnology "Enable"
Enable Total Memory Encryption (TME)
Intel processors only: This setting does not apply to servers based on AMD processors.
Total Memory Encryption provides functionality that allows for full physical memory encryption. When enabled, all data sent on the external memory buses of the chip are encrypted using NIST standard AES-XTS algorithm. When enabled, TME is intended to support existing system and application software without modification. Overall performance impact is dependent on workload but is expected to be relatively small.
Tips:
- If you do not see this setting in the F1 Menu your processor does not support TME.
- This setting will be disabled if your system has Persistent Memory installed.
This parameter can be set in the following ways:
F1 Menu:
System Settings → Processors → TotalMemoryEncryption
OneCLI (ThinkSystem V1-V3 Servers):
Processors.TotalMemoryEncryption "Enabled"
OneCLI (ThinkSystem V4 Servers and newer):
UEFI.Processors_TotalMemoryEncryption "Enabled"
Enable Multi-Key Total Memory Encryption (MKTME)
Intel processors only: This setting does not apply to servers based on AMD processors.
Multi-Key Total Memory Encryption builds on TME by adding support for multiple encryption keys. The implementation supports a fixed number of encryption keys and software can configure the chip to use a subset of the available keys for encrypting any page of memory. Overall performance impact again is dependent on workload but is expected to be relatively small.
Tips:
- If you do not see this setting in the F1 Menu your processor does not support MKTME.
- This setting will be disabled if your system has Persistent Memory installed.
- To enable MKTME you must first enable Total Memory Encryption as described in the Enable Total Memory Encryption (TME) section.
This parameter can be set in the following ways:
F1 Menu:
System Settings → Processors → MultikeyTotalMemoryEncryption
OneCLI (ThinkSystem V1-V3 Servers):
Processors.MultikeyTotalMemoryEncryption "Enabled"
OneCLI (ThinkSystem V4 Servers and newer):
UEFI.Processors.MultikeyTotalMemoryEncryption "Enabled"
Enable Intel Software Guard Extensions (SGX)
Intel processors only: This setting does not apply to servers based on AMD processors.
Intel Software Guard Extensions (Intel SGX) is an extension to the Intel processor architecture that provides new CPU instructions and platform enhancements to allows applications to create private areas to protect sensitive information. Sensitive information is protected even when attackers have full control of platform. Protection is achieved through the use of private regions of memory called enclaves.
This setting should only be enabled when using applications that are specifically developed to take advantage of Intel SGX.
For more details on how and when to enable Intel SGX on Lenovo ThinkSystem servers refer to Lenovo Press document Enabling Intel SGX on Lenovo ThinkSystem Servers.
Enable AMD Secure Memory Encryption (SME)
AMD processors only: This setting does not apply to servers based on Intel processors.
AMD Secure Memory Encryption (SME) is a hardware-based memory protection feature that transparently encrypts data stored in system DRAM to protect it from physical memory attacks such as cold‑boot, DIMM removal, or bus snooping. SME is dependent upon OS kernel enablement.
Tips:
- If you do not see this setting in the F1 Menu your processor does not support SME.
- SME cannot be enabled if SME-MK is enabled.
- SME introduces additional memory-access latency.
This parameter can be set in the following ways:
F1 Menu:
System Settings → Processors → SMEE
OneCLI (ThinkSystem V1, V3 Servers)
Memory.SMEE "Enabled"
Enable AMD Transparent Secure Memory Encryption (TSME)
AMD processors only: This setting does not apply to servers based on Intel processors. If you do not see this setting in the F1 Menu, your processor does not support TSME.
Transparent Secure Memory Encryption transparently encrypts all of physical memory independent of the operating system.
This parameter can be set in the following ways:
F1 Menu:
System Settings → Memory → TSME
OneCLI (ThinkSystem V1, V3 Servers):
Memory.TSME "Enabled"
Enable AMD Secure Memory Encryption Mulitple Keys (SME-MK)
AMD processors only: This setting does not apply to servers based on Intel processors.
Secure Memory Encryption Multiple Keys builds on SME by adding support for multiple encryption keys. The implementation supports the use of multiple encryption keys assigned to different ownership domains.
Tips:
- If you do not see this setting in the F1 Menu your processor does not support SME-MK.
- SME-MK cannot be enabled if SME is enabled.
This parameter can be set in the following ways:
F1 Menu:
System Settings → Memory → SME-MK
OneCLI (ThinkSystem V1, V3 Servers):
Memory.SME-MK "Enabled"
Configure Security for Intel Optane Persistent Memory
Note: This section only applies if you have Persistent Memory installed in your server.
Intel Optane Persistent Memory Modules (PMMs) are supported with 2nd Gen and 3rd Gen Intel Xeon Scalable processors. PMMs add another layer to the data center memory and storage hierarchy on servers. It enables a new class of memory that can be utilized to move and maintain larger amounts of data closer to the processor.
Whenever PMMs are being used for persistent storage, it is important to ensure the information being stored is secure. If this is the case you should configure PMM security. You can choose to configure the security for all PMMs at one time or configure each PMM individually. Determine which method is best for your security needs.
Review the settings below to configure the security for the information stored on them.
Tip: If you do not see the settings below in the F1 Menu then your system does not support PMMs.
Enable security on PMMs
Enable security on the PMMs. When you do this, you are prompted to set a passphrase. This passphrase is used to unlock the PMM at boot time. The passphrase is also used to generate the encryption key that is used to protect any data that is stored persistently.
Make sure you store this passphrase securely in cases where it is required for you to supply it.
To enable security on all of the installed PMM units at once use Platform. To configure security on only one or more of selected PMM units use Single PMM.
The parameter can be set in the following ways:
F1 Menu:
System Settings → Intel Optane PMMs → Security
OneCLI:
IntelOptanePMM.SecurityOperation "Enable Security"
Set the security passphrase on PMMs
The maximum number of passphrase characters is 32 and the minimum number is 1. Based on your organization’s security policy update the pass phrase for the PMMs on a periodic basis.
The parameter can be set in the following ways:
F1 Menu:
System Settings → Intel Optane PMMs → Security
OneCLI:
IntelOptanePMM.SecurityPassphrase "passphrase"
Secure Erase PMMs
Before putting the device in to service with customer data, it is advised that you do a secure erase command on all PMMs. Also do a secure erase anytime the device is switched between customers. The Secure Erase function erases all data from the PMMs, disables security and clears the passphrase.
The parameter can be set in the following ways:
F1 Menu:
System Settings → Intel Optane PMMs → Security
OneCLI:
IntelOptanePMM.SecurityOperation "Secure Erase"
Hardening Lenovo XClarity Controller
Note: This section does not apply to the the following servers as they do not have an XClarity Controller service processor:
- ThinkSystem ST50
- ThinkSystem SR635
- ThinkSystem SR655
- ThinkSystem ST50 V2
- ThinkSystem HX350X V3
Lenovo XClarity Controller (XCC) runs on a powerful processor that is built in to Lenovo ThinkSystem servers and is used to remotely and securely manage a ThinkSystem server. XCC runs outside of the operating system and starts running as soon as the server is connected to a power source. Within XCC, users can configure, update and monitor their ThinkSystem server remotely.
This section provides the configuration settings to review and adjust to harden the XCC configuration of a ThinkSystem Server. This includes the XCC2 and XCC3 variants.
This section provides instructions for changing settings in two ways:
- Using the XCC WebUI
- Using the Lenovo XClarity Essentials OneCLI
The only exception to this is the Minimum TLS Level setting which can only be changed using XCC CLI.
The following topics are covered in this section:
Harden the network settings of XCC
Do not connect the Lenovo XClarity Controller (XCC) network interface to untrusted networks. Restricting XCC network access to only trusted networks reduces its attack surface and makes it more difficult for attackers to exploit any weaknesses it might have.
A trusted network is a network that is internal to an enterprise. Devices on a trusted network are normally not directly reachable from the internet. An untrusted network is a network that is considered a public network. The internet for example is an untrusted network, the Wi-Fi at a hotel or coffee shop is an untrusted network. XCC should never be connected to an untrusted network.
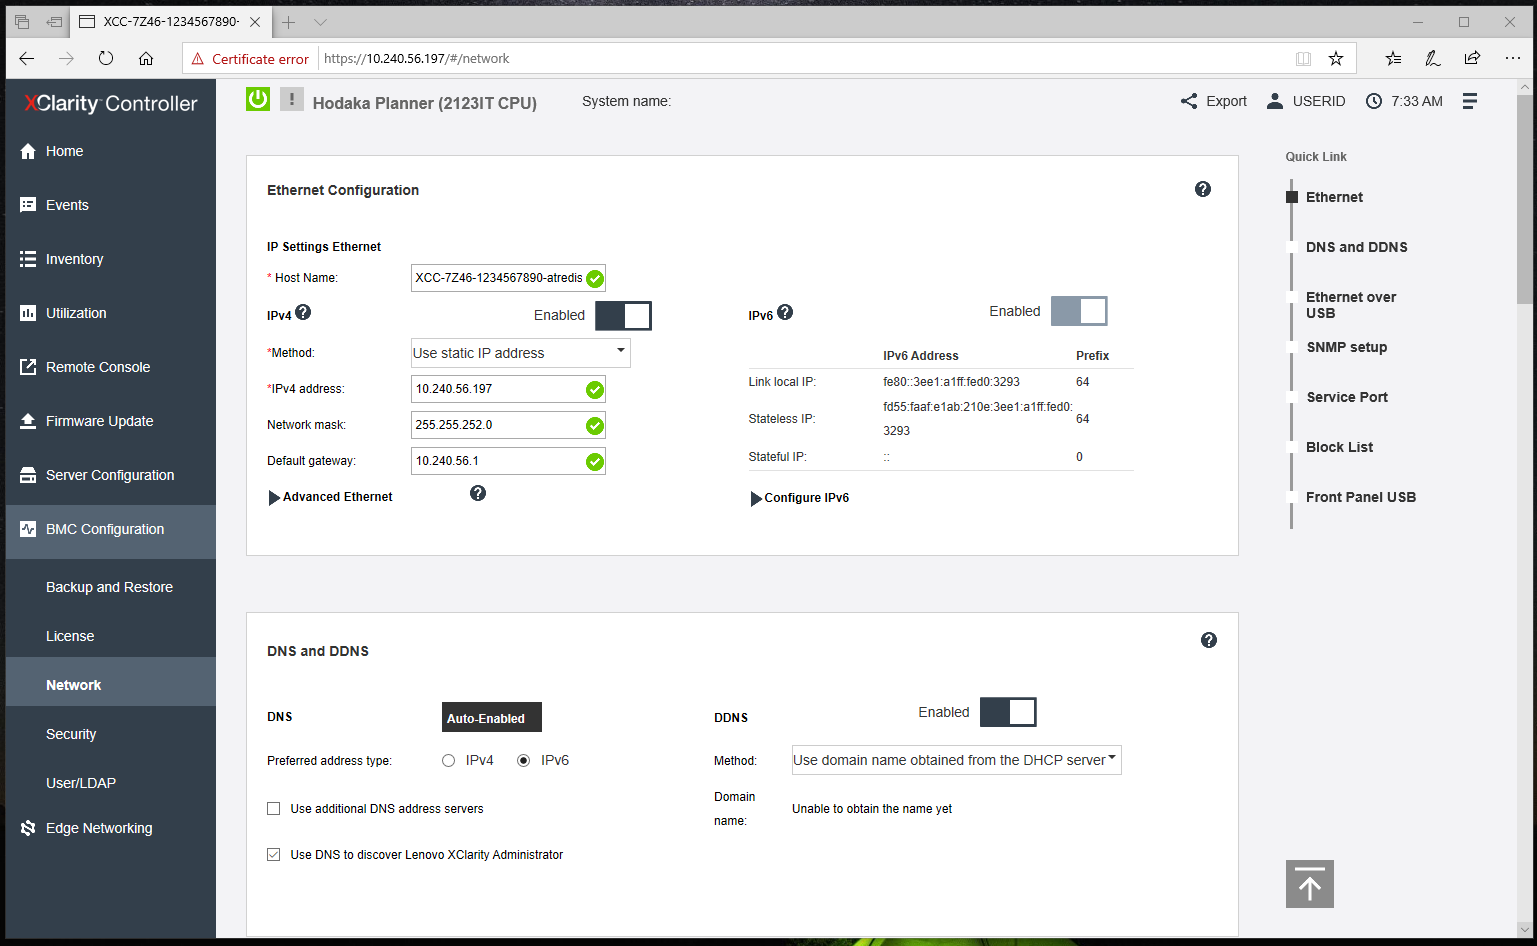
Figure 1. XCC Network Settings
Topics on hardening the network settings:
- Configure IPv4
- Configure IPv6
- Disable or configure Ethernet over USB
- Verify SNMP configuration
- Disable unnecessary services
- Configure Block List and Time Restriction
Configure IPv4
Select the proper method for determining the IPv4 address of the XCC interface. For example, if you do not wish the IPv4 address to be obtained from a DHCP server then do not select that option.
The parameters can be set in the following ways:
XCC WebUI:
BMC Configuration → Network → Ethernet Configuration → IPv4
OneCLI (ThinkSystem V1-V3 Servers) – IPv4 Settings for Network Interface 1:
IMM.Network1 "Disabled" | "Enabled"
IMM.DHCP1 "Disabled" | "Enabled"
IMM.HostName1 "hostname for the network"
IMM.HostIPAddress1 "static ipv4 address"
IMM.HostIPSubnet1 "static ipv4 netmask"
IMM.GatewayIPAddress1 "static ipv4 gateway"
OneCLI (ThinkSystem V4 Servers and newer) – IPv4 Settings for Network Interface 1:
BMC.Eth0Enabled "Disabled" | "Enabled"
BMC.Eth0IPv4ConfigMode "Disabled" | "Enabled"
BMC.StaticHostName "hostname for the network"
BMC.Eth0StaticIPv4Address "static ipv4 address"
BMC.Eth0StaticIPv4Subnet "static ipv4 netmask"
BMC.Eth0IPv4DefaultGateway "static ipv4 gateway"
Configure IPv6
Select the proper Method for determining the IPv6 address of the XCC interface. If your organization does not use IPv6 then you should disable it. If you are using IPv6, then select the address configuration method used by your organization.
The parameters can be set in the following ways:
XCC WebUI:
BMC Configuration → Network → Ethernet Configuration → IPv6
OneCLI (ThinkSystem V1-V3 Servers) – IPv6 Settings for Network Interface 1:
IMM.IPv6Network1 "Disabled" | "Enabled"
IMM.IPv6Static1 "Disabled" | "Enabled"
IMM.IPv6DHCP1 "Disabled" | "Enabled"
IMM.IPv6Stateless1 "Disabled" | "Enabled"
IMM.IPv6HostIPAddressWithPrefix1 "ipv6 address value"
IMM.IPv6GatewayIPAddress1 "ipv6 gateway address value"
IMM.IPv6LinkLocalIPAddress1 "ipv6 link local address value"
IMM.IPv6StatelessIPAddress1 "ipv6 gateway address value"
IMM.IPv6StatelessGateway1 "ipv6 stateless gateway value"
OneCLI (ThinkSystem V4 Servers and newer) – IPv6 Settings for Network Interface 1:
BMC.Eth0IPv6Enabled "Disabled" | "Enabled"
BMC.Eth0IPv6StaticEnabled "Disabled" | "Enabled"
BMC.Eth0IPv6ConfigMode "Disabled" | "Enabled"
BMC.Eth0IPv6AcceptRAEnabled "Disabled" | "Enabled"
BMC.Eth0StaticIPv6AddressWithPrefix "ipv6 address value"
BMC.Eth0IPv6DefaultGateway "ipv6 gateway address value"
BMC.Eth0IPv6LinkLocalIP "ipv6 link local address value"
BMC.Eth0IPv6StatelessIP "ipv6 gateway address value"
Disable or configure Ethernet over USB
Ethernet over USB is used for in-band communication between the host server and XCC. This feature provides an in-band channel for applications on the host server to communicate with XCC and vice-versa. This means that a user logged in to the host can use applications on XCC that can communicate over this channel. It also means that users can use the XCC interface to access applications on the host like Microsoft RDP or VNC.
To prevent applications that are running on the server from accessing XCC via this interface, you should disable the USB in-band interface. If you do disable the USB in-band interface, you cannot perform an in-band update of the XCC firmware, the UEFI firmware, the embedded provisioning tool, and certain adapter firmware by using the XClarity Essentials in-band update utility. Use the Firmware Update option on the XCC Web interface or the XClarity Essentials out-of-band update utility to update the firmware.
Note: Disabling the Ethernet-over-USB interface may negatively affect system manageability from the host using the OneCLI or UpdateXpress utilities. If you use OneCLI or UpdateXpress in in-band mode locally on a server do not entirely disable Ethernet over USB. This is because OneCLI and UpdateXpress require Ethernet over USB to communicate with the XCC. If you totally disable Ethernet over USB neither OneCLI nor UpdateXpress will function.
Ethernet over USB is the connection path that the XCC provides between its external network interface and the server, through the XCC’s Ethernet over USB interface. XCC opens a listening port for each enabled server on its USB interface and redirects the traffic received on the port between the external network and the host server.
The defaults are to enable this feature, to use an ipv6 link local address for the forwarding, and to configure the default ports which are 3389 (Microsoft RDP) and 5900(VNC). Please note that XCC is only acting in forward mode meaning it is only redirecting packet data between the host and the external network. If you do not need to use Microsoft RDP or VNC through the XCC interface, then you should remove those from the list of enabled ports.
The parameter can be set in the following ways:
XCC WebUI:
BMC Configuration → Network → Ethernet over USB
OneCLI (ThinkSystem V1-V3 Servers):
IMM.LanOverUsb "Disabled" | "Enabled"
OneCLI (ThinkSystem V4 Servers and newer):
BMC.EthOverUSBEnabled "Disabled" | "Enabled"
Verify SNMP configuration
SNMP can be used to manage and monitor XCC using the SNMP protocol. If you enable SNMP, then only enable those items that you need. For example, if you do not need SNMPv1 traps then ensure it is disabled.
If you do need to use an SNMP Agent, then enable the SNMPv3 Agent only. While some version of XCC may support SNMPv1 or SNMPv2c it is recommended that you only use SNMPv3 for management purposes.
The parameters can be set in the following ways:
XCC WebUI:
BMC Configuration → Network → SNMP setup
OneCLI (ThinkSystem V1-V3 Servers):
IMM.SNMPv3Agent "Disabled" | "Enabled" IMM.SNMPTraps "Disabled" | "Enabled"
OneCLI (ThinkSystem V4 Servers and newer):
BMC.SNMPv3Agent "Disabled" | "Enabled"
BMC.SNMPTraps "Disabled" | "Enabled"
Disable unnecessary services
The following table shows the network services that are available within XCC. To reduce XCC’s attack surface disable any service that your organization does not require. Certain services are required by XCC and cannot be disabled. Those are noted below.
Configure Block List and Time Restriction
Block Lists and Time Restrictions are used to further restrict access to XCC. Use the Block List settings and configure the IPs and MAC addresses of those systems that do not need access to XCC. Use the Time Restrictions and configure the times that XCC cannot be accessed.
The parameter can be set in the following ways:
XCC WebUI:
BMC Configuration → Network → Block List and Time Restriction
OneCLI:
Not Available
Configure security settings
XCC supports several security specific settings. Review the recommendations below for each setting and customize them so they adhere to the security policies and needs of your organization.
Access the settings as follows:
XCC WebUI:
BMC Configuration → Security, as shown in the figure below.
OneCLI:
Not Available
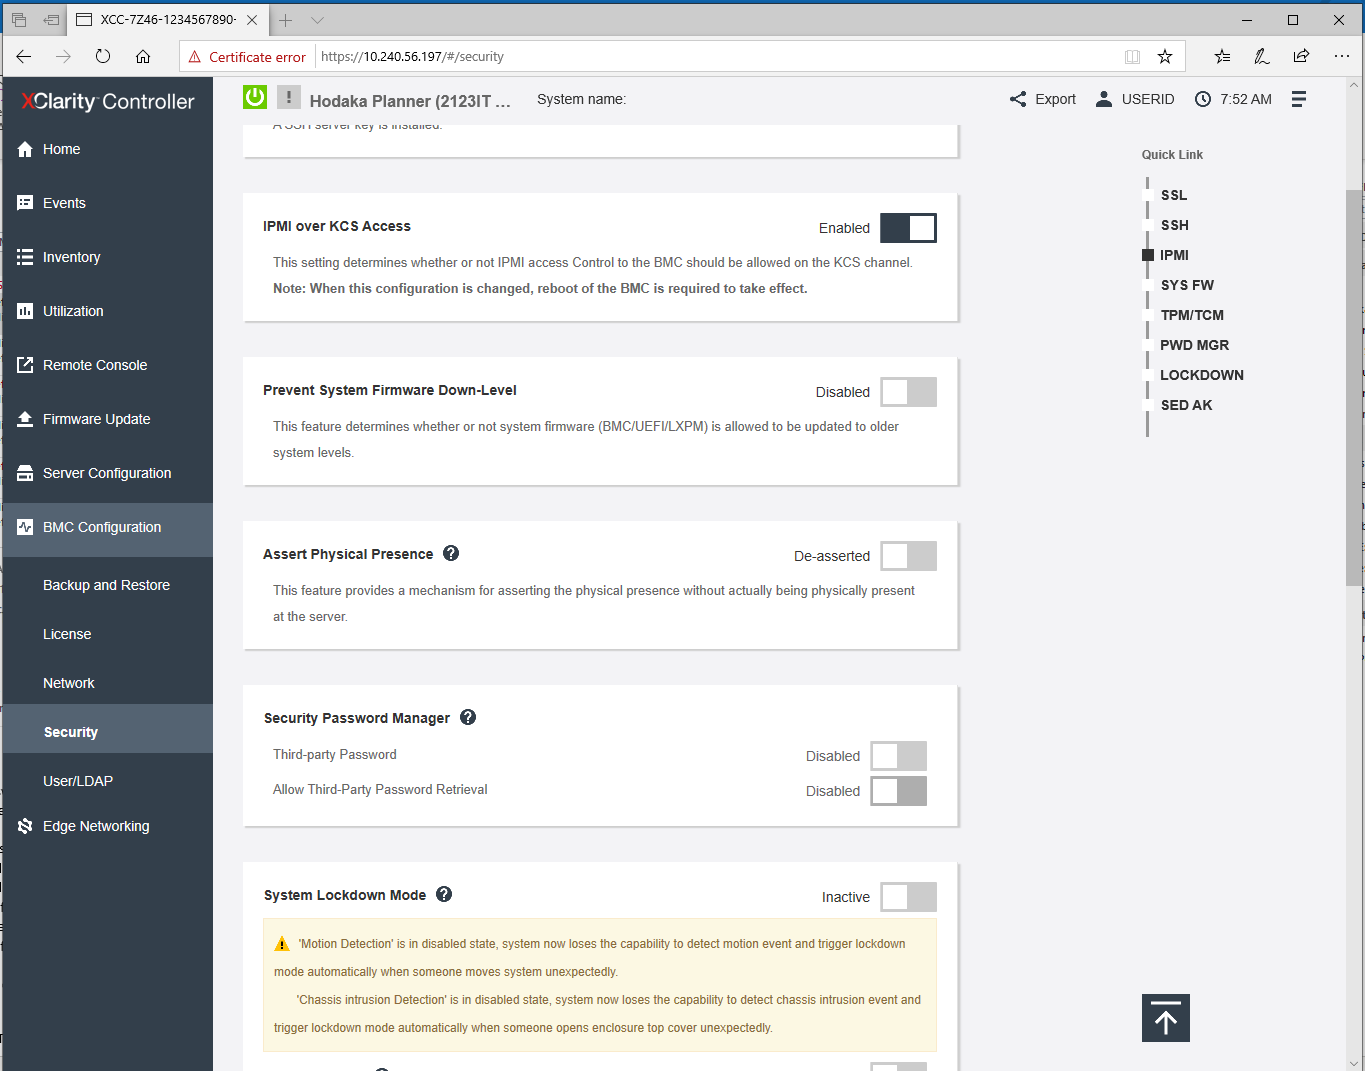
Figure 2. XCC Security Settings
Topics on configuring security settings:
- Configure an SSL certificate
- Disable IPMI over Keyboard Controller Style (KCS) Access
- Enable Prevent System Firmware Down-Level
- Configure Security Key Lifecycle Manager (SKLM)
- Configure System Lockdown Mode (SE350 and all ThinkEdge servers)
- Make a backup of your SED Authentication Key (Edge servers only)
- Configure TLS Ciphers
- Configure TLS Version Support
- Configure the number of Concurrent Logins Per User Account
- Configure Security Mode (ThinkSystem V3 Servers and newer)
- Enable and Configure System Guard (ThinkSystem V3 Servers and newer)
Configure an SSL certificate
The SSL certificate is the server certificate used by the XCC WebUI, the Redfish Service and the CIM Service. By default, XCC will generate a self-signed certificate for the server. Self-signed certificates typically cause errors or warnings in browsers that the server cannot be trusted.
When possible use a valid CA signed certificate as it is preferred and is considered a security best practice. To do this, use XCC to generate a certificate signing request, get it signed by the CA of your choosing and then upload the CA signed certificate into XCC.
The parameter can be set in the following ways:
XCC WebUI:
BMC Configuration → Security → SSL Certificate Management
OneCLI:
Not Available
Disable IPMI over Keyboard Controller Style (KCS) Access
The IPMI over KCS channel allows a host user, who is an administrator user on the host, full access to the IPMI commands supported by XCC without any form of XCC authentication. If you are not running any tools or applications on the server that access the XClarity Controller through the IPMI protocol, it is highly recommended that you disable the IPMI-over-KCS access for improved security of XCC.
When using XClarity Essentials on the host, the IPMI-over-KCS interface to the XClarity Controller is required. It is still recommended that you disable the IPMI-over-KCS interface and only re-enable it when you need to use XClarity Essentials on the host then disable it after you’ve finished using XClarity Essentials.
VMware ESXi: If you are using VMware ESXi on your system and you want to display the hardware system sensors, you cannot disable the IPMI Keyboard Controller Style Access as recommended, because VMware ESXi uses it to access the hardware system sensors.
The parameter can be set in the following ways:
XCC WebUI:
BMC Configuration → Security → IPMI over KCS Access
OneCLI:
Not Available
Enable Prevent System Firmware Down-Level
The Enable Prevent System Firmware Down-level option prevents all system firmware including XCC, UEFI, and LXPM from being downgraded to an older revision. Enabling this setting prevents an attacker from installing a previous version of firmware that contains known vulnerabilities that can then be exploited. This option should be enabled unless for some reason there is an organizational requirement to allow firmware to be downgraded to an older version.
The parameter can be set in the following ways:
XCC WebUI:
BMC Configuration → Security → Prevent System Firmware Down-Level
OneCLI:
Not Available
Configure Security Key Lifecycle Manager (SKLM)
IBM Security Key Lifecycle Manager (SKLM) is a centralized key manager that can be employed to manage the keys for self-encrypting drives. This feature requires a separate license from Lenovo. Configure this setting if you have licensed it and if you are using self-encrypting drives. SKLM is used to manage the keys for self-encrypting drives and ensures that SED keys are available should something happen to the system.
The parameter can be set in the following ways:
XCC WebUI:
BMC Configuration → Security → Security Key Lifecycle Manager
OneCLI:
Not Available
Configure System Lockdown Mode (SE350 and all ThinkEdge servers)
ThinkEdge Security: For additional information about enabling and managing the security features of edge servers, see the following documents:
- ThinkSystem SE350: https://lenovopress.lenovo.com/lp1725-thinkedge-security-for-se350
- All ThinkEdge servers: https://lenovopress.lenovo.com/lp2189-thinkedge-security
System Lockdown mode settings are available only on the edge servers. Edge servers may be deployed in environments that are not physically secure such as a gas station, a factory floor, a grocery store, a hotel lobby etc. Edge servers support additional security features designed to protect the data on the system if the system is compromised.
When enabled, if a sensor detects someone attempting to tamper with the system it will, by default, immediately shutdown the server and lock the server so it does not boot. It is important to enable these features especially if it is deployed in environments that are not physically secure.
- Enable and Configure Motion Detection
Enable and configure Motion Detection so that the system is locked down anytime the system detects unexpected movement. Also check the configuration of “Additional Configurations”. The default settings are the most secure but may need to be adjusted based on your requirements.
The parameter can be set in the following ways:
XCC WebUI:
BMC Configuration → Security → System Lockdown Mode / Motion Detection
OneCLI:
Not Available
- Enable Chassis Intrusion Detection
Enable Chassis Intrusion Detection so that the system is locked down automatically when the top cover is opened, or the front bezel is removed.
Also check settings accessible via Additional Configurations in the WebUI. The default settings are the most secure but may need to be adjusted based on your requirements.
The parameter can be set in the following ways:
XCC WebUI:
BMC Configuration → Security → System Lockdown Mode / Chassis Intrusion Detection
OneCLI:
Not Available
Make a backup of your SED Authentication Key (Edge servers only)
When using self-encrypting-drives (SEDs), it is very important to make a backup of the SED Authentication Key and store it in a safe location. The backup of the SED Authentication key is needed to restore access to the data on SEDs if the motherboard ever requires replacement.
This operation can be performed in the following ways:
XCC WebUI:
BMC Configuration → Security → SED Authentication Key Manager / Backup the SED AK
OneCLI:
Not Available
Configure TLS Ciphers
TLS Ciphers control the cryptography that can be used when communicating with XCC over https. By default, the TLS Cipher configuration is set to NIST Compliant Mode which enables ciphers that are compatible with most browsers and tools and is sufficient for most applications today. To enable only the highest strength ciphers set the TLS Cipher Configuration to High Security Mode.
This parameter can be set in the following ways:
XCC WebUI:
BMC Configuration → Security → TLS Cipher configuration
OneCLI:
Not Available
Configure TLS Version Support
By default, TLS Version Support is set to TLS 1.2 and Higher. This setting provides support for a wide range of browsers and tools. If you know that the browsers and tools being used support TLS 1.3 change the setting to TLS 1.3 for maximum security.
This parameter can be set in the following ways:
XCC WebUI:
BMC Configuration → Security → TLS Version Support
OneCLI:
Not Available
Configure the number of Concurrent Logins Per User Account
Set the maximum number of concurrent sessions that can be active at a time for a user’s account according to your organization’s policy.
This parameter can be set in the following ways:
XCC WebUI:
BMC Configuration → Security → Sessions
OneCLI:
Not Available
Configure Security Mode (ThinkSystem V3 Servers and newer)
Security Mode controls cryptography that XCC uses as well as the services that are enabled in XCC. The default Security Mode is Standard Mode which is FIPS 140-3 compatible. All cryptography used is compatible with FIPS 140-3. Services that require non-FIPS 140-3 compatible can be enabled if necessary and a warning is provided when this is necessary.
The strongest Security Mode is Enterprise Strict. In Enterprise Strict Mode all cryptography used must be allowed by CNSA. Only services that use CNSA cryptography can be enabled. Enterprise Strict Mode requires the Lenovo XClarity Controller Enterprise Upgrade license to be used. If the strongest security is required, then enable the Enterprise Strict Security Mode.
This parameter can be set in the following ways:
XCC WebUI:
BMC Configuration → Security → Security Mode
OneCLI (ThinkSystem V1-V3 Servers):
IMM.Security_Mode "Compatibility" | "Standard" | "Enterprise Strict"
OneCLI (ThinkSystem V4 Servers and newer):
BMC.SecurityModeLevel "Compatibility" | "Standard" | "Enterprise Strict"
Enable and Configure System Guard (ThinkSystem V3 Servers and newer)
The System Guard feature takes a snapshot of the hardware component inventory as trusted reference, and then monitors for any deviation from the reference snapshot. When a deviation occurs, it can report an event to the user and optionally prevent the server from booting into the OS and prompt the user for a response.
This parameter can be set in the following ways:
XCC WebUI:
BMC Configuration → Security → SYS GUARD
OneCLI:
Not Available
Configure User / LDAP settings
Configure Users
When creating new users adhere to the principle of least privilege by only granting administrative privileges only to those who need it. Also, review the list of users periodically to verify they still need access to XCC.
Access these settings as follows:
XCC WebUI:
BMC Configuration → User/LDAP, as shown in the figure below
OneCLI (ThinkSystem V1-V3 Servers):
IMM.LoginId.1-12 "userid"
IMM.Password1 "password"
IMM.SHA256Password.1-12 "sha256pw"
IMM.SHA256PasswordSalt.1-12 "salt"
IMM.AuthorityRolePriv.1-12 = "Supervisor"|"Read-Only"|"Custom"
OneCLI (ThinkSystem V4 Servers and newer):
BMC.LoginId_1-12 "userid"
BMC.Password_1 "password"
BMC.HASH256Password_1-12 "sha256pw"
BMC.HASH256PasswordSalt_1-12 "salt"
BMC.RolePrivileges_1-32 = "priv-admin" | "priv-operator" | "priv-user" | "custom"
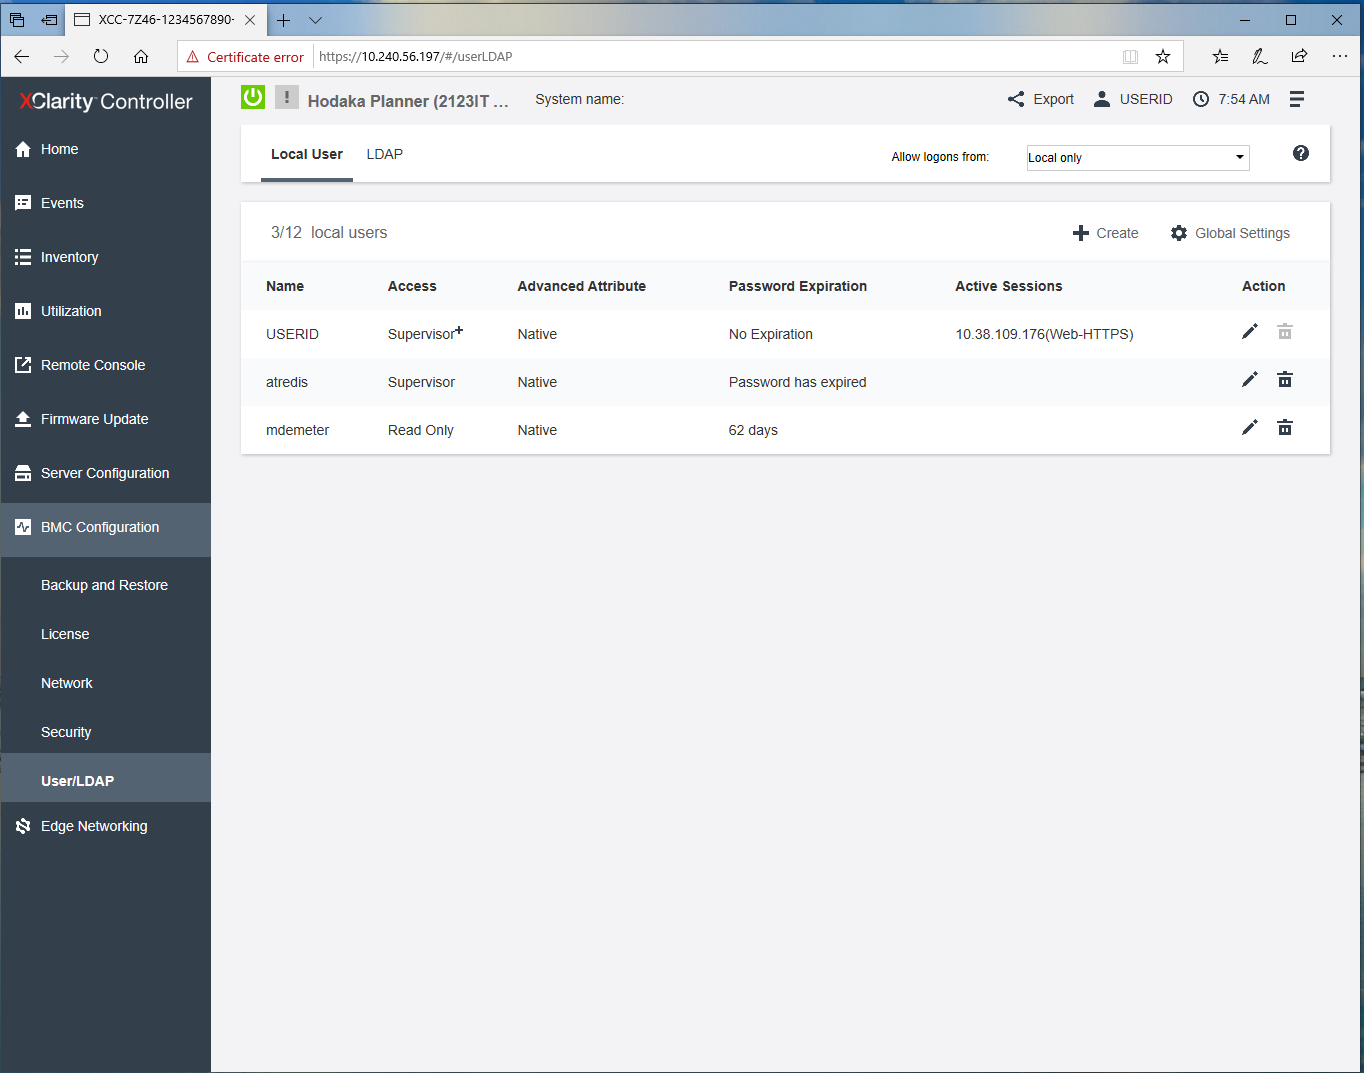
Figure 3. XCC User/LDAP Settings
Change the Default Account Username and Password
The default USERID account and its password should be changed to values appropriate to the organization.
Tip: It is important that the default account password be stored safely, preferably in an enterprise password management system. If the password is lost, it is difficult to reset it.
The parameter can be set in the following ways:
XCC WebUI:
BMC Configuration → User/LDAP
OneCLI:
Not available
Configure LDAP
If your organization uses an LDAP server, such as Microsoft Active Directory, for authentication and authorization, you can configure XCC to use your LDAP server to authenticate and authorize XCC users too.
Be sure to select Enable Secure LDAP as well. Note that in order to enable it, a valid SSL certificate must first be in place and at least one SSL client trusted certificate must be imported. The LDAP server must also support TLS 1.2 because it is used by LDAP client in XCC.
The parameters can be set in the following ways:
XCC WebUI:
BMC Configuration → User/LDAP
OneCLI (ThinkSystem V1-V3 Servers):
IMM.User_Authentication_Method "Local only"|"LDAP only"|"Local first, then LDAP"|"LDAP first, then Local"
IMM.Select_LDAP_Servers="Use Pre-Configured LDAP Servers" | "Use DNS to Find LDAP Servers"
IMM.Search_Domain= "search domain"
IMM.LDAP_Server1_HostName_IPAddress "hostname or ip address" IMM.LDAP_Server1_Port "port number" IMM.LDAP_Server2_HostName_IPAddress "hostname or ip address" IMM.LDAP_Server2_Port "port number" IMM.LDAP_Server3_HostName_IPAddress "hostname or ip address" IMM.LDAP_Server3_Port "port number"’ IMM.LDAP_Server4_HostName_IPAddress "hostname or ip address" IMM.LDAP_Server4_Port "port number"
IMM.Root_DN "root dn"
IMM.UID_Search "user id search attribute"
IMM.BindingMethod "Anonymous Bind" | "Bind with Configured Credentials" | "Bind using Login Credentials"
IMM.ClientDN "Client DN" IMM.RoleBasedSecurity "Disabled" | "Enabled"
IMM.ServerTargetName "Not Defined" | "server target name" IMM.GroupFilter "group filter"
IMM.Group_Search_Attribute "group search attribute"
IMM.AuthorizationMethod "authorization will be done in LDAP Server" | "authorization will be done locally using AOM"
IMM.Forest_Name "forest name" IMM.Login_Permission_Attribute "login permission attribute" IMM.SSL_Client_Enable "Enabled"|"Disabled"
OneCLI (ThinkSystem V4 Servers and newer):
BMC.AuthMode "LocalOnly"|"LDAPOnly"|"LocalFirstThenLDAP"|"LDAPFirstThenLocal"
BMC.LDAPServerSearchMethod="Use Pre-Configured LDAP Servers" | "Use DNS to Find LDAP Servers"
BMC.LDAPSearchDomain= “search domain”
BMC.LDAPServerHostName_1 "hostname or ip address"
BMC.LDAPServerPort_1 "port number"
BMC.LDAPServerHostName_2 "hostname or ip address"
BMC.LDAPServerPort_2 "port number"
BMC.LDAPServerHostName_3 "hostname or ip address"
BMC.LDAPServerPort_3 "port number"
BMC.LDAPServerHostName_44 "hostname or ip address"
BMC.LDAPServerPort_4 "port number"
BMC.LDAPRootDN "root dn"
BMC.LDAPUserSearchAttribute "user id search attribute"
BMC.LDAPBindingMethod "Anonymous Bind" | "Bind with Configured Credentials" | "Bind using Login Credentials"
BMC.ClientDN "Client DN" IMM.RoleBasedSecurity "Disabled" | "Enabled"
BMC.LDAPGroupSearchAttribute "group search attribute"
BMC.LDAPLocalAuthorizationEnabled true | false
BMC.LDAPForestName "forest name"
BMC.LDAPLoginPermissionAttribute "login permission attribute"
IMM.SSL_Client_Enable "Enabled"|"Disabled"
Configure Global Settings
The Global User Settings are XCC settings that apply to all user accounts. These include global login settings and password settings. Configure these settings according to your organization’s policy.
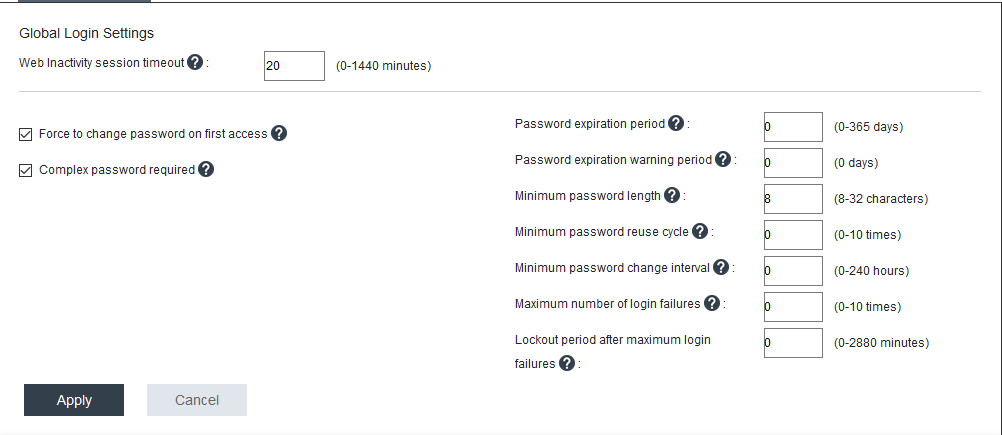
Figure 4. Global Login Settings
Configure Web Inactivity Session Timeout
The Web Inactivity Session timeout defines the amount of time, in minutes, of inactivity after which XCC disconnects a web session. While the maximum value is 1,440 minutes, the configured value should be much lower. The default value for XCC is 20 minutes.
The parameter can be set in the following ways:
XCC WebUI:
BMC Configuration → User/LDAP → Global Settings
OneCLI (ThinkSystem V1-V3 Servers):
IMM.WebTimeout "number of idle minutes for timeout"
OneCLI (ThinkSystem V4 Servers and newer):
BMC.WebUISessionTimeoutMinutes "number of idle minutes for timeout"
Configure Account Security policy to your security policy
Configure the account security settings below according to your organization’s policy:
- Force a password change on first login
- Complex Password required
- Password expiration period (days)
- Password expiration warning period (days)
- Minimum password length
- Minimum password reuse cycle
- Minimum password change interval (hours)
- Maximum number of login failures
- Lockout Period after max login failures (minutes)
By default, these settings follow recommended best practices, but allow the customer to change them when necessary.
Note: Be sure to verify the settings of Password expiration period, and Lockout Period after max login failures if you do not want passwords to ever expire or if you do not wish to be locked out for an extended amount of time after the maximum number failed login attempts is exceeded. In some cases, organizations prefer that passwords do not expire and they do not desire an extended locked out period.
The parameters can be set in the following ways:
XCC WebUI:
BMC Configuration → User/LDAP → Global Settings
OneCLI (ThinkSystem V1-V3 Servers):
IMM.FirstAccessPwChange "Enabled" | "Disabled"
IMM.ComplexPassword "Enabled" | "Disabled"
IMM.PasswordAge "number of days before password expires"
IMM.PwExpWarningPeriod "number of days"
IMM.MinPasswordLen "min length for a password"
IMM.PasswordReuse "number of previous passwords"
IMM.PwChangeInterval "min amount of time before password can be changed"
IMM.PwMaxFailure "max number of login failures before lockout" IMM.LockoutPeriod "number of minutes"
OneCLI (ThinkSystem V4 Servers and newer):
BMC.PasswordChangeOnFirstAccess "Enabled" | "Disabled"
BMC.ComplexPassword "Enabled" | "Disabled"
BMC.PasswordExpirationPeriodDays "number of days before password expires"
BMC.PasswordExpirationWarningPeriodDays "number of days"
BMC.MinimumPasswordLength "min length for a password"
BMC.MinimumPasswordReuseCycle "number of previous passwords"
BMC.MinimumPasswordChangeIntervalHours "min amount of time before password can be changed"
BMC.AccountLockoutThreshold "max number of login failures before lockout"
BMC.AccountLockoutDurationSeconds "number of seconds"
Configure multi-factor authentication (ThinkSystem V4 servers and newer)
Multi-factor authentication settings that apply to all user accounts. Configure these settings according to your organization’s policy.

Figure 5. Multi-factor authentication settings
The parameters can be set in the following ways:
XCC WebUI:
BMC Configuration → User/LDAP → Global Settings
OneCLI (ThinkSystem V4 Servers and newer):
BMC.TOTPDigitals=<DIGITAL_LENGTH_8>=DIGITAL_LENGTH_6
BMC.TOTPHashAlgo=<HMAC_SHA384>=HMAC_SHA1=HMAC_SHA256=HMAC_SHA512
BMC.MFAMethodForCLI=<PASSWORD_AND_TOTP>=PUBLICKEY_AND_PASSWORD=PUBLICKEY_AND_TOTP
BMC.MFAMethodForWeb=<PASSWORD_AND_TOTP>
In addition to enabling multi-factor authentication globally it needs to be configured for each local user.
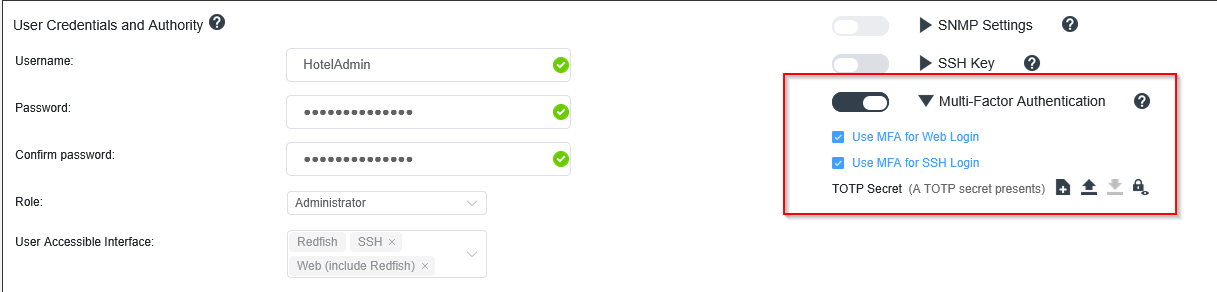
Figure 6. User Credentials and Authority
The parameters can be set in the following ways:
XCC WebUI:
BMC Configuration → User/LDAP → {edit specific user settings} → Multi-Factor Authentication
OneCLI (ThinkSystem V4 Servers and newer):
BMC.MFAUserRequiredForCLI_1=<False>=True
BMC.MFAUserRequiredForWeb_1=<False>=True
Configure Minimum TLS Level to TLS 1.2
The Minimum TLS Level setting controls the version(s) of TLS that the XCC web server uses when clients connect to it. Vulnerabilities have been found in the older versions of TLS and SSL. It is important that the Minimum TLS Level be set to TLS 1.2 if possible. Use the TLS command in the CLI to verify and set the minimum level. In the latest version of XCC the default value is TLS 1.2. If you are using an older version of XCC you should verify that the setting is TLS 1.2.
You should also configure your organization’s browsers to use only secure TLS cipher suites. A great reference for configuring secure cipher suites is the Transport Layer Security Cheat Sheet, available from the following page:
https://cheatsheetseries.owasp.org/cheatsheets/Transport_Layer_Security_Cheat_Sheet.html
The parameter can be set in the following ways:
XCC WebUI:
Not Available
OneCLI:
Not Available
XCC CLI:
tls -min 1.2
Make a backup of the XCC Configuration
Once you have hardened your XCC settings it is important to make a back of the settings, download them and save them in a safe location. This will ensure that you can easily restore the settings in the event they become corrupted or updated inadvertently.
The task can be performed in the following ways:
XCC WebUI:
BMC Configuration → Backup and Restore → Backup BMC Configuration
OneCLI:
Not Available
Hardening Lenovo XClarity Administrator
Lenovo XClarity Administrator (LXCA) is a centralized, resource-management solution that simplifies infrastructure management, speeds responses, and enhances the availability of Lenovo server systems and solutions. It runs as a virtual appliance and automates discovery, inventory, tracking, monitoring, and provisioning of server, network, and storage hardware.
This section provides the configuration settings to review and adjust to harden an LXCA installation. This section provides instructions for changing settings using the LXCA WebUI.
The following pages in the LXCA documentation provide additional guidance and for securely deploying and using LXCA. It is recommended that these pages be reviewed in addition to following the guidance in this section.
- Security considerations
https://pubs.lenovo.com/lxca/plan_securityconsiderations.html - Managing authentication and authorization
https://pubs.lenovo.com/lxca/authentication_manage.html - Implementing a secure environment
https://pubs.lenovo.com/lxca/security_implement.html
The following topics are covered in this section:
Configure encapsulation
When you manage servers and other systems, using LXCA you can configure LXCA so that it changes the firewall rules of those systems so that they accept incoming requests from LXCA only. This is called Encapsulation. You can enable encapsulation if you plan to use only Lenovo XClarity Administrator to manage the systems that support it.
Note: If you enable encapsulation you will NOT be able to access the SSH login or the WebUI that is running on server’s management processor as this access is blocked as part of enabling encapsulation. Only enable encapsulation if you do not need access to access the management processor using SSH or its WebUI.
You can Enable Encapsulation for all future managed devices on the Discover and Manage New Devices pages as shown in the figure below. To enable encapsulation device-by-device go to the device summary page of a device and select Actions.
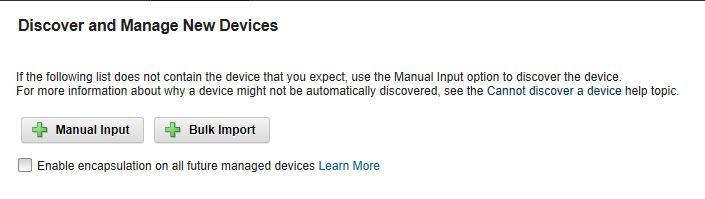
Figure 7. Enable Encapsulation – Discover and Manage New Devices
To enable all future managed devices via the LXCA WebUI, click Hardware → Discover and Manage New Devices.
To enable a single device via the LXCA WebUI, click Device Summary Page Actions → Enable Encapsulation.
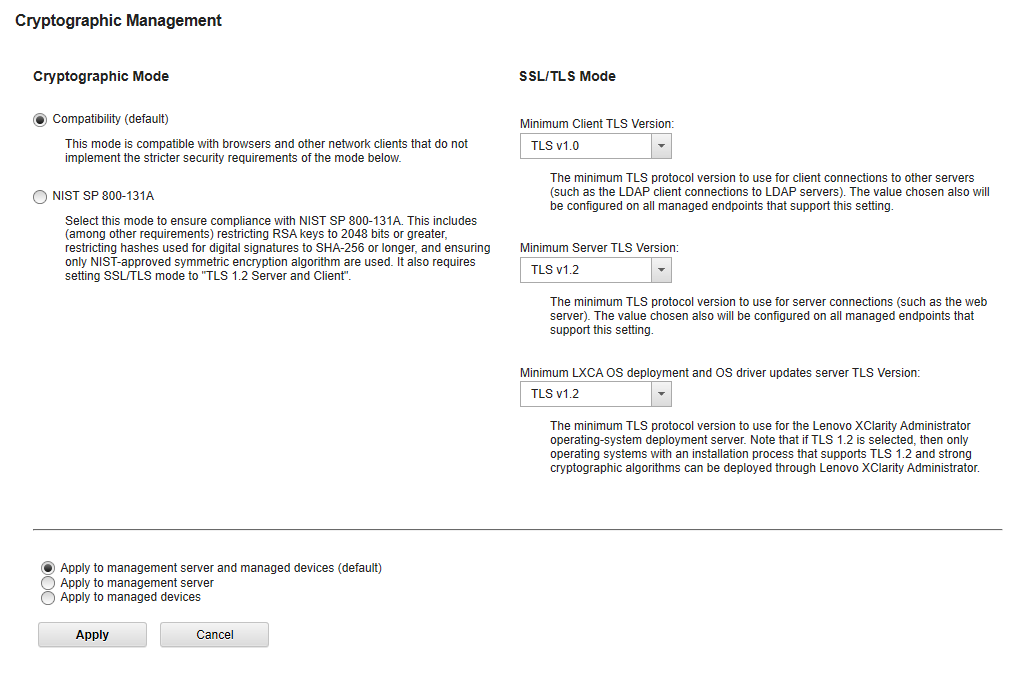
Configure Cryptographic Mode
Cryptographic Mode controls the algorithms and protocols used for secure communications between LXCA and managed devices. When you change Cryptography Mode in LXCA, the same setting is also changed in the CMMs and BMCs of the managed devices, based on the setting at the bottom of Figure 6.
If you are able, configure Cryptographic Mode in LXCA to use NIST SP 800-131A. This mode enforces that all cryptography adheres to NIST SP 800-131A and is the most secure setting.
If you are able, configure SSL/TLS mode to use TLS v1.2 for all settings.
Access the web page in the LXCA WebUI by clicking Administration → Security → Cryptography as shown in the figure below.
Certificates
By default, Lenovo XClarity Administrator generates server certificates that are unique to every instance of Lenovo XClarity Administrator. This does provide sufficient security for many environments. LXCA can manage certificates for you or you can choose to take a more active role and create and deploy certificates that are specific to your organization. LXCA provides the features needed for you to do this if you wish.
See the LXCA Information Center for more information on managing certificates if your organization wishes to manage its own certificates:
https://pubs.lenovo.com/lxca/certificates_workwith.html
To manage certificates in the LXCA WebUI, click Administration → Security → Certificate Management as shown in the figure below.
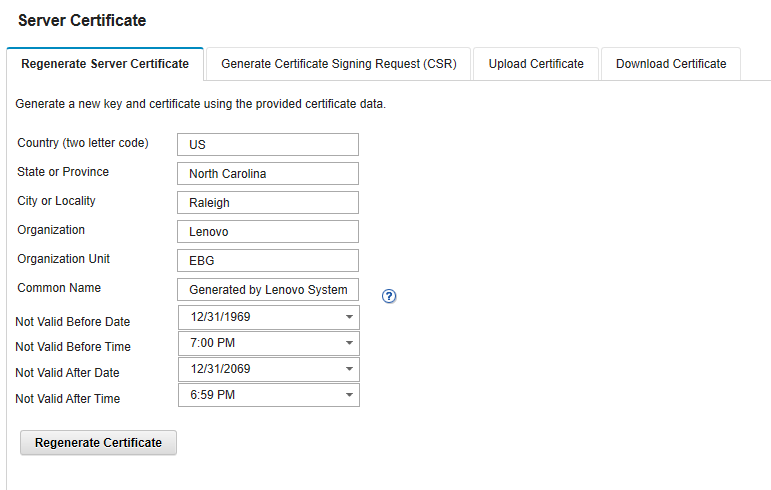
Figure 9. Administration > Security > Certificate Management
Configure the authentication server for user authentication
XClarity Administrator by default is configured to use an embedded LDAP server for Authenticating user credentials. It also provides options for you to configure an external LDAP server such as Microsoft Active Directory, and a SAML identity provider such as Microsoft Active Directory Federation Services, if your organization wishes to do so.
Consult the following Information Center page if you wish to configure either if your organization’s security policy requires you to use these external services:
https://pubs.lenovo.com/lxca/ldapserver_managing.html
To configure an external LDAP server in the LXCA WebUI, click Administration → Security → LDAP Client.
To configure a SAML identity provider in the LXCA WebUI, click Administration → Security → SAML Settings.
Configure authorization
It is very important to adhere to the principle of least privilege when assigning roles and role groups to your users. You should review the default roles and role groups and create any custom ones that are required to meet the security policy of your organization.
Configure roles
Roles are used to control user access to resources and limit the actions users can perform on those resources. By default, LXCA is configured with several roles. Use the default roles or create custom the roles that meet the security policy of your organization.
For the details of creating a custom role see the following Information Center page:
https://pubs.lenovo.com/lxca/roles_create.html
Configure roles in the LXCA WebUI by clicking Administration → Security → Roles as shown in the following figure.
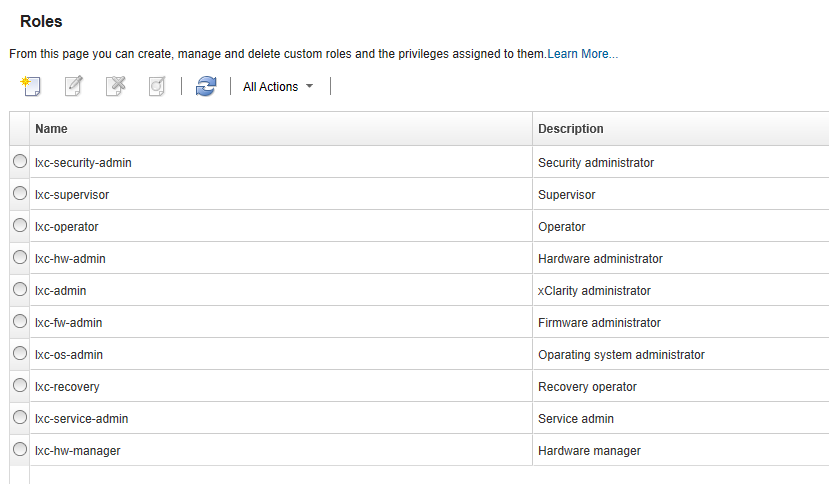
Figure 10. Administration > Security > Roles
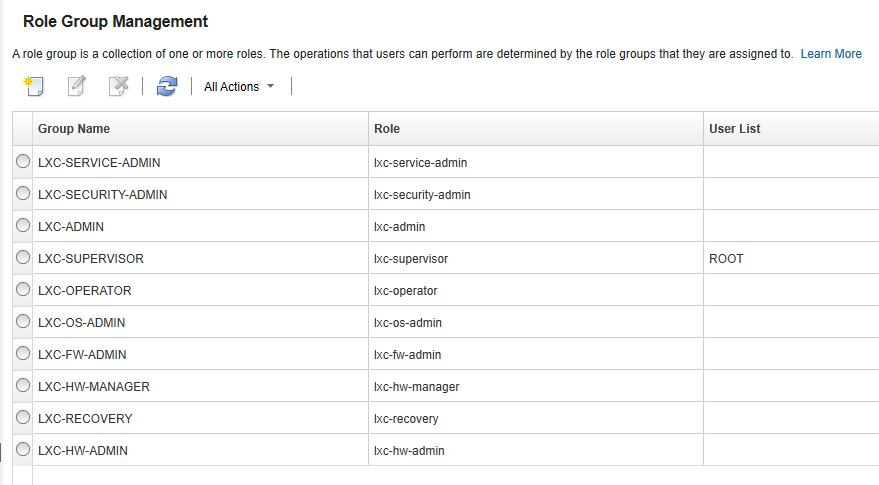
Configure role groups
A role group is a collection of one or more roles and the users who are members of the role group. By default, LXCA includes a set of default role groups for each default role. Customize role groups to match the security policy of your organization. In addition, assign users to role groups to match the security policy of your organization.
Configure role groups in the in the LXCA WebUI by clicking Administration → Security → Role Groups, as shown in the figure below.
For additional details for creating a custom role group see this page:
https://pubs.lenovo.com/lxca/rolegroup_create.html
For additional details for adding users to and removing users from a role groups see:
https://pubs.lenovo.com/lxca/rolegroup_addusers.html
Configure Account Security settings
Configure the Account Security settings to follow your organizations password management and session management policy. These settings specify password security settings such as complexity and length and also session type settings such as the maximum number of concurrent sessions per user id and web session timeout.
Note: Be sure to verify the settings of Password expiration period, and Lockout Period after max login failures if you do not want passwords to ever expire or if you do not wish to be locked out for an extended amount of time after the maximum number failed login attempts is exceeded. In some cases, organizations prefer that passwords do not expire and they do not desire an extended locked out period.
Manage the Account Security settings in the LXCA WebUI by clicking Administration → Security → Account Security Settings as shown in the figure below.
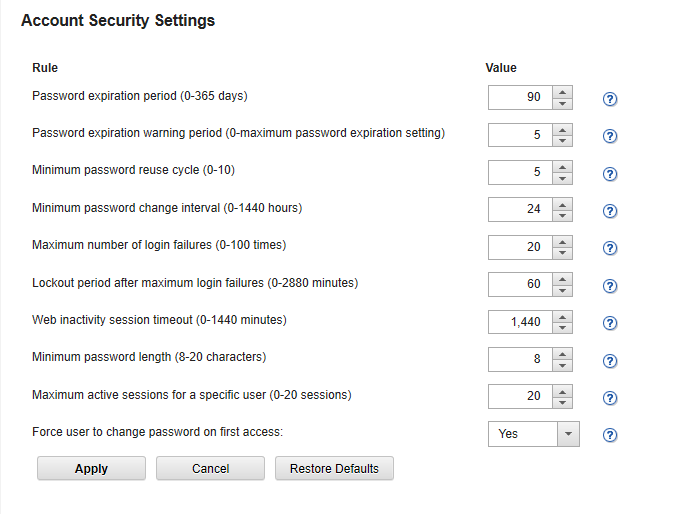
Figure 12. Administration > Security > Account Security Settings
For additional details see the following Information Center page:
https://pubs.lenovo.com/lxca/users_changesecuritysettings.html
Review device authentication mechanisms
By default, credentials that XClarity Administrator uses to authenticate to the devices it manages use XClarity Administrator managed authentication. You can choose to use local authentication if your organization prefers that. For example, if your organization wants to store credentials in a corporate LDAP Server you may want to consider using local authentication.
See the Device Authentication topic in the Information Center for more details:
https://pubs.lenovo.com/lxca/plan_securityconsiderations_ldapserver.html
Hardening Lenovo XClarity Orchestrator
Lenovo XClarity Orchestrator (LXCO) provides centralized monitoring, management, provisioning, and analytics for environments with large numbers of devices. It leverages existing resource managers (such as Lenovo XClarity Administrator and Schneider Electric EcoStruxure IT Expert) across multiple sites to view overall health, collect device inventory and health summaries, drill down into device details, view event and audit logs, and apply updates to managed resources.
This section provides the configuration settings to review and adjust to harden an LXCO installation. This section provides instructions for changing the settings using the LXCO WebUI.
The following pages in the LXCO documentation provide additional guidance for securely deploying and using LXCO. It is recommended that these pages be reviewed in addition to the guidance in this section.
- Security Considerations
https://pubs.lenovo.com/lxco/plan-security.html - Administering Lenovo XClarity Orchestrator
https://pubs.lenovo.com/lxco/admin.html
The following topics are covered in this section:
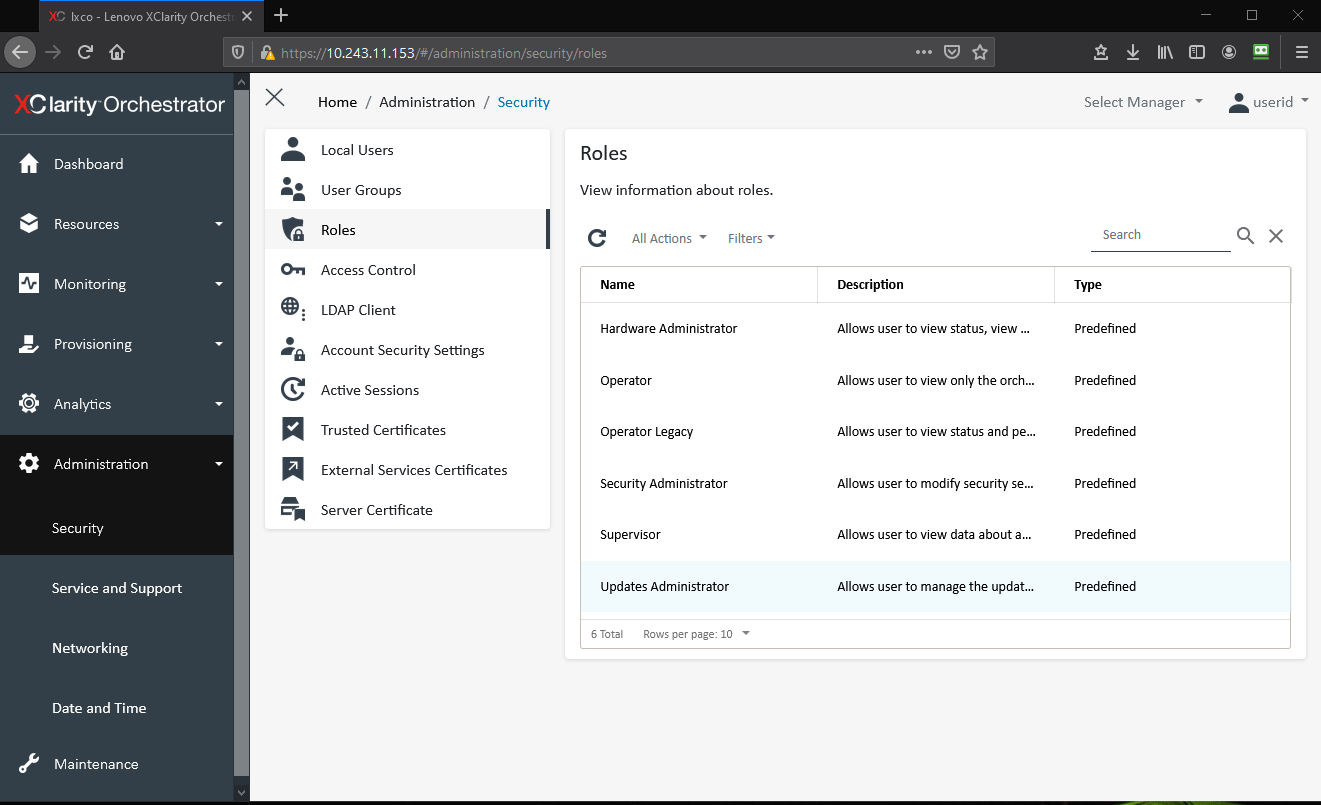
Understand the LXCO Roles
Roles are used to limit the functions users can perform within Lenovo XClarity Orchestrator. By default, Lenovo XClarity Orchestrator is configured with several roles. Review these roles so that you understand them and can assign them to the User Groups you create.
For a detailed description of the roles and the functions each provides see:
https://pubs.lenovo.com/lxco/admin-roles.html
To Configure Roles in the LXCO Web UI, click Administration → Security → Roles as shown in the figure below.
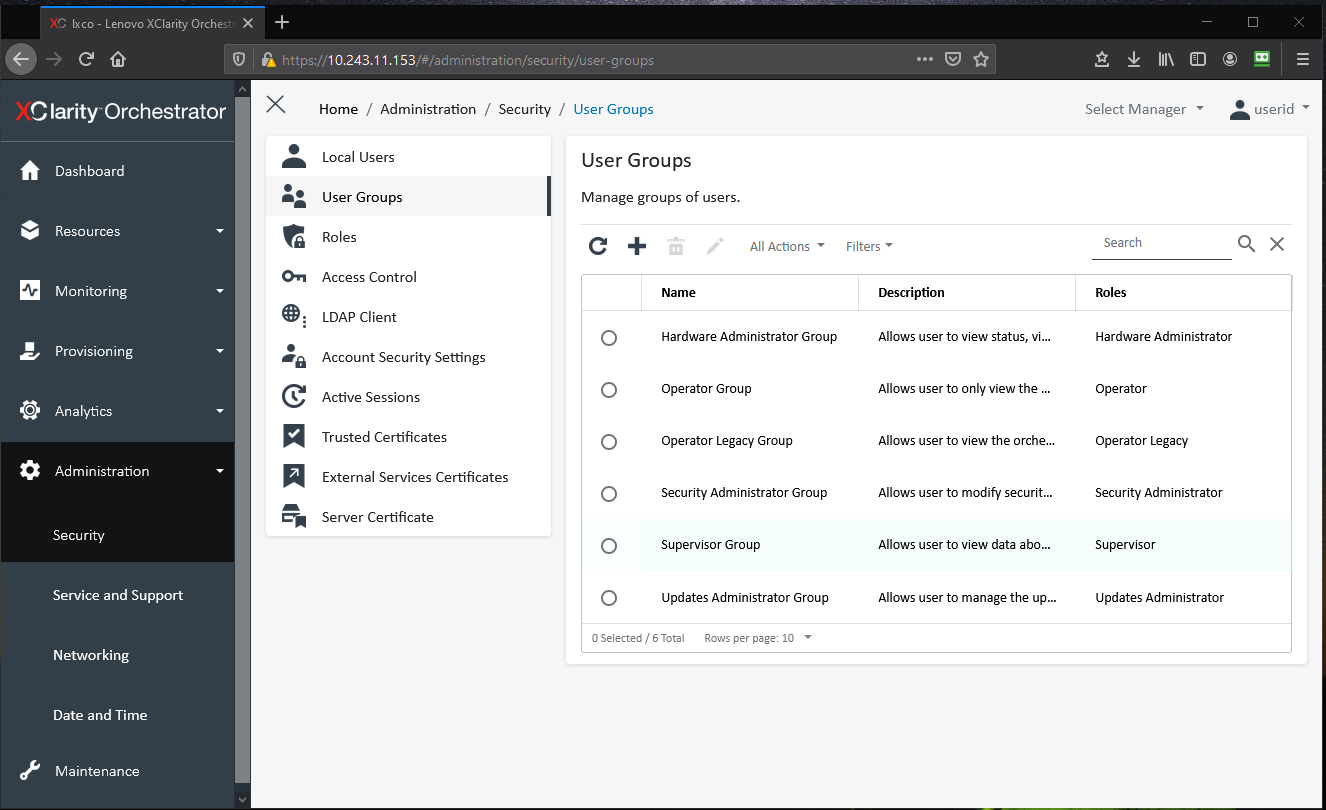
Create User Groups
Lenovo XClarity Orchestrator uses User Groups to control the functions that users can perform. Lenovo XClarity Orchestrator comes with a User Group for each of its predefined roles. Create User Groups that fit your organizations needs and assign users to those roles. You can also create User Groups that mirror your groups in LDAP if you are using LDAP for Authentication.
For a detailed description of creating User Groups see:
https://pubs.lenovo.com/lxco/admin-usergroups-add.html
To configure User Groups in the LXCO WebUI click, Administration → Security → User Groups as shown in the figure below.
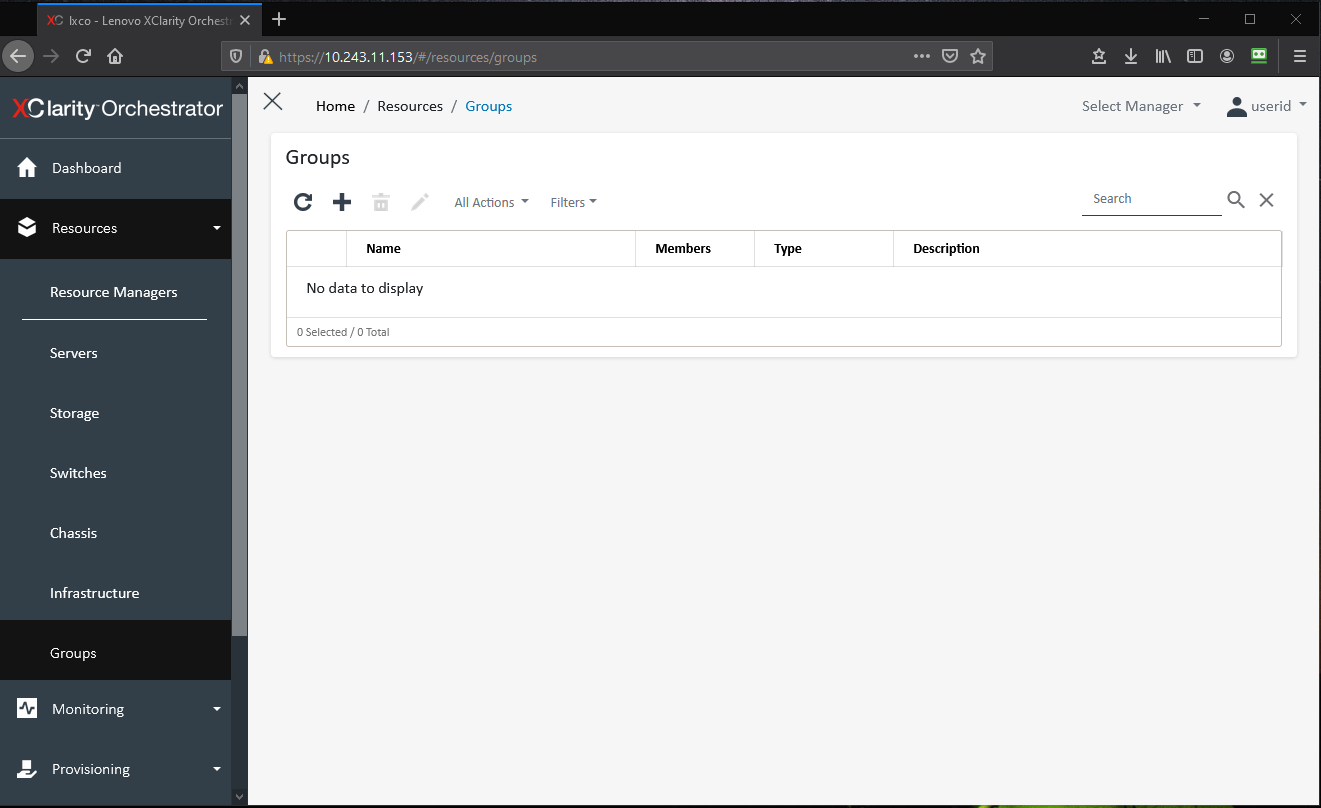
Create Resource Groups
Lenovo XClarity Orchestrator uses resource groups to logically group devices into device groups and resource managers into manager groups. Use resource groups to segment devices and resource managers into logical groupings. Then assign resource groups to an Access Control list to limit who has access to the items in the group.
For a detailed description of Resource Groups see:
https://pubs.lenovo.com/lxco/admin-acls-enable.html
To configure LXCO in the LXCO WebUI click, Resources → Groups as shown in the following figure.
Create Access Control Lists
Lenovo XClarity Orchestrator uses access-control lists (ACLs) to determine which resources (devices, resource managers, and XClarity Orchestrator) users can access. When a user has access to a specific set of resources, that user can see data (such as inventory, events, alerts, and analytics) that is related to only those resources. Create access control lists to control who (the users in user groups) can perform what actions (the roles assigned to the user group) on what resources (the items in the resource groups).
For a detailed description of Access Control Lists see:
https://pubs.lenovo.com/lxco/admin-acls-add.html
To configure Resource Groups in the LXCO WebUI click, Administration → Security → Access Control as shown in the following figure.
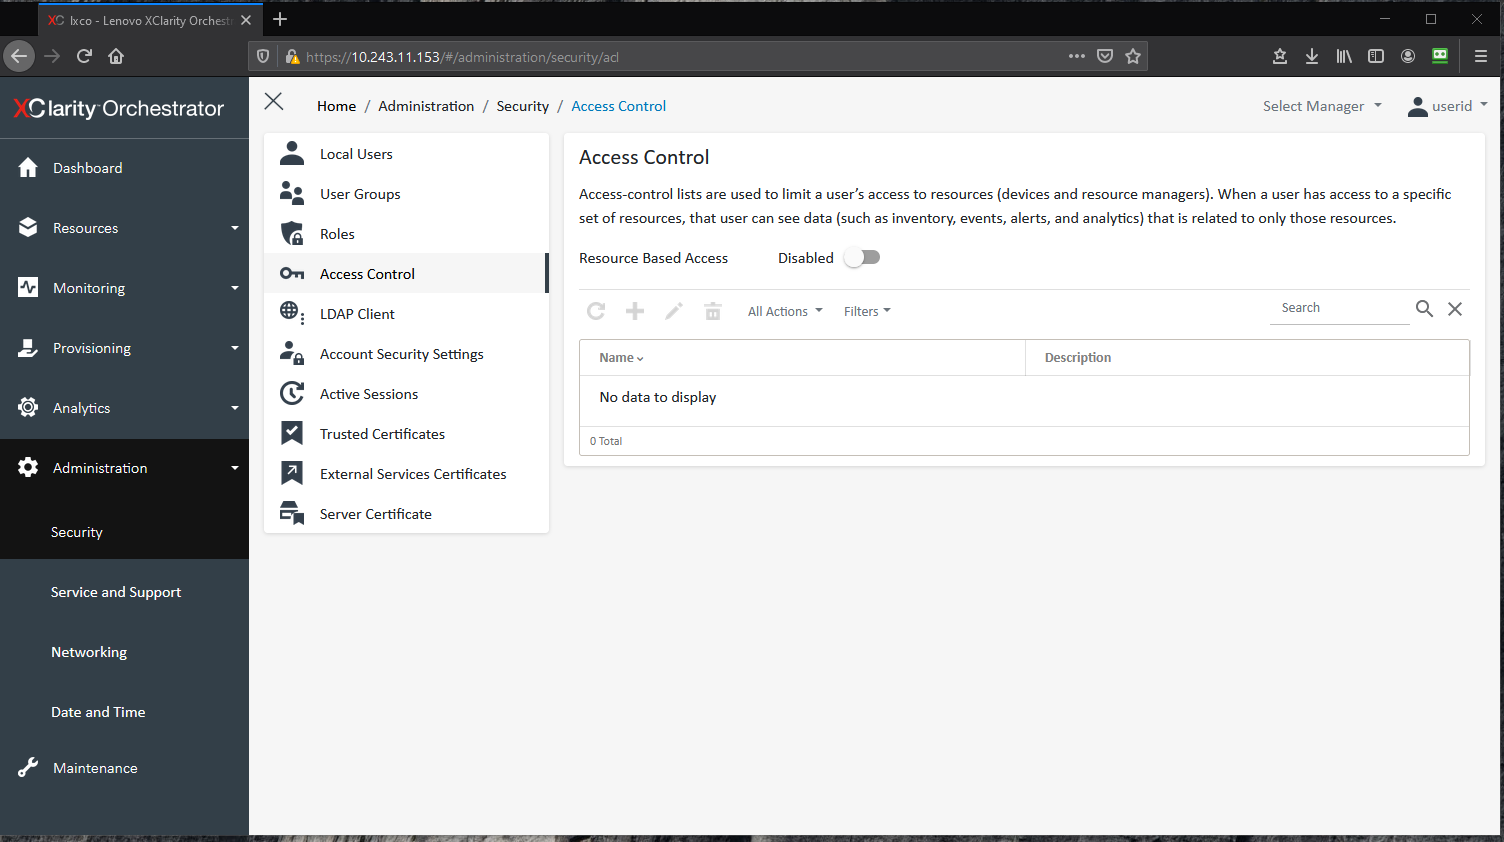
Figure 16. LXCO - Administration > Security > Access Control
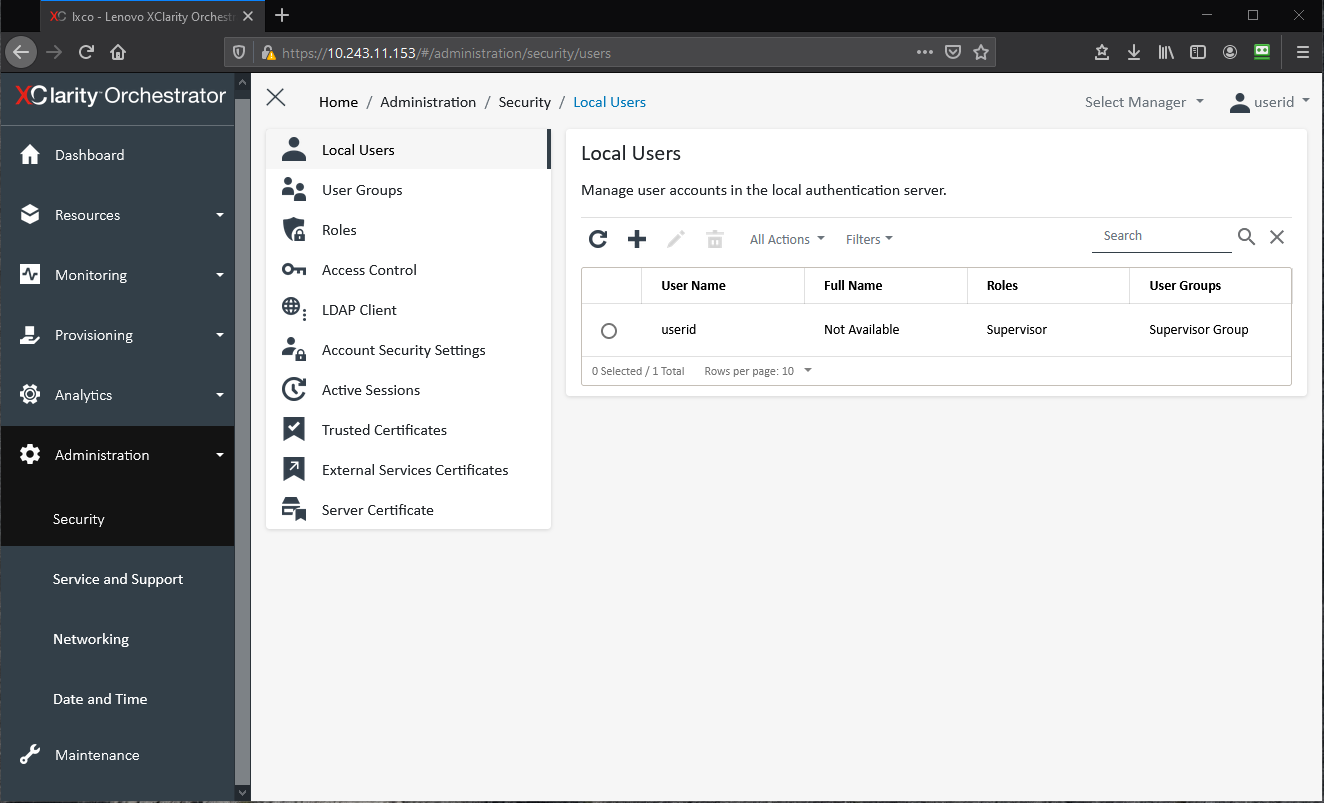
Configure Local Users
By default, Lenovo XClarity Orchestrator has a single local supervisor user called userid. Create a new local user that is a supervisor with a different Username and delete the default userid account.
If you create other local users configure the User Groups of each user according to their access needs. Do not make all users a member of the Supervisor Group.
To configure Local Users in the LXCO WebUI click, Administration → Security → Local Users as shown in the figure below.
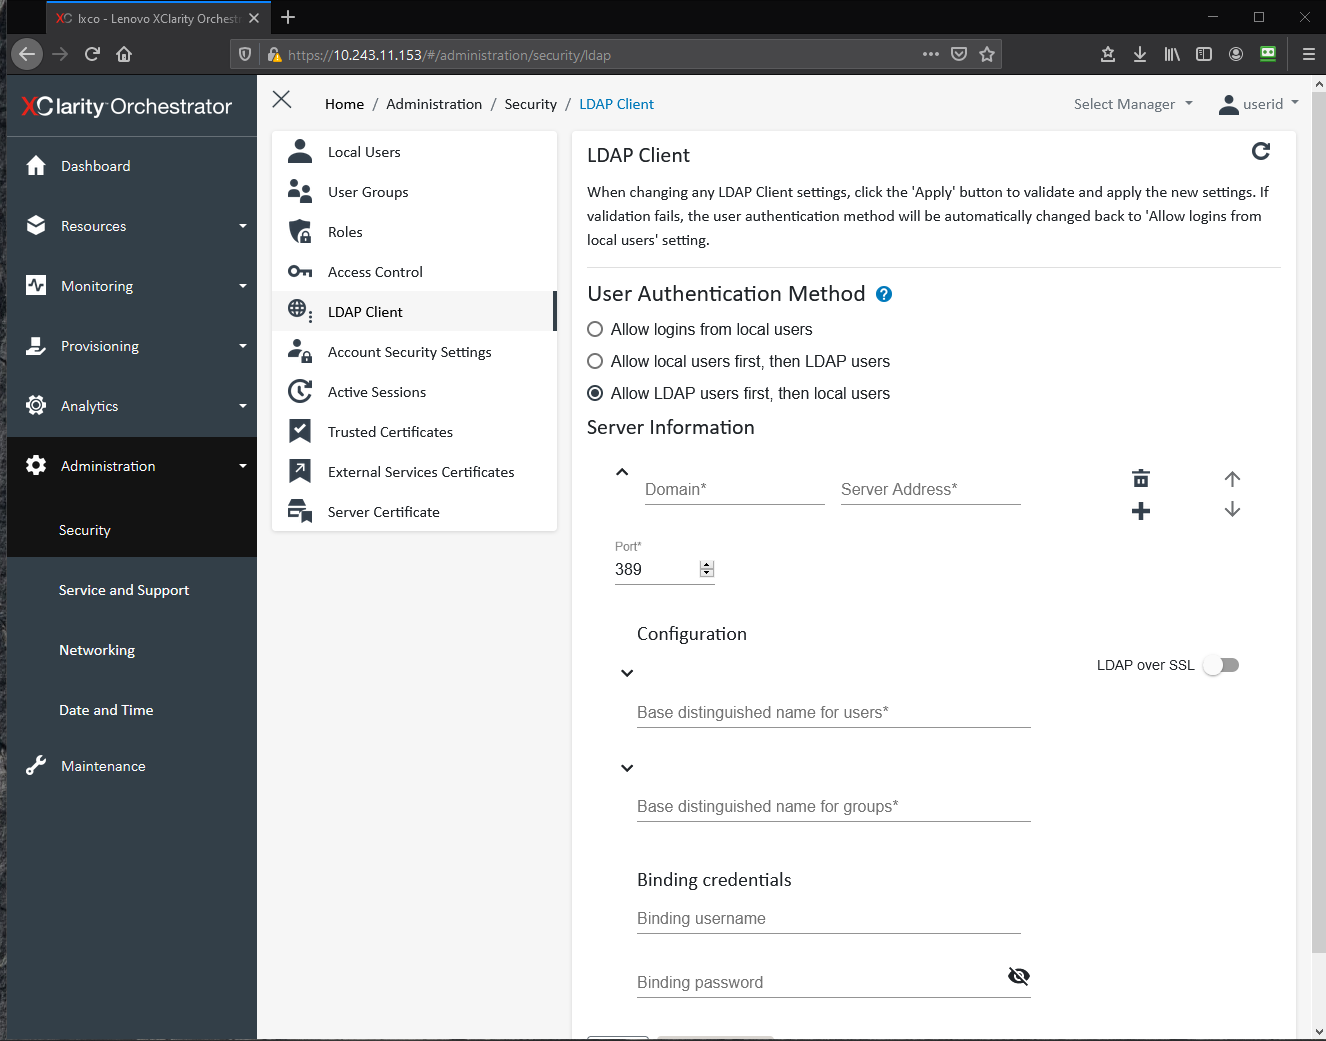
Configure the LDAP Client
XClarity Orchestrator by default is configured to use a local authentication server for Authenticating user credentials. It also provides options for you to configure an external LDAP server if your organization wishes to do so. Be sure to enable LDAP over SSL if your LDAP Server supports it as this is the most secure way to communicate with an LDAP Server.
Please consult the following page you wish to configure the LDAP client:
https://pubs.lenovo.com/lxco/admin-ldapserver-setup.html
To configure the LDAP Client in the LXCO WebUI click Administration → Security → LDAP Client as shown in the figure below.
Configure Account Security Settings
Configure the Account Security settings to follow your organizations policies for session timeout and password management.
To configure Account Security Settings in the LXCO WebUI click Administration → Security → Account Security Settings as shown in the figure below.
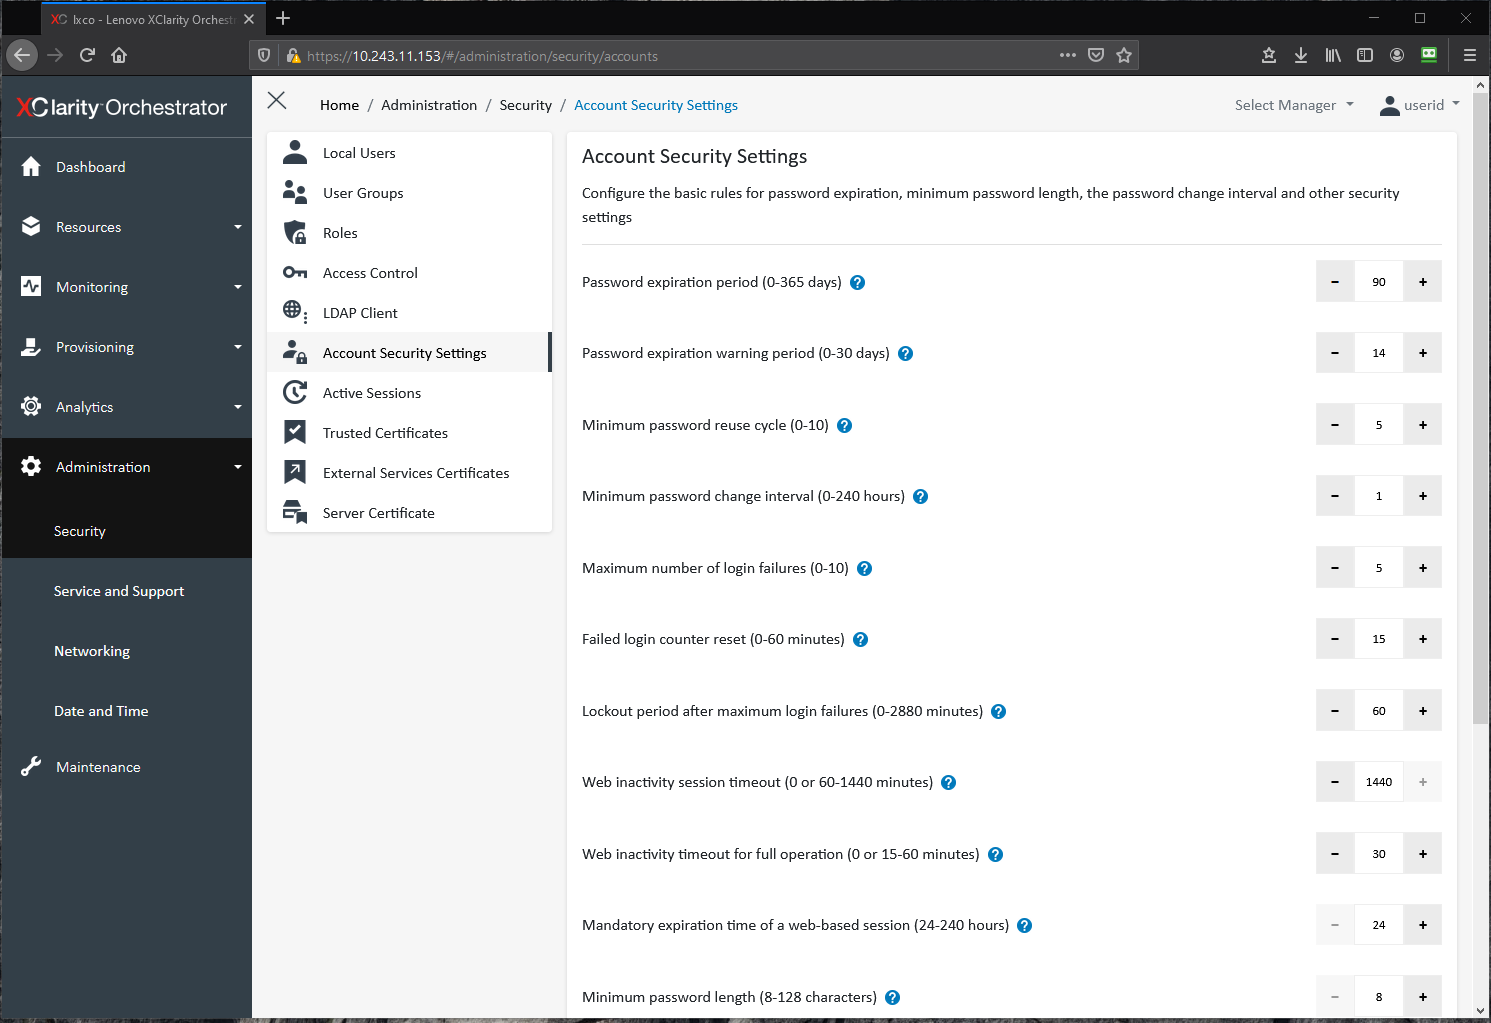
Figure 19. LXCO - Administration > Security > Account Security
Configure a Server Certificate
By default, Lenovo XClarity Orchestrator generates server certificates that are unique to every instance of XClarity Orchestrator which are the basis for encrypted communications performed by XClarity Orchestrator. This does provide sufficient security for many environments. You should always import the certificate into your browser trust store instead of accepting the certificate exception each time you connect to Lenovo XClarity Orchestrator. This prevents an attacker from spoofing the Lenovo XClarity IP Address and performing a man-in-the-middle attack. For additional security, you can choose to create and deploy certificates that are specific to your organization. XClarity Orchestrator provides the features needed for you to do this if you wish.
See the following page for more information on managing certificates if your organization wishes to manage its own certificates:
https://pubs.lenovo.com/lxco/admin-security-certificates.html
To configure a Server Certificate in the LXCO WebUI click Administration → Security → Server Certificate as shown in the figure below.
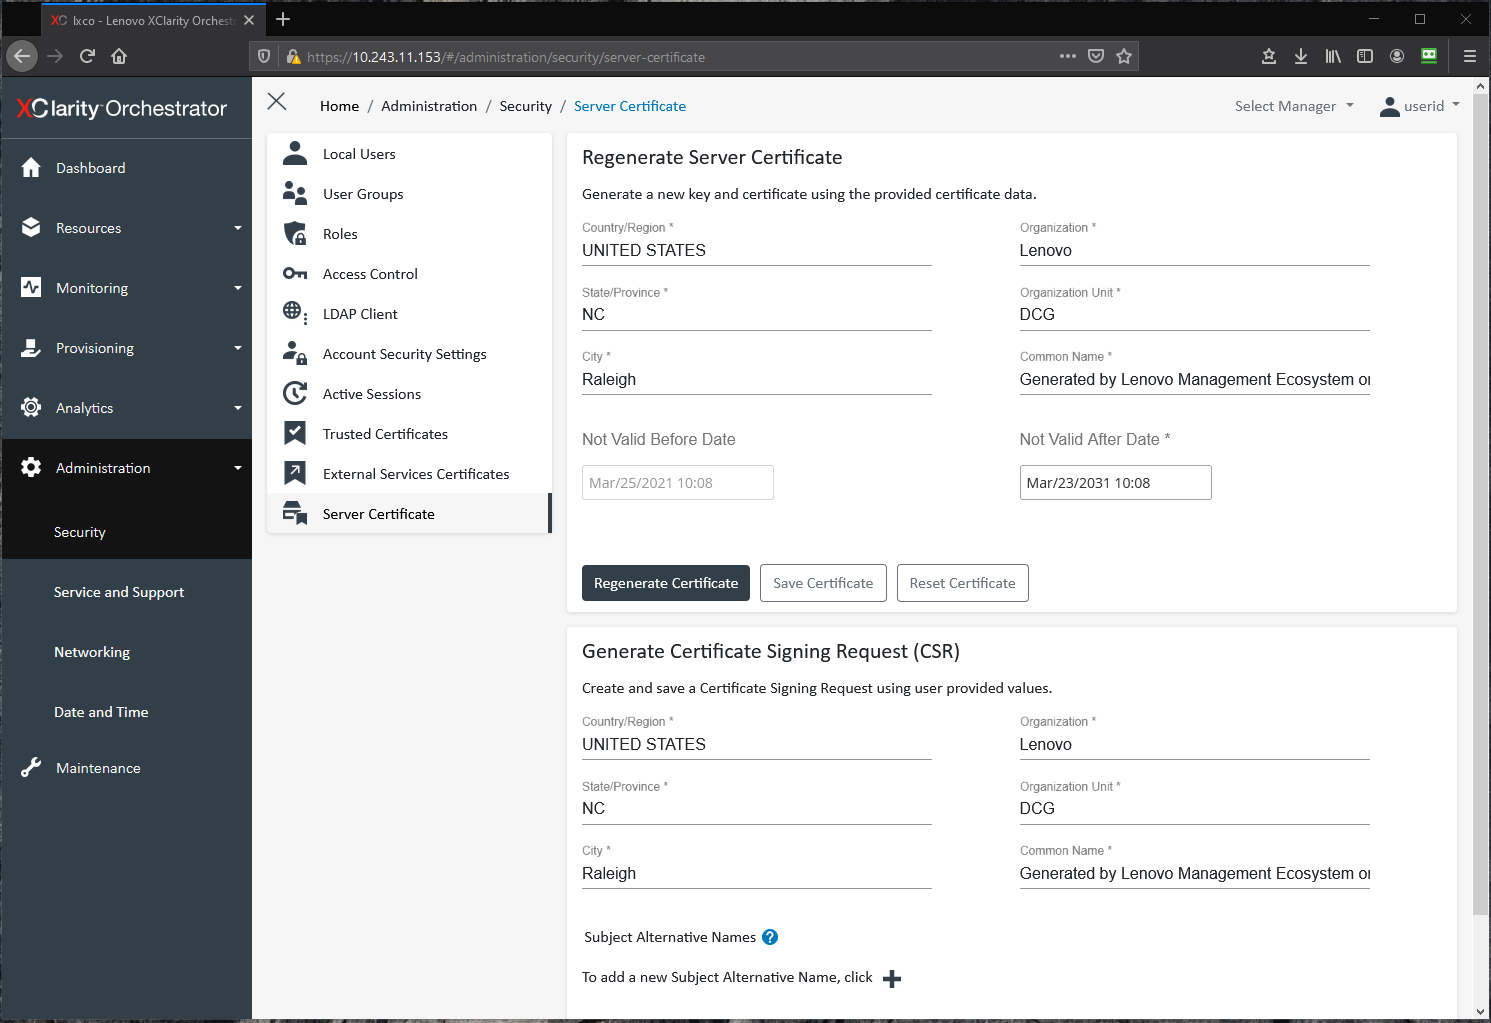
Figure 20. LXCO - Administration > Security > Server Certificate
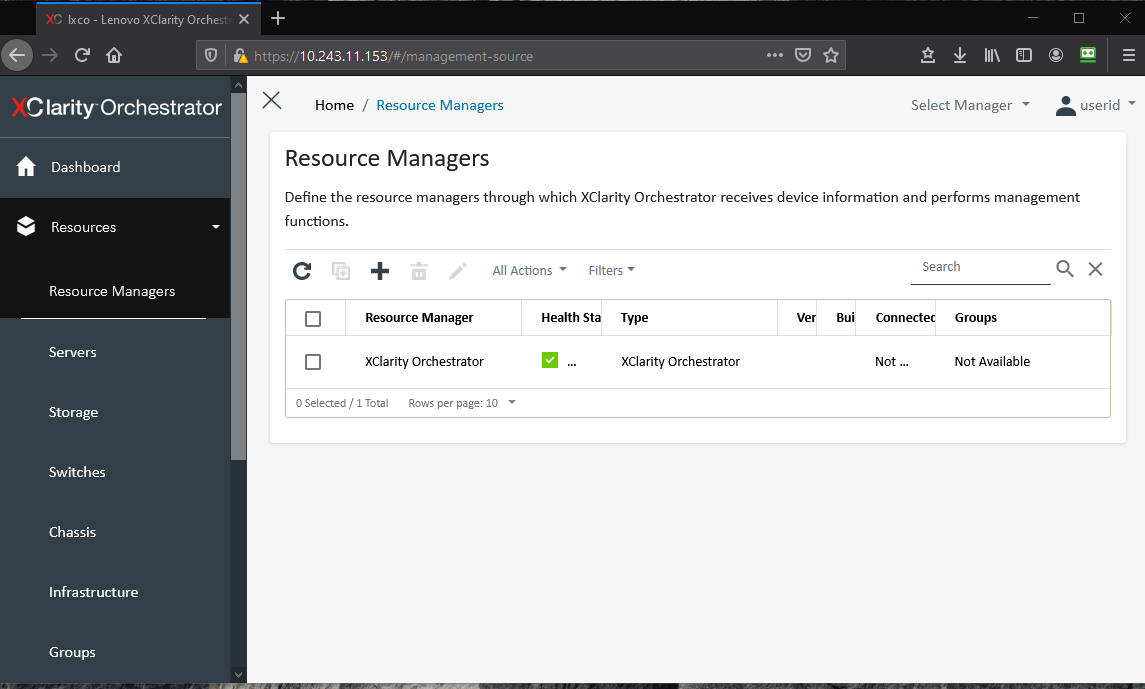
Configure Resource Managers and Event Forwarders with Strong Credentials
When setting up resource managers and event forwarders that require usernames/passwords that Lenovo XClarity Orchestrator uses to authenticate to them be sure to use strong passwords. Also change the passwords based on your organizations password policies.
To configure Resource Managers in the LXCO WebUI click Resources → Resource Managers as shown in the figure below.
Hardening Chassis Management Module
The Lenovo Chassis Management Module 2 (CMM2, or simply CMM) is a hot-swap Flex System module that is used to configure and manage Flex System components that are installed in a Lenovo Flex System Enterprise Chassis. Both CMM and the Flex System products include features that can help you secure your Flex System products.
This section provides the configuration settings to review and adjust to harden a CMM installation. This section provides instructions for changing settings in two ways:
- Using the CMM command line interface (CLI)
- Using the CMM WebUI
The following are links to the Lenovo CMM2 documentation. Most of the information in this section also applies to original CMM1.
- CMM Security
https://pubs.lenovo.com/cmm2/cmm_security.html - Flex System Security
https://pubs.lenovo.com/cmm2/security_planning.html - General security considerations
https://pubs.lenovo.com/cmm2/ov_GeneralSecurityConsiderations.html
The following topics are covered in this section:
- Configure the Security Policy
- Configure Cryptography Mode and TLS Cipher Suites
- Configure LDAP and LDAP client security
- Configure CMM access controls
- Change the password of the default CMM user account
- Configure the CMM user authentication method
- Configure CMM global login settings
- Configure CMM user account security level
- Configure CMM permission groups
- Disable insecure CMM network services
- Configure CMM certificates
Configure the Security Policy
The Security Policy controls several security specific configuration settings. Use the Secure security policy if possible, which is the default. It is the most secure, but it is less flexible than the Legacy security policy. The Secure policy enforces stronger password policies, mandatory change of passwords on first login and only allows secure communication protocols to be enabled.
For more details see the following page:
https://pubs.lenovo.com/cmm2/cmm_security_policies.html
The security policy can be configured in the following ways:
CMM CLI:
security -p secure -T {target}
WebUI:
Mgt Module Management → Security → Security Policies Tab, as shown in the following figure.
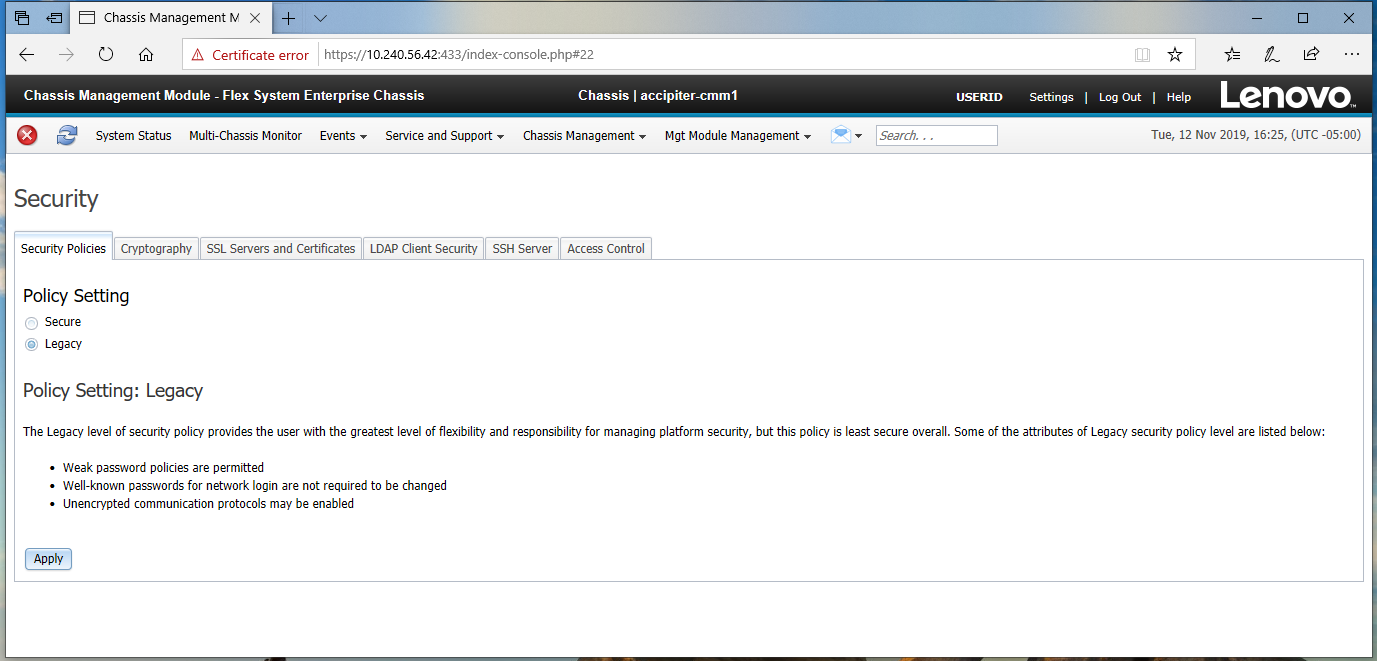
Figure 22. CMM - Management > Security > Security Policies Tab (also shows other tabs referenced below)
Configure Cryptography Mode and TLS Cipher Suites
The most secure setting for cryptography mode is NIST SP 800-113A. This mode requires that all compute and management nodes in the chassis have firmware that supports NIST SP800-113A. If this is not the case with your system, then configure the TLS/SSL setting to be TLS 1.2 Server and Client.
The methods to configure the cryptography settings are as follows:
CLI - configure SP800-113A:
crypto -m nist800-131a -T {target}
CLI - configure TLS 1.2:
crypto -cs tls1.2 -T {target7}
WebUI:
Mgt Module Management → Security → Cryptography Tab
For more details consult the following Information Center page:
https://pubs.lenovo.com/cmm2/cmm_ui_configure_NIST_compliance.html
Configure LDAP and LDAP client security
If your organization uses LDAP for user authentication you should configure CMM to use LDAP for user authentication. This simplifies user account management for CMM users.
The methods to configure the LDAP settings are as follows:
CLI (see ldapcfg -h for command options):
ldapcfg <flags> <parameters>
WebUI - configure LDAP:
Mgt Module Management → Network → LDAP Client Tab
WebUI - configure LDAP security:
Mgt Module Management → Security → LDAP Client Security Tab
For more details consult the following Information Center page:
https://pubs.lenovo.com/cmm2/configuring_the_cmm_ldap.html
Configure CMM access controls
Access Controls are configured to allow or deny access to CMM via IP and MAC address. If you know the IP addresses or MAC addresses of the computers that require CMM access, create a white-list and add those to it. If you know specific IP addresses or MAC address of computers that you do not want to access CMM, configure a black-list and add those to it.
The methods to configure the access controls are as follows:
CLI (see accesscontrol -h for command options):
accesscontrol <flags> <parameters>
WebUI:
Mgt Module Management → Security → Access Control Tab
For additional details please see the following Information Center page:
- accesscontrol command
https://pubs.lenovo.com/cmm2/cli_command_accctrl.html - CMM management options
https://pubs.lenovo.com/cmm2/cmm_ui_mgt_module_management.html
Change the password of the default CMM user account
Change the password of the USERID account from the original value if you didn’t do this on first login.
CLI (see users -h for command options):
users <flags> <parameters>
WebUI:
Mgt Module Management → User Accounts → Account Tab → USERID user
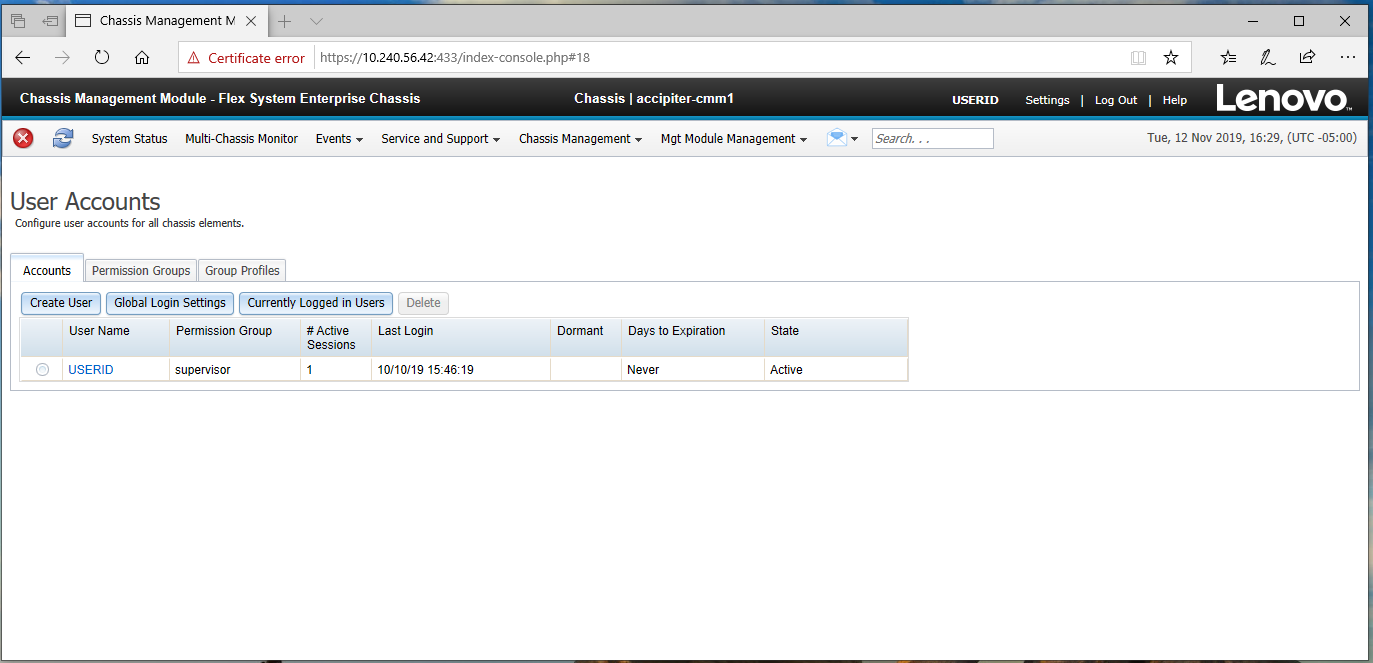
Figure 23. Mgt Module Management > User Accounts (also shows other tabs referenced below)
Configure the CMM user authentication method
If you want to use LDAP for authentication, you first must configure the LDAP Server and Client, then Configure User Authentication so that LDAP is used to authenticate users. To do this set the User authentication level to a setting that uses External authentication. The setting should be set to one of the values that includes External and depends on your specific security policies.
CLI (see acceseccfg -h for command options):
accseccfg <flags> <parameters>
WebUI:
Mgt Module Management → User Accounts → Account Tab / Global Login Settings → Account General Tab
Configure CMM global login settings
The Global Login Settings include items like the Web Activity Session timeout, the CLI inactivity session timeout and other settings. It is important to review and change any of the Global Login Settings. These should be adjusted to meet your organization’s security policy settings.
Note: Be sure to verify the settings of Password expiration period and Lockout Period after max login failures if you do not want passwords to ever expire or if you do not wish to be locked out for an extended amount of time after the maximum number failed login attempts is exceeded. In some cases, organizations prefer that passwords do not expire and they do not desire an extended locked out period.
CLI (see accseccfg -h for command options):
accseccfg <flags> <parameters>
WebUI:
Mgt Module Management → User Accounts → Account Tab / Global Login Settings → Account General Tab
For more details consult the following Information Center page:
https://pubs.lenovo.com/cmm2/cmm_password_policy_settings.html
Configure CMM user account security level
The user account security level controls all aspects of user accounts. These default to values based on the Security Policy chosen in Configure the Security Policy. If you are not able to use the Secure Security policy, then you should review and adjust the User Account Policy according to your organization’s security policy. Use the High policy if possible, if that is not possible then select Custom and set each individual value according to your organization’s security policy.
CLI (see accseccfg -h for command options):
accesccfg <flags> <parameters>
WebUI:
Mgt Module Management → User Accounts → Account Tab / Global Login Settings → Account Security Level Tab
For more details see the following Information Center page:
https://pubs.lenovo.com/cmm2/cmm_password_policies.html
Configure CMM permission groups
It is important to follow the principal of least privilege for users who are granted access to CMM. As you provide access to the users of CMM be sure to configure each user with the minimum privileges they require. To do this create groups containing only those permissions required by your users. The permission groups can then be assigned to users as they are added.
CLI (see permgroups -h for command options):
permgroups <flags> <parameters>
WebUI:
Mgt Module Management → User Accounts → Account Tab / Permission Groups Tab
For more details see the following Information Center pages:
- Web interface pages and user roles
https://pubs.lenovo.com/cmm2/cmm_ui_webpagesanduserroles.html - Commands and user authority
https://pubs.lenovo.com/cmm2/cli_use_cmd_authority.html
Disable insecure CMM network services
Review the enabled services and disable any that are not required. In particular, disable the insecure services listed in the table below if your organization does not require them.
Methods to disable the services are as follows:
CLI (see ports -h for command options):
ports <flags> <parameters>
WebUI:
Mgt Module Management → Network (see tabs in the figure below).
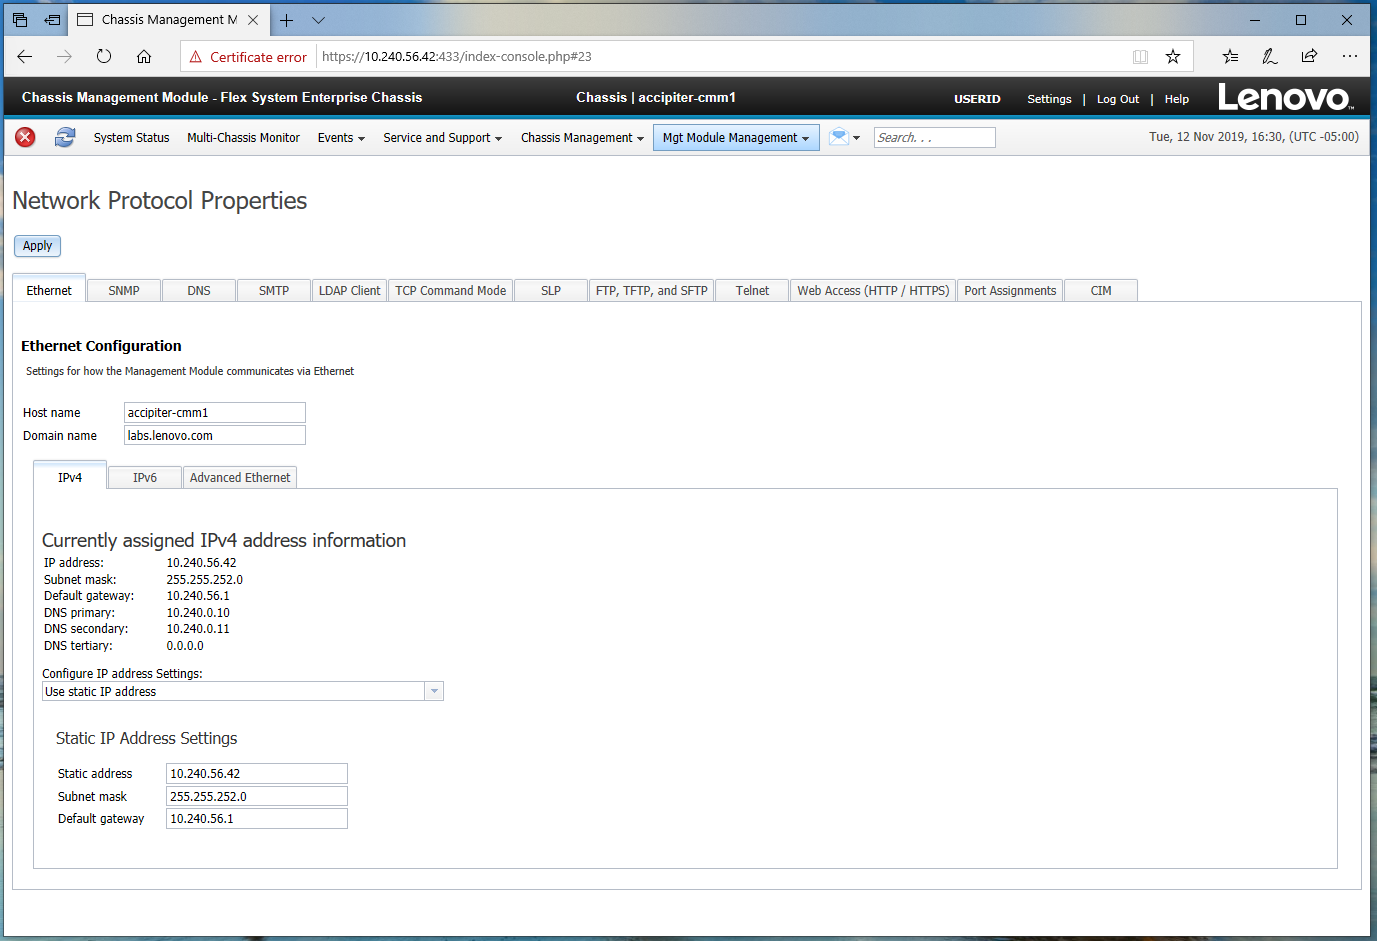
Configure CMM certificates
By default, CMM generates its own self-signed certificate that it uses for multiple purposes such as its web server, server certificate, its LDAP Client certificate (if LDAP is enabled) and to sign certificates that are required for the nodes in the chassis. If you wish to reduce the number of untrusted certificate messages configure CMM to use an externally signed certificate where the CA is trusted by the user’s web browser.
For more details see the following Information Center pages:
- Certificates
https://pubs.lenovo.com/cmm2/ov_planning_certificates.html - External authentication of certificates
https://pubs.lenovo.com/cmm2/cli_ext_cert_authentication.html
The methods to configure certificates are as follows:
CLI (see sslccfg -h for command options):
sslcfg <flags> <parameters>
WebUI:
Mgt Module Management → Security → SSL Servers and Certificates Tab
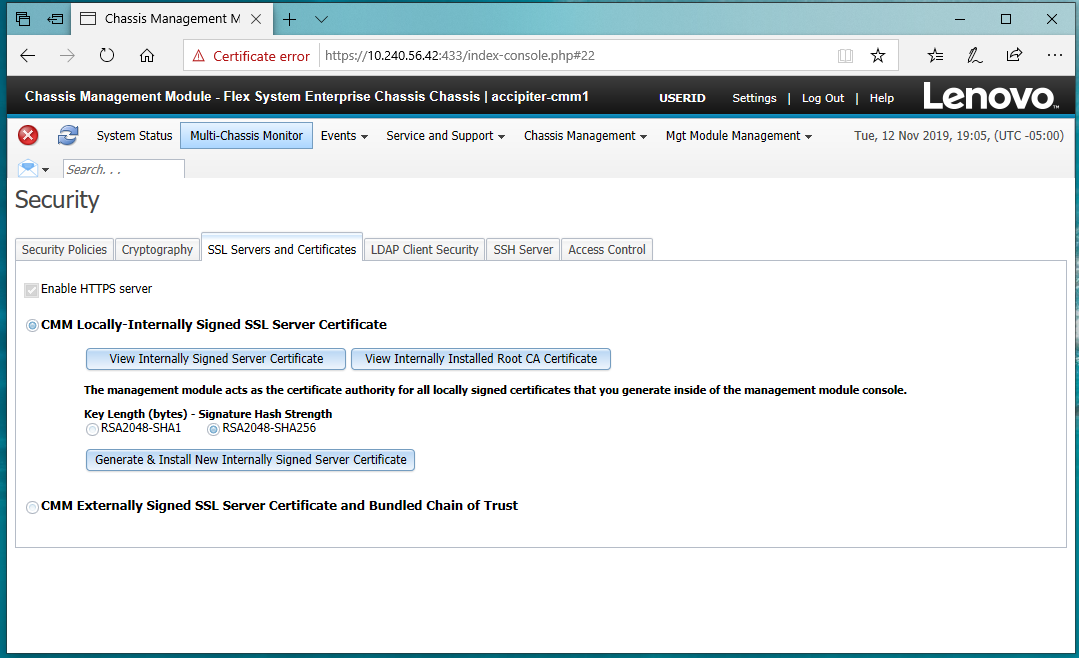
Figure 25. Mgt Module > Security > SSL Servers and Certificates Tab
Hardening System Management Module
The System Management Module (SMM) is used to monitor and manage a ThinkSystem D2 Enclosure. It is used to obtain reports, manage and configure fan and power, manage the event log, and to backup and restore SMM settings.
This section provides the configuration settings to review and adjust to harden a SMM installation. This section provides instructions for changing settings using the SMM WebUI.
For information about the SMM, see the SMM User’s Guide in the Information Center:
https://pubs.lenovo.com/mgt_tools_smm2/
The following topics are covered in this section:
Disable secure rollback for SMM firmware
When upgrading to new firmware using the WebUI always leave the Secure Rollback checkbox in the firmware image confirmation table unchecked. This prevents the firmware from being rolled back to a previous version that is potentially less secure.
To review this setting, in the SMM WebUI, go to the Firmware Image Confirmation page.
Change the password of the default SMM user account
Change the password of the USERID account from the original value if not required to do so on first login.
To change the password in the SMM WebUI, click Configuration → User Account Tab.
Configure SMM user accounts securely
As you add accounts to SMM configure them according to the principle of least privilege. Set the Role value of each added user to the value that best matches what the user needs to be able to do.
To set the role value in the SMM WebUI, click Configuration → User Account Tab. For more details on setting up user accounts see the following Information Center page:
https://pubs.lenovo.com/mgt_tools_smm2/c_user_account.html
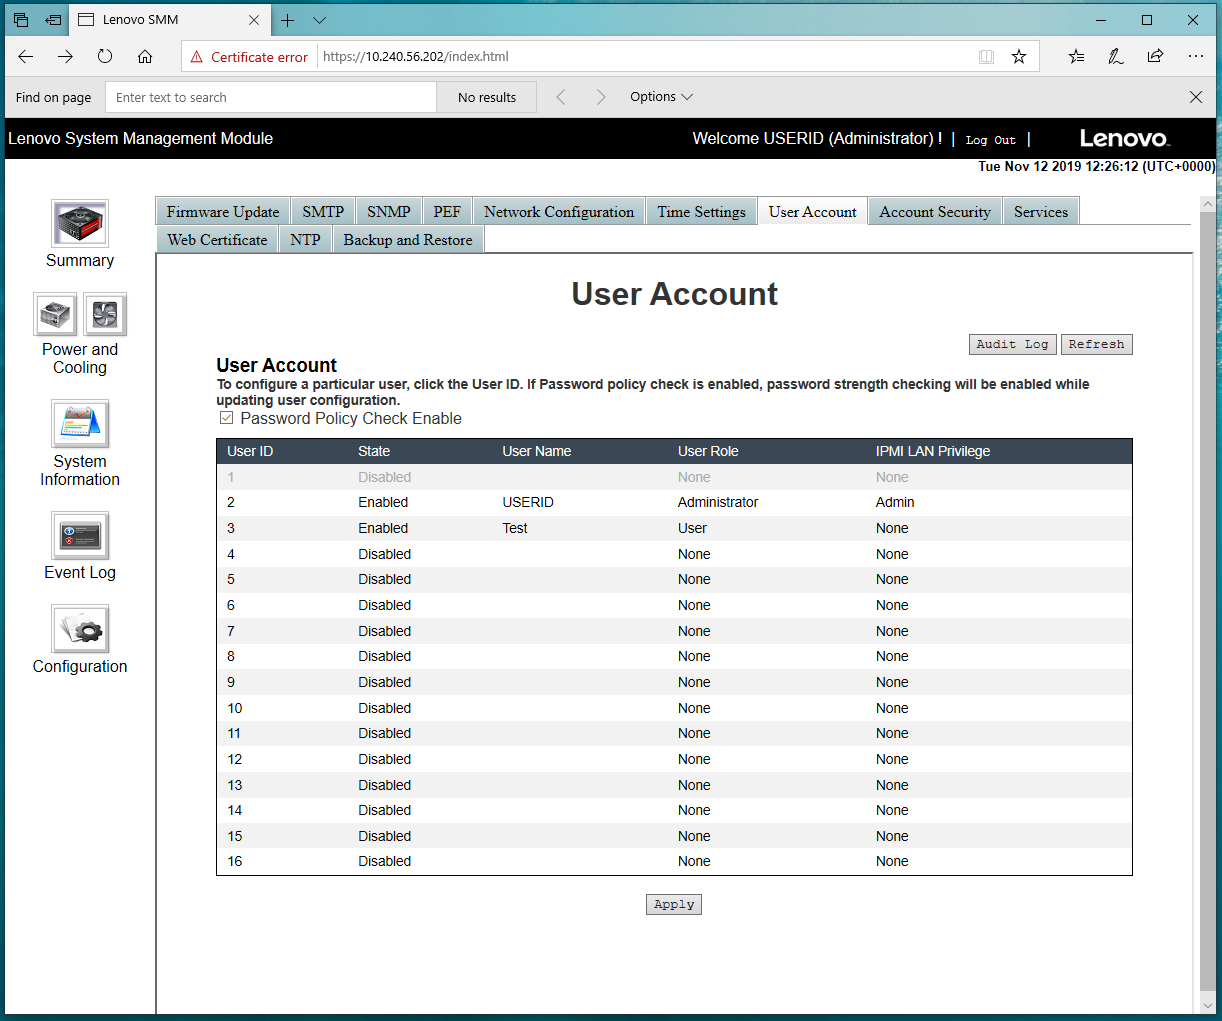
Configure SMM account security
Account Security controls all aspects of user accounts, sessions and passwords. Configure Account Security so that it follows your organization’s policy.
Note: Be sure to verify the settings of Password expiration period and Lockout Period after max login failures if you do not want passwords to ever expire or if you do not wish to be locked out for an extended amount of time after the maximum number failed login attempts is exceeded. In some cases, organizations prefer that passwords do not expire and they do not desire an extended locked out period.
To access account security in the SMM WebUI, click Configuration → Account Security Tab.
For more details on configuring account security see the following Information Center page:
https://pubs.lenovo.com/mgt_tools_smm2/c_account_security.html
Disable IPMI on SMM if not required
IPMI is a service that can be used to configure the system. If you’re not planning to use IPMI then disable it. Configure the service in the SMM WebUI by clicking Configuration → Services as shown in the figure below.
For more details on configuring SMM services see the following Information Center page:
https://pubs.lenovo.com/mgt_tools_smm2/c_web_service.html
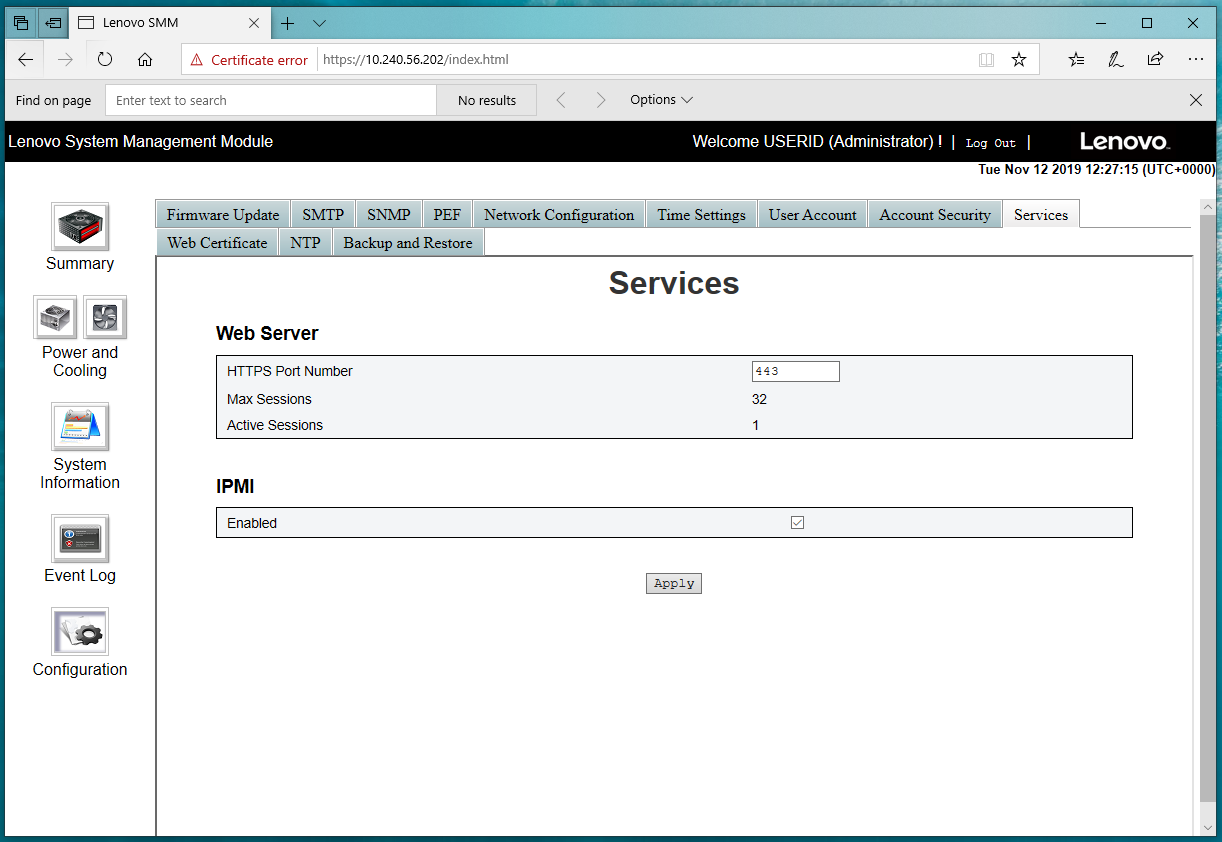
Configure SMM network interfaces
Disable network protocols (IPv4 and IPv6) that are not necessary for your deployment of SMM
Review the settings in the SMM WebUI, Configuration → Network Configuration, as shown in the figure below.
For more details on configuring the network see:
https://pubs.lenovo.com/mgt_tools_smm2/c_network_configuration.html
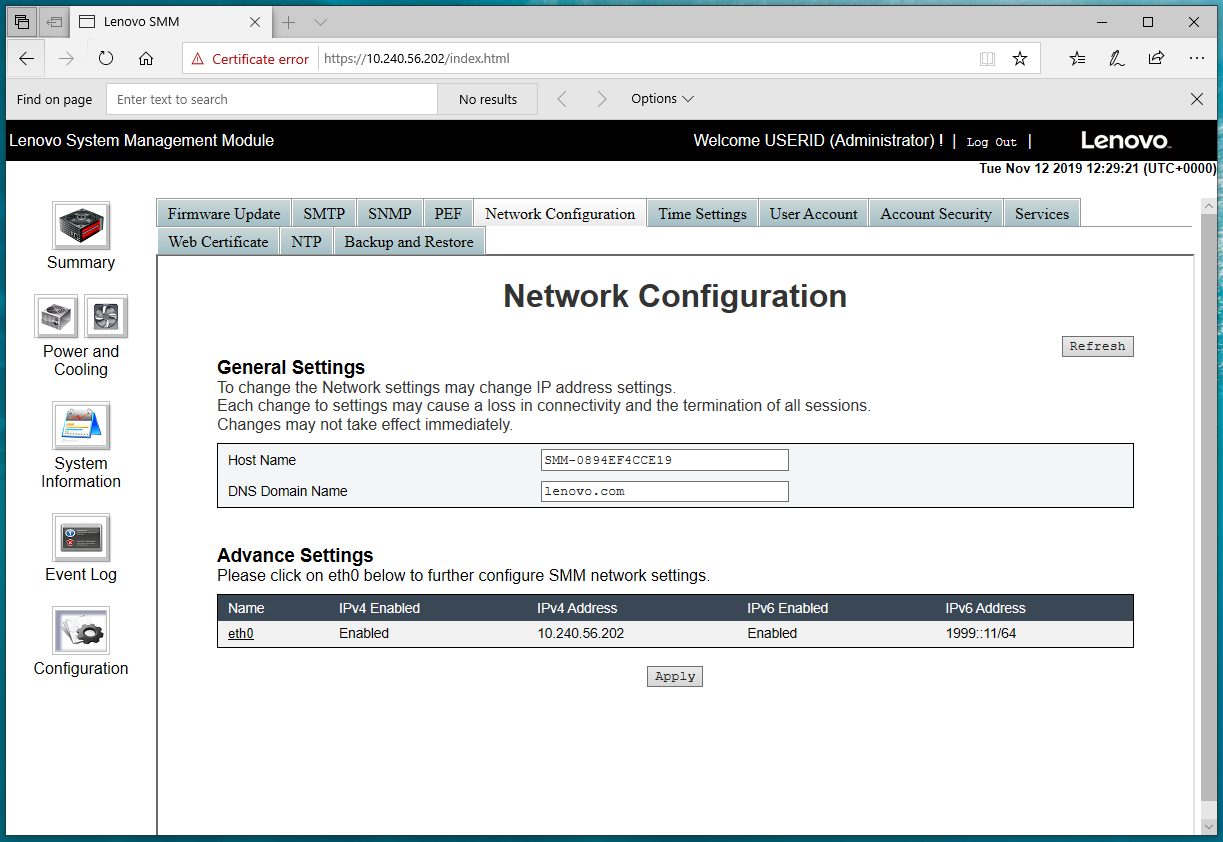
Configure the SMM web certificate
By default, SMM generates its own self-signed certificate that it uses for multiple purposes such as its web server, server certificate. If you wish to reduce the number of untrusted
certificate messages configure SMM to use an externally signed certificate where the CA is trusted by the user’s web browser.
Generate a certificate-signing request and import a server certificate that is signed by a CA trusted by the web browsers in your organization.
Web certificate management in the SMM WebUI is accessed by clicking Configuration → Web Certificate, as shown in the figure below.
For more details on configuring a web certificate see:
https://pubs.lenovo.com/mgt_tools_smm2/t_web_certificate.html
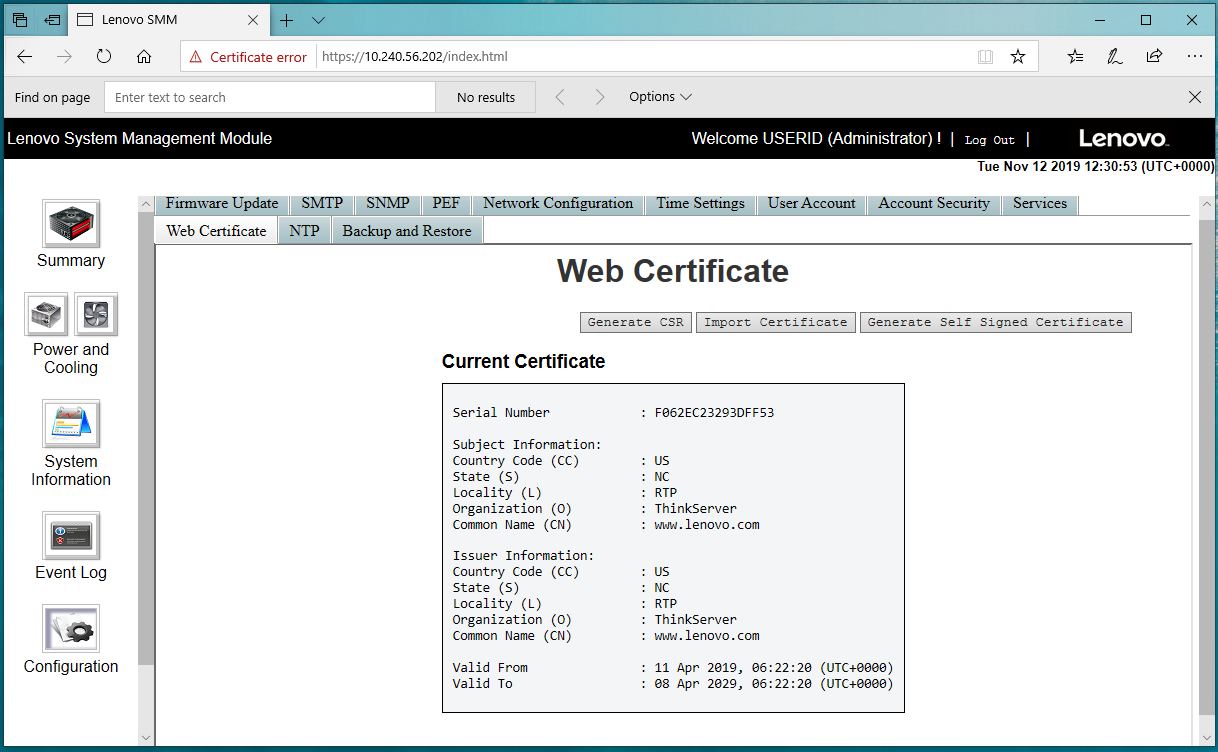
Hardening Fan and Power Controller
The Fan and Power Controller (FPC) is used to monitor and manage a ThinkSystem SD650 and n1200 Enclosure. It is used to obtain reports, manage and configure fan and power, manage the event log, and to backup and restore FPC settings.
This section provides the configuration settings to review and adjust to harden an FPC installation. This section provides instructions for changing settings using the FPC WebUI.
For information about the FPC, see the FPC User’s Guide:
https://pubs.lenovo.com/sd650/r_fpc_users_guide.html
The following topics are covered in this section:
Configure FPC network interfaces
Disable network protocols (IPv4 and IPv6) that are not necessary for your deployment of FPC. Manage protocols in the FPC WebUI by clicking Configuration → Network as shown in the following figure.
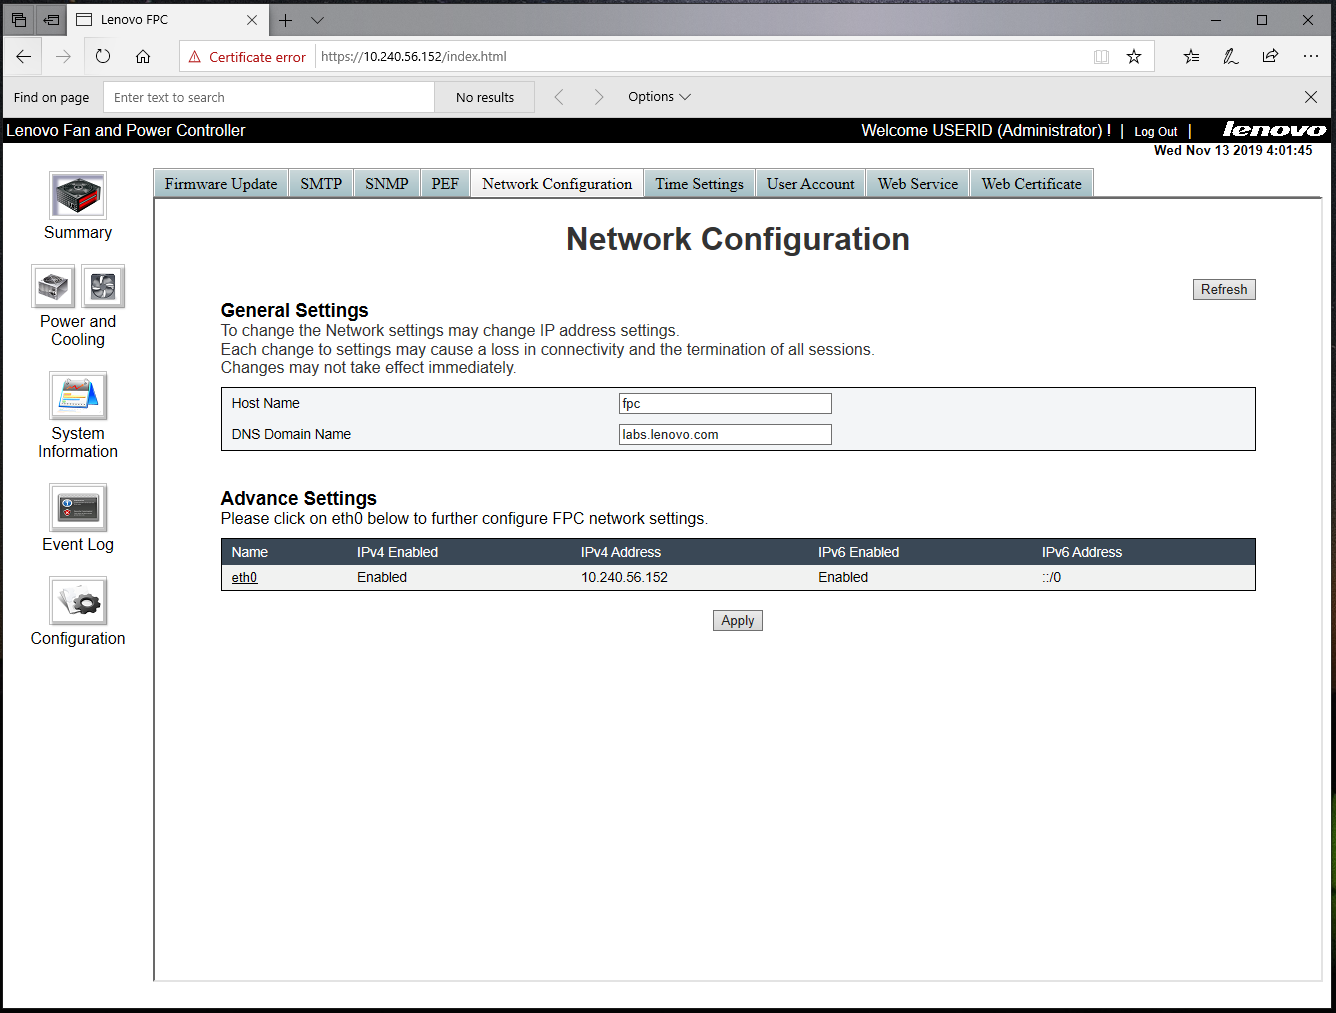
Change the FPC password of the default user account
Change the password of the USERID account from the original value if not required to do so on first login.
User management in the FPC WebUI is at Configuration → User Account.
Enable FPC password policy check
Review and if necessary, enable the Password Policy Check. Enabling this check requires that passwords are at least eight characters and contain a mix of lower-case letters, upper-case letters, numbers and one special character.
Change password policies in the FPC WebUI by clicking Configuration → User Account as shown in following figure.
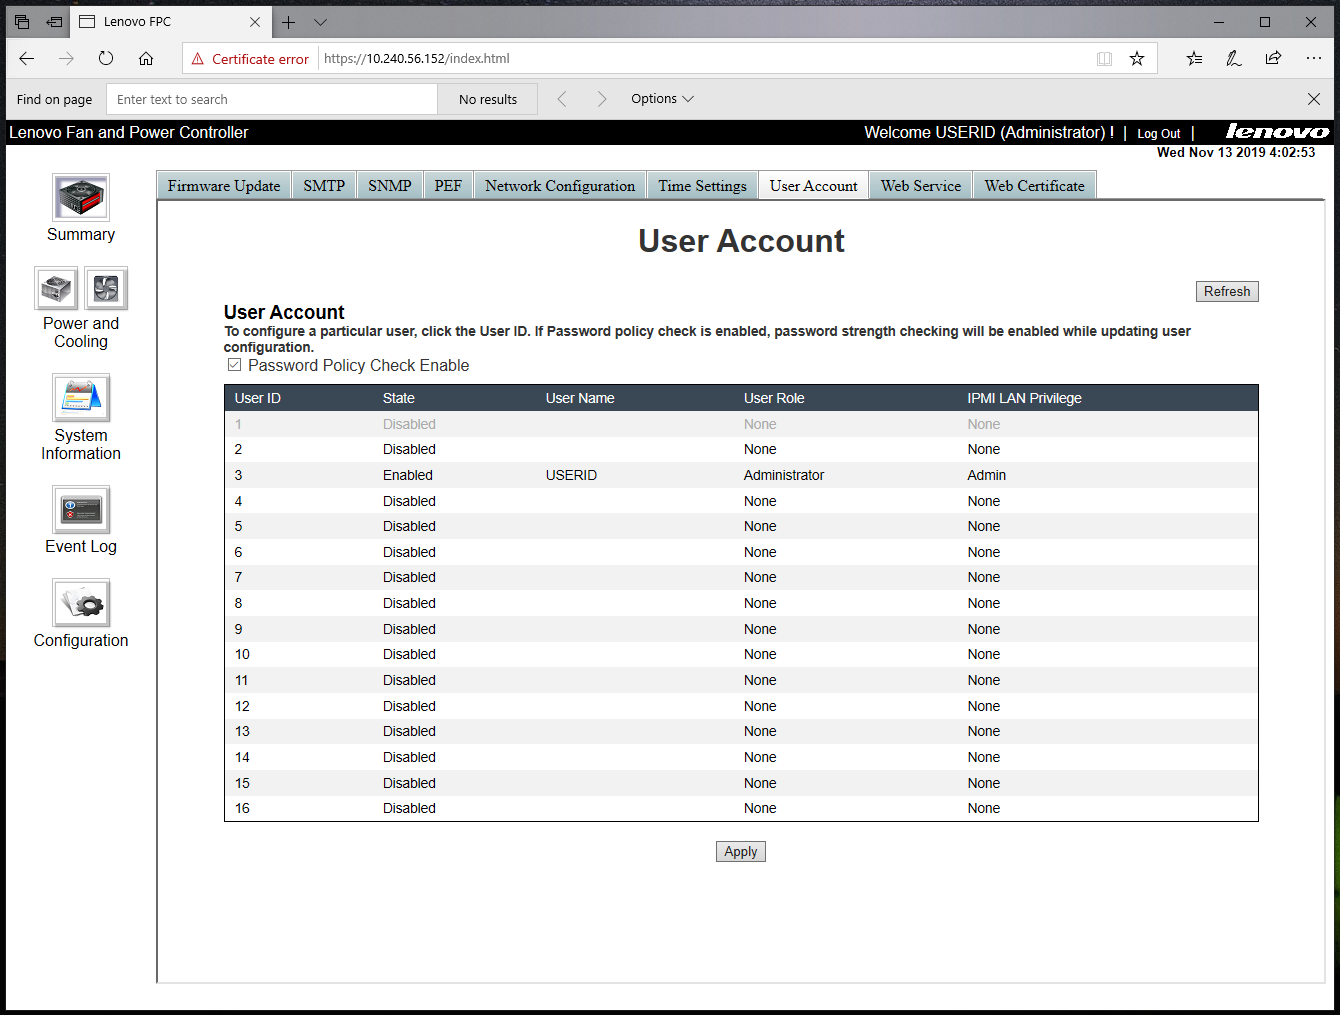
Disable IPMI in the FPC if not Required
IPMI is a service that can be used to configure the system. If you’re not planning to use IPMI then disable it. Click Configuration → Web Service.
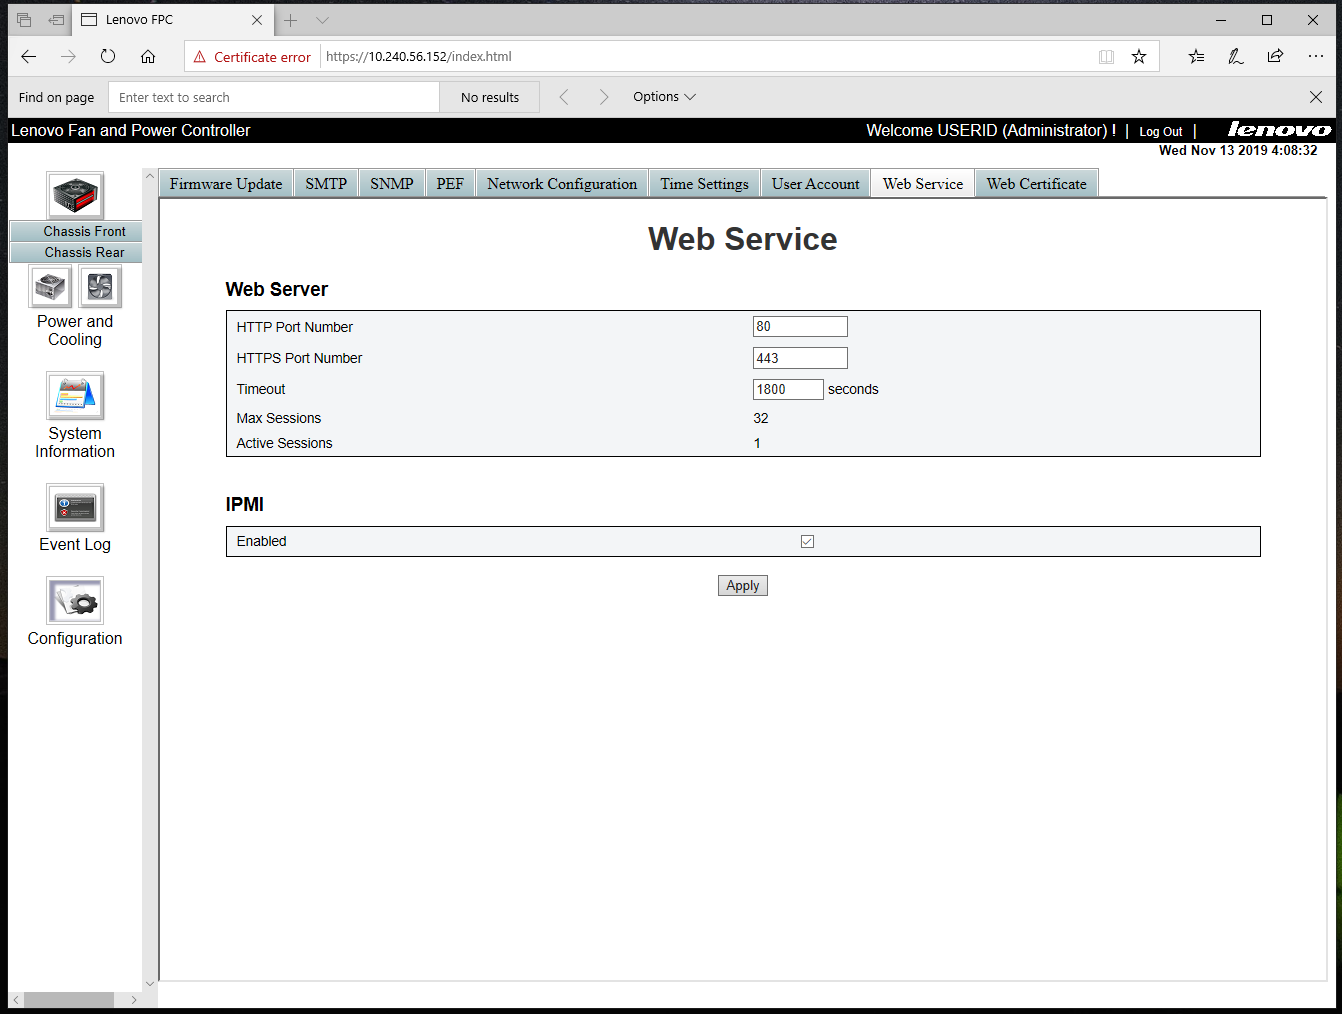
Configure the FPC Web Certificate
By default, FPC generates its own self-signed certificate that it uses for multiple purposes such as its web server, server certificate. If you wish to reduce the number of untrusted certificate messages configure FPC to use an externally signed certificate where the CA is trusted by the user’s web browser.
Generate a certificate-signing request and import a server certificate that is signed by a CA trusted by the web browsers in your organization. Click Configuration → Web Certificate as shown in the following figure.
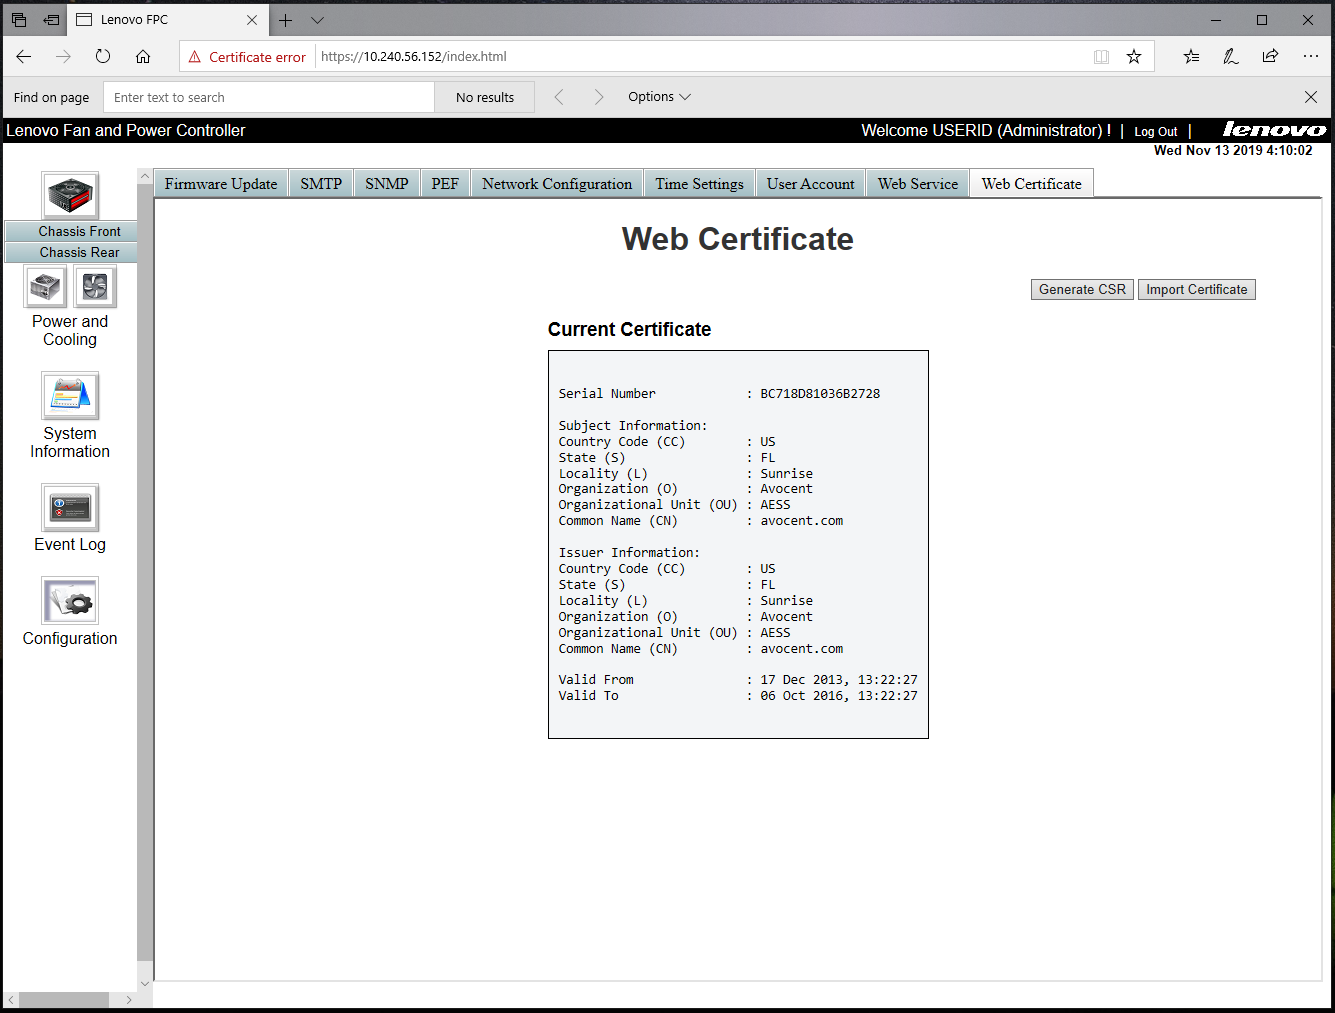
Author
Mike Demeter is a Principal Product Security Architect with the Lenovo Infrastructure Solutions Group’s Product Security Office. His product security background expands over 20 years as a security architect and software engineer. His focus is on ensuring that security is built into data center products throughout the entire secure development lifecycle. He has been the product security architect responsible for the Lenovo ISG ThinkEdge products since their inception.
Thanks to the following people for their contributions to this project:
- Bill Jaeger
- Pierre Mouallem
- Scott Piper
- Jarrod Johnson
Trademarks
Lenovo and the Lenovo logo are trademarks or registered trademarks of Lenovo in the United States, other countries, or both. A current list of Lenovo trademarks is available on the Web at https://www.lenovo.com/us/en/legal/copytrade/.
The following terms are trademarks of Lenovo in the United States, other countries, or both:
Lenovo®
ThinkEdge®
ThinkSystem®
XClarity®
The following terms are trademarks of other companies:
AMD is a trademark of Advanced Micro Devices, Inc.
Intel®, the Intel logo, Intel Optane®, and Xeon® are trademarks of Intel Corporation or its subsidiaries.
Linux® is the trademark of Linus Torvalds in the U.S. and other countries.
Microsoft is a trademark of Microsoft Corporation in the United States, other countries, or both.
IBM® and IBM Security® are trademarks of IBM in the United States, other countries, or both.
Other company, product, or service names may be trademarks or service marks of others.
Configure and Buy
Please select a locale
Full Change History
Changes in the April 16, 2026 update:
- Reformatted the document to be a web page with an available PDF download
- New sections:
- Updated all OneCLI commands to include the syntax needed for ThinkSystem V4 servers
March 22, 2024:
- Added a recommendation about storing your passwords:
- “Set an administrator password” on page 9
- “Set a Power-On Password” on page 10
- “Change the Default Account Username and Password” on page 25
January 12, 2023:
- New commands:
- “Configure the number of Concurrent Logins Per User Account” on page 23
- “Configure Security Mode (V3 Servers and newer)” on page 24
- “Enable and Configure System Guard (V3 Servers and newer)” on page 24
September 21, 2022:
- Added a note regarding the use of VMware ESXi - “Disable IPMI over Keyboard ControllerStyle (KCS) Access” on page 21
May 7, 2022:
- Added “Configure TLS Ciphers” on page 23
- Added “Configure TLS Version Support” on page 23
October 17, 2021
- Added note about 3rd Gen Intel Xeon processors - “Configure the Physical PresencePolicy” on page 4
- Removed IMM.DefPasswordExp command - “Configure Account Security policy to yoursecurity policy” on page 27
May 30, 2021:
- Minor updates
May 25, 2021:
- Minor updates
May 16, 2021:
- Added the following sections:
- “Enable Total Memory Encryption (TME)” on page 11
- “Enable Multi-Key Total Memory Encryption (MKTME)” on page 11
- “Enable Intel Software Guard Extensions (SGX)” on page 12
April 2021:
- Added new section, “Hardening Lenovo XClarity Orchestrator” on page 37
October 21, 2020:
- Minor update to Table 1 on page 17.
May 4, 2020:
- Clarified the sections that do not apply to certain ThinkSystem servers
March 20, 2020:
- Updates to “Enable Execute Disable Bit” on page 10.
January 14, 2020:
- Added a recommendation about password expiration and lockout period settings.
December 3, 2019
- More minor corrections
November 26, 2019
- Minor corrections
First published: November 21, 2019
Course Detail
Employees Only Content
The content in this document with a is only visible to employees who are logged in. Logon using your Lenovo ITcode and password via Lenovo single-signon (SSO).
The author of the document has determined that this content is classified as Lenovo Internal and should not be normally be made available to people who are not employees or contractors. This includes partners, customers, and competitors. The reasons may vary and you should reach out to the authors of the document for clarification, if needed. Be cautious about sharing this content with others as it may contain sensitive information.
Any visitor to the Lenovo Press web site who is not logged on will not be able to see this employee-only content. This content is excluded from search engine indexes and will not appear in any search results.
For all users, including logged-in employees, this employee-only content does not appear in the PDF version of this document.
This functionality is cookie based. The web site will normally remember your login state between browser sessions, however, if you clear cookies at the end of a session or work in an Incognito/Private browser window, then you will need to log in each time.
If you have any questions about this feature of the Lenovo Press web, please email David Watts at dwatts@lenovo.com.


