Author
Published
15 Feb 2024Form Number
LP1891PDF size
19 pages, 1.2 MBAbstract
This article provides instructions for setting up wireless networks on the Linux Operating Systems supported by SE360 V2. This will save your time by eliminating the need to search for separate articles on supported Linux Operating Systems.
Introduction
The ThinkEdge SE360 V2 edge server optionally supports wireless LAN (WLAN) to enable connectivity to Wi-Fi as clients. Red Hat, SUSE, and Ubuntu Enterprise OSes are supported on the ThinkEdge SE360 V2 server. However, the wireless setting guide is in the different Linux OS distribution document. This article consolidates all different Linux OS distribution setting methods and provides the customer with the practice of setting wireless function in all supported Linux OS distributions.

Figure 1. Lenovo ThinkEdge SE360 V2 with wireless LAN functionality
This article contains three sections. The first one introduces the wireless network devices provided by the SE360 V2 system. The second one lists wireless network connection methods used by different Linux OSes. The last one includes all the wireless setting examples of different Linux OSes to enable users to quickly configure wireless network settings.
Prerequisites
Before setting up a wireless network, make sure that the system includes the wireless network module. See the SE360 V2 product guide for detailed information about the server for reference:
https://lenovopress.lenovo.com/lp1677-thinkedge-se360-v2-server
The SE360 V2 WLAN solution is equipped with Intel AX210 module. For Intel AX210 wireless solution, user can refer to Intel website for more information:
https://www.intel.com/content/www/us/en/support/articles/000005511/wireless.html
Before you set up the system, you can refer to the Lenovo OS interoperability guide to get the latest support information:
https://lenovopress.lenovo.com/osig
Firmware settings
Make sure the wireless chip is listed on the system via XCC browser interface, as shown in the following figure.
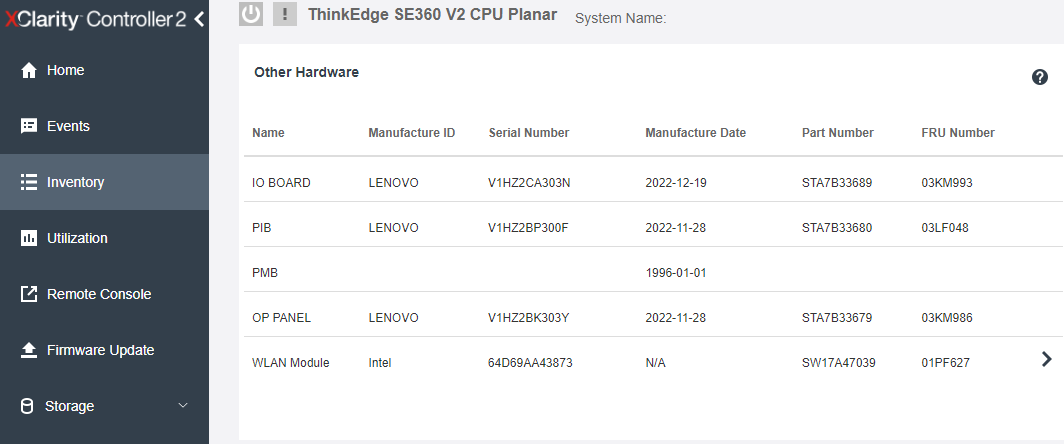
Figure 2. Check wireless device via XCC interface
Refer to the XCC manual for all other XCC configuration details:
https://pubs.lenovo.com/xcc2/iot_servers
OS driver checking
Before you proceed with the wireless connection settings, ensure that the AX210 device is visible in your operating system and that the driver iwlwifi is being used for it.
- Check the device is existed in OS.
# root@se360v2:/home/conie# lspci |grep -i ax210 0000:05:00.0 Network controller: Intel Corporation Wi-Fi 6 AX210/AX211/AX411 160MHz (rev 1a) - Check the driver in use:
root@se360v2:/home/conie# lspci -s 0000:05:00.0 -vvv|grep -i kernel Kernel driver in use: iwlwifi Kernel modules: iwlwifi - Check the device via command “ip a” as shown in the following figure.
root@se360v2:/home/conie# ip a
NetworkManager wireless software
NetworkManager is a software tool that can manage both wired and wireless network interfaces, including Wi-Fi and ethernet. It also provides users with multiple options for manually configuring their network connections, based on their specific requirements. These options include using the graphical interface or the command-line interface.
To use NetworkManager, you need to start it. Currently, most Linux operating systems employ the systemd service to launch NetworkManager. Once NetworkManager is enabled and started, it will also initiate other required services, such as WPA and 802.1x.
Details about NetworkManager in key Linux distributions:
- SUSE
The SLES operating system includes NetworkManager for connecting to wireless networks. You can find more detailed information in the below official documentation:
https://documentation.suse.com/sles/15-SP5/single-html/SLES-gnome-user/index.html#sec-gnomeuser-start-network-connectFor more SUSE NetworkManager information, please also check SUSE document:
https://documentation.suse.com/sles/15-SP5/single-html/SLES-administration/#cha-nm - Red Hat
Red Hat Linux Enterprise Server OS introduces various NetworkManager methods to configure the NetworkManager connection. It includes:
- nmcli: Network configuration via command line
- nmtui: Network configuration via text-based user interface
- nmstatectl: Network configuration via nmstatectl API
- RHEL System Roles: Use RHEL System Roles to automate the configuration of connections on one or multiple hosts.
For details, see the following page:
https://access.redhat.com/documentation/en-us/red_hat_enterprise_linux/9/html-single/configuring_and_managing_networking/index#configuring-an-ethernet-connection_configuring-and-managing-networking - Ubuntu and Debian
Ubuntu document introduces NetworkManager as a tool for wireless configuration. Ubuntu also introduces NetworkManager along with nmcli, for the practice, we will use the nmcli command as the wireless setting example:
https://help.ubuntu.com/community/NetworkManager?action=show&redirect=WifiDocs%2FNetworkManager
Wireless configuration steps for RHEL
To configure wireless on Red Hat, use the following steps. We used RHEL 8.6 and nmcli in our lab.
- Check the wireless device by running the 'lspci' command and make sure the wireless device is displayed in OS.
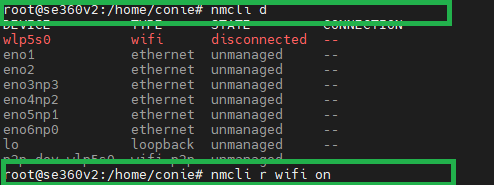
- Enable Wi-Fi function and list Wi-Fi access point.
[root@localhost ~]# nmcli r wifi on
[root@localhost ~]# nmcli d wifi list
Figure 5. Check network device, turn on the wireless radio, and list all access point - Connect to AP and check the connectivity.
[root@localhost ~]# nmcli d wifi connect lenovo-internet password [password]
[root@localhost ~]# ip a
Figure 6. Connect to lenovo-internet AP
Figure 7. Check the wireless, such as wlan0,by command “ip a” - Disable all wired network and only leave wireless network, and then check again the connection by ping command.
- If there is not any requirement to use Wi-Fi function, we can disable the wireless connection.
#nmcli r wifi off
Wireless configuration steps for SLES
In the SLES OS document, it suggests using NetworkManager applet to configure the wireless connection. To set up the wireless connection, follow the steps below:
- Install the NetworkManager
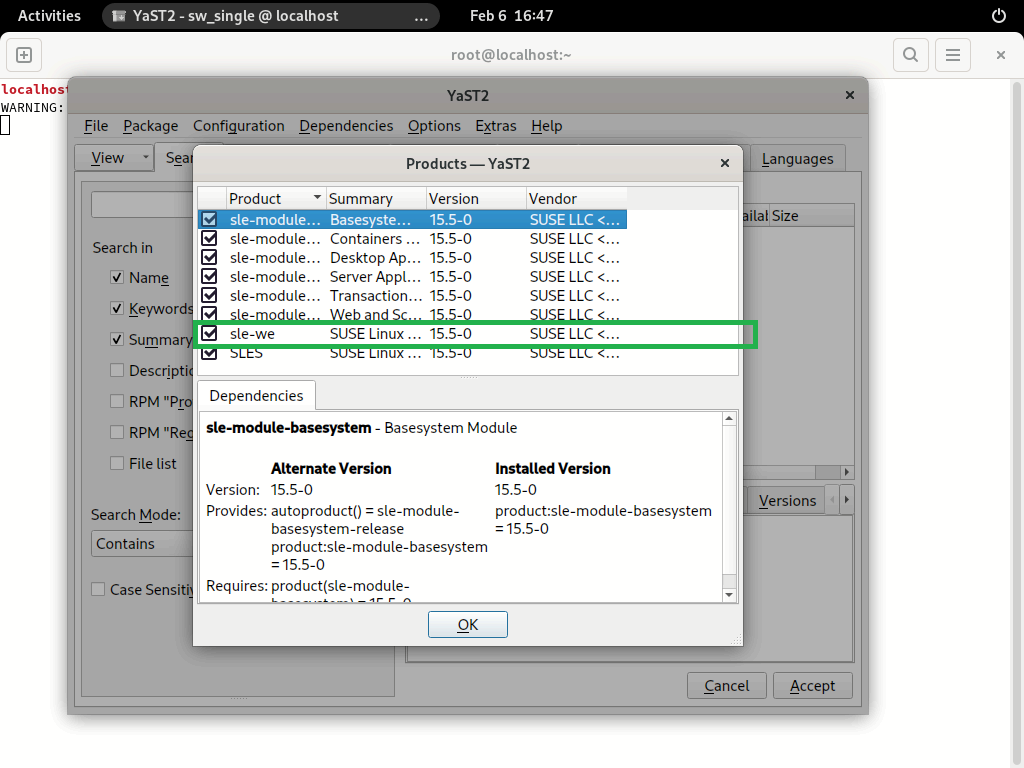
When installing the SLES OS, such as SLES15 SP5, ensure that NetworkManager is included in the OS's installation list before proceeding with the installation. Make sure to check if the SUSE Enterprise Workstation Extension is listed in the software. If it's not listed, add it to the installation list.
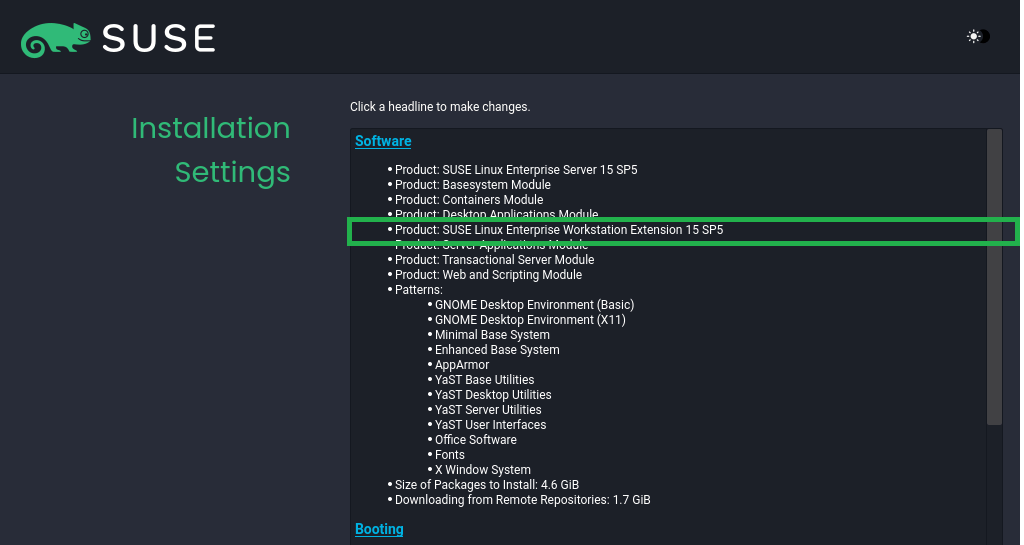
Figure 9. SUSE Enterprise Workstation Extension listed in SoftwareMake sure the NetworkManager software is in the Software Selection and System Tasks list.
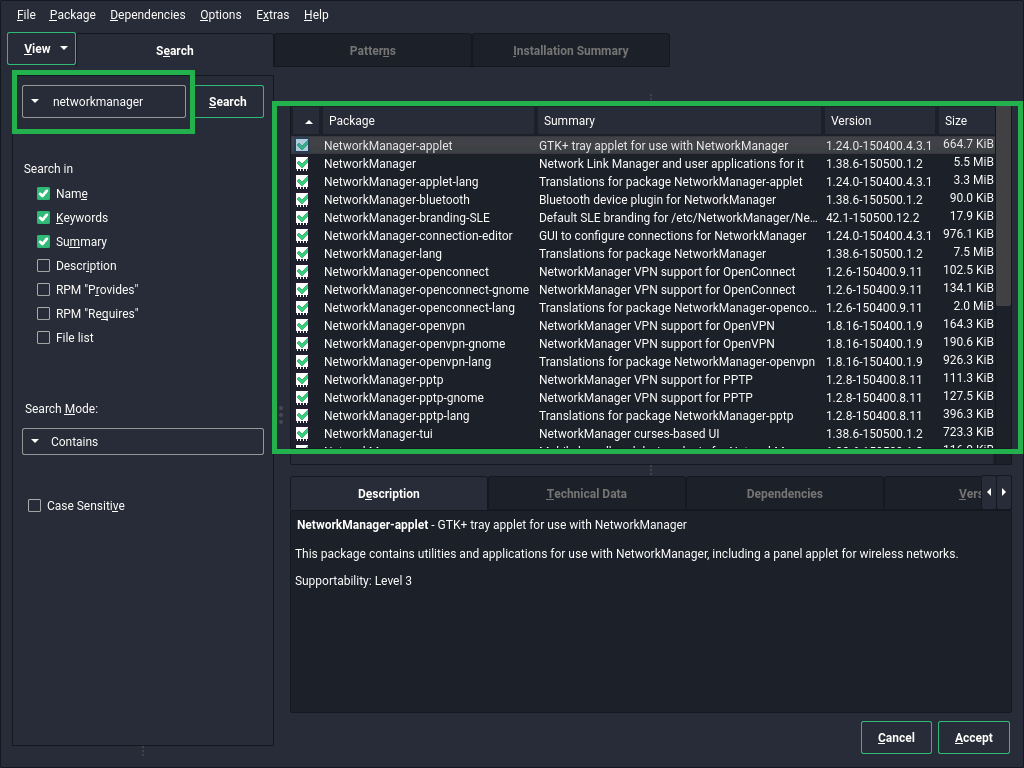
Figure 10. NetworkManager in the Software Selection and System Tasks listIf SLES OS is installed, but NetworkManager software is not installed yet:
- Install NetworkManager and make sure the NetworkManager installed in OS using SUSE yast2 tool.
#yast2 sw_single - Locate the SLES-workstation repository as shown in the figure below. Follow the instructions in the SLES network document to install NetworkManager. Refer to preceding figure for an example.
- Install NetworkManager and make sure the NetworkManager installed in OS using SUSE yast2 tool.
- After completing NetworkManager installation, configure wireless setting of NetworkManager
- Open the network setting via yast2 tool and make sure NetworkManager is being used.
#yast2 lan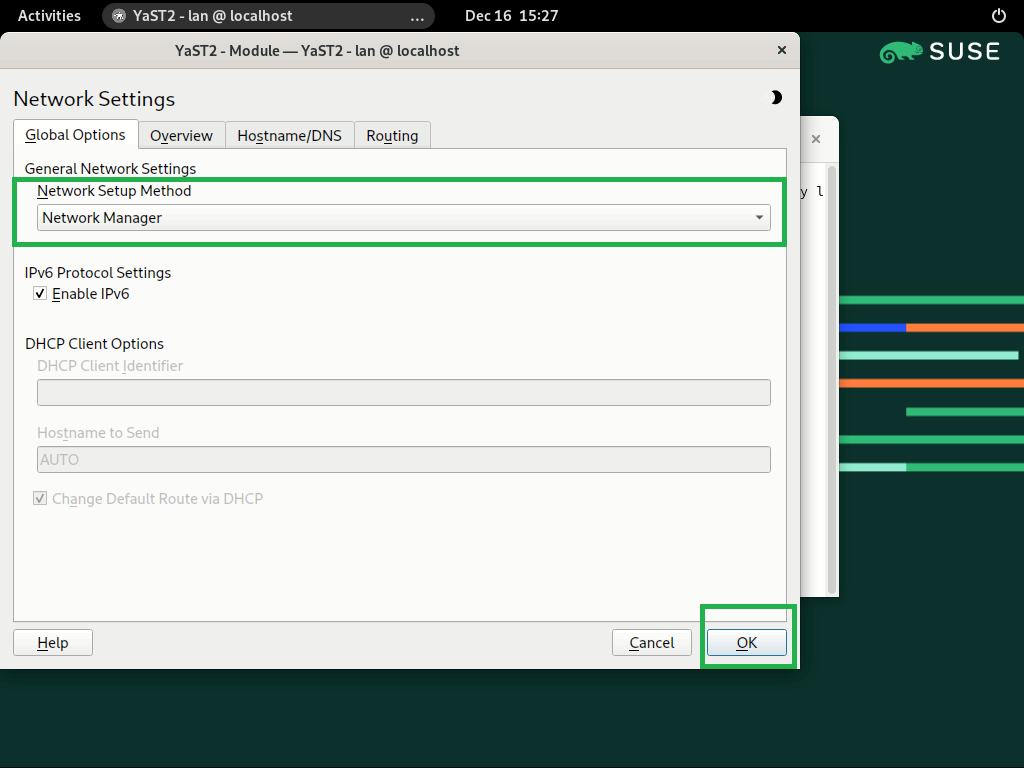
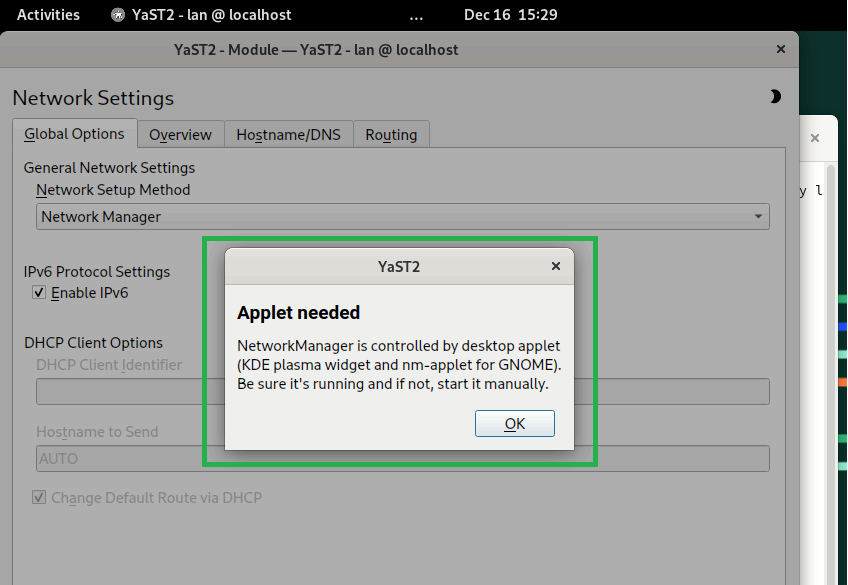
Figure 12. Check the NetworkManager is being used via yast2 lan - The warning message appears. And then press “ok” to close the dialog.
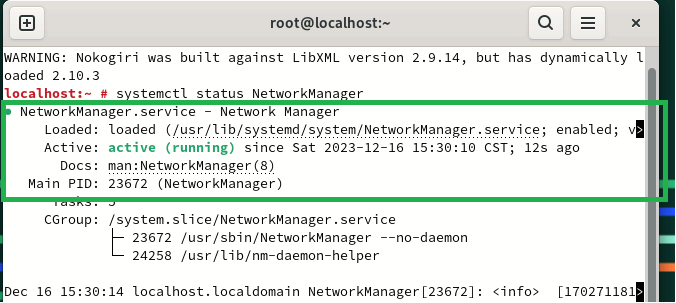
- Open one terminal and make sure the NetworkManager is working by systemctl command.
- Use the yast2 tool to select network configuration and ensure that the Wi-Fi device is listed in the Overview section. Then, follow the yast2 tool's suggestion to use NetworkManager for wireless configuration and close the yast2 tool.

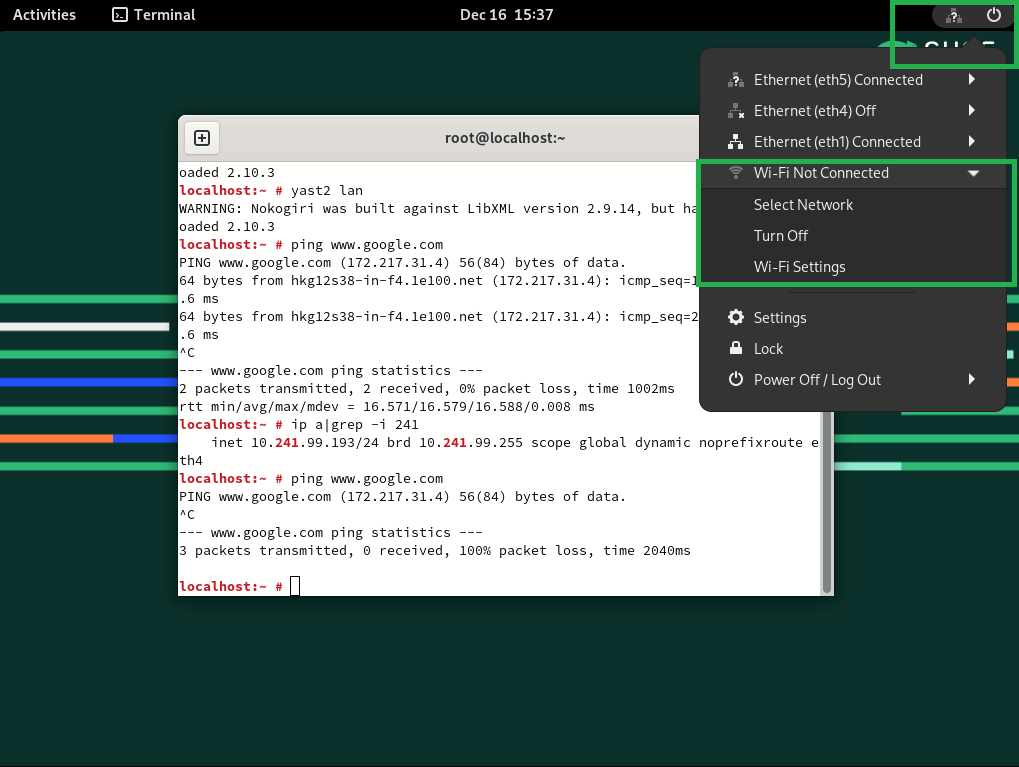
Figure 15. Confirm the Wi-Fi device is listed in Overview listed - As shown in the figure below, click on the “Network Connection” button in the upper right corner, and select the “Select Network” option from the 'Wi-Fi Not Connected' menu.
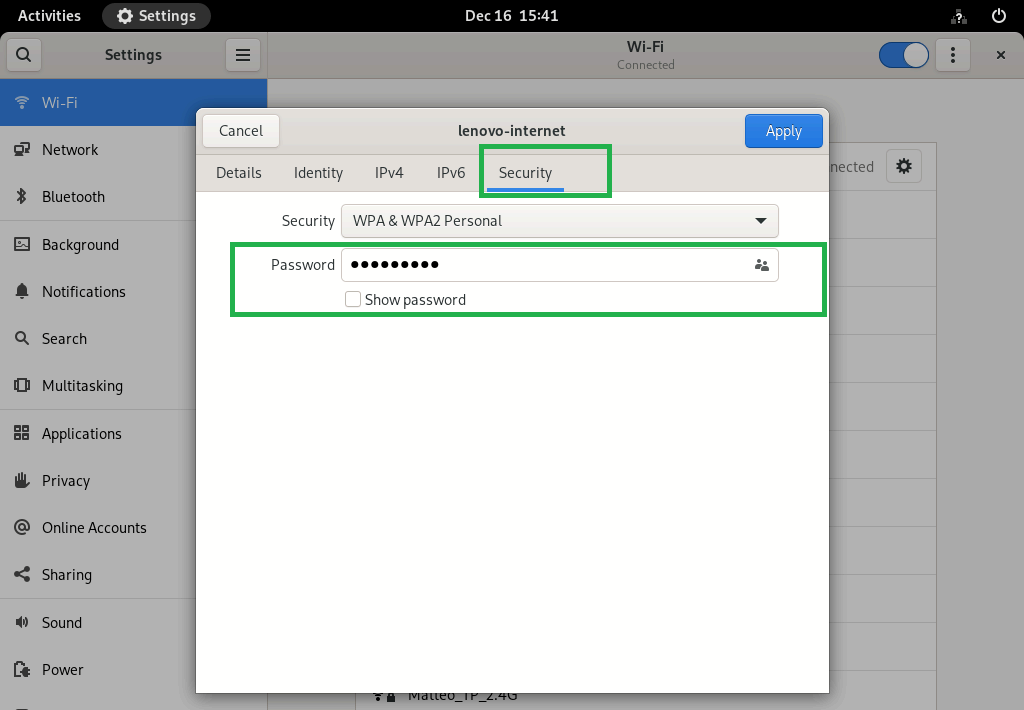
- Go to the “Wi-Fi Settings” and choose the appropriate AP/Security method to connect and then enter the password.
- Open the network setting via yast2 tool and make sure NetworkManager is being used.
- After completing the wireless configuration, open one terminal to double check if the connection works by command ping.
#ip a |grep wlan
#ping www.google.com
Wireless configuration steps for other Linux
For other Linux distributions, we use Ubuntu 22.04 LTS as our example.
root@hakuba:~# uname -mrs
root@hakuba:~# cat /etc/os-release

Figure 19. OS information checking
To configure wireless, perform these steps:
- Check and install NetworkManager tool, such as network-manager.
root@se360v2:~# apt-cache search network-manager root@se360v2:~# apt install -y network-manager - First, determine the name of the Wi-Fi interface:
root@se360v2:~# nmcli d - Make sure the Wi-Fi radio is on (which is its default state):
root@se360v2:~# nmcli r wifi on - Then, list the available Wi-Fi networks:
root@se360v2:~# nmcli d wifi list - Connect the access point “lenovo-internet” (you might access the available access point in your wireless network) with the following command:
root@se360v2:~# nmcli d wifi connect [SSID] password [password] - Close all wired network, and then use the command “ping” to double confirm the wireless client network connection.
root@se360v2:~# ping www.google.com
Author
Conie Chang is a Linux Engineer in the Lenovo Infrastructure Solutions Group, based in Taipei, Taiwan. She has experience in Red Hat and SUSE Linux OS.
Thanks to the following people for their assistance:
- Adrian Huang, Senior Linux Kernel Engineer
- David Watts, Lenovo Press
Trademarks
Lenovo and the Lenovo logo are trademarks or registered trademarks of Lenovo in the United States, other countries, or both. A current list of Lenovo trademarks is available on the Web at https://www.lenovo.com/us/en/legal/copytrade/.
The following terms are trademarks of Lenovo in the United States, other countries, or both:
Lenovo®
ThinkEdge®
The following terms are trademarks of other companies:
Intel®, the Intel logo is a trademark of Intel Corporation or its subsidiaries.
Linux® is the trademark of Linus Torvalds in the U.S. and other countries.
Other company, product, or service names may be trademarks or service marks of others.
Configure and Buy
Full Change History
Course Detail
Employees Only Content
The content in this document with a is only visible to employees who are logged in. Logon using your Lenovo ITcode and password via Lenovo single-signon (SSO).
The author of the document has determined that this content is classified as Lenovo Internal and should not be normally be made available to people who are not employees or contractors. This includes partners, customers, and competitors. The reasons may vary and you should reach out to the authors of the document for clarification, if needed. Be cautious about sharing this content with others as it may contain sensitive information.
Any visitor to the Lenovo Press web site who is not logged on will not be able to see this employee-only content. This content is excluded from search engine indexes and will not appear in any search results.
For all users, including logged-in employees, this employee-only content does not appear in the PDF version of this document.
This functionality is cookie based. The web site will normally remember your login state between browser sessions, however, if you clear cookies at the end of a session or work in an Incognito/Private browser window, then you will need to log in each time.
If you have any questions about this feature of the Lenovo Press web, please email David Watts at dwatts@lenovo.com.


