

Top
Author
Published
14 Apr 2025Form Number
LP2202PDF size
29 pages, 4.7 MBSubscribed to LP2202.
Thank you for your feedback.
Abstract
Dev Drive is a storage volume that aims to enhance the performance of crucial developer workloads. Dev Drive uses ReFS technology and incorporates specific file system optimizations to offer greater control over storage volume settings and security. Administrators can now designate trust, configure antivirus settings, and exercise administrative control over the attached filters. With Dev Drive, you can create a separate volume on your server that will improve performance for disk-bound operations, such as cloning, building, copying files, and package restore.
This paper provides an introduction to Dev Drive and shows how to manually configure it on Windows Server 2025. It is aimed at Windows administrators or software developers interested in leveraging Dev Drive to improve the storage performance and security on ThinkSystem servers.
Introduction
Dev Drive is a new form of storage volume to improve performance for key developer workloads.
Dev Drive builds on ReFS technology to employ targeted file system optimizations and provide more control over storage volume settings and security, including trust designation, antivirus configuration, and administrative control over what filters are attached.
The Resilient File System (ReFS) is Microsoft's newest file system, designed to maximize data availability, scale efficiently to large data sets across diverse workloads, and provide data integrity with resiliency to corruption. It seeks to address an expanding set of storage scenarios and establish a foundation for future innovations. For more details about ReFS, see: Resilient File System (ReFS) overview
The Dev Drive utilizes ReFS, enabling you to initialize a storage volume specifically for development workloads, providing faster performance and customizable settings optimized for development scenarios. ReFS contains several file system specific optimizations to improve the performance of key developer scenarios.
The Dev Drive is intended for:
- Source code repositories and project files
- Package caches
- Build output and intermediate files
With Dev Drive, you can create one or more separate volumes on your server that will improve performance for disk-bound operations, such as cloning, building, copying files, and package restore. Microsoft measured average improvements in these operations around 25%. The Dev drive has good isolation, meaning that each Dev Drive can be used for a specific software development project, allowing you to delete it at the end of development without affecting your system disk.
For more information, see the Microsoft developer blog post: Dev Drive for Performance Improvements in Visual Studio and Dev Boxes
Dev Drive is supported on all ThinkSystem servers running Windows Server 2025.
Prerequisites
Before setting up a Dev Drive, ensure that the prerequisites are met:
- Windows Server 2025 Build #10.0.26100 or later
- Recommend 16 GB memory (minimum of 8 GB)
- Minimum 50 GB free disk space
- Local administrator permissions
When updating to the latest Windows Server 2025 release, you may need an additional reboot before the Dev Drive feature becomes available. If you are working in a business enterprise environment, your security administrator will need to configure the Dev Drive security policy to enable Dev Drive.
Setting up a Dev Drive
To set up a new Dev Drive, follow the steps below.
- Open Windows Settings and navigate to System > Storage.

Figure 1. Open Windows Settings and navigate to System > Storage - Navigate to Advanced storage settings, click on it and find Disks & volumes in the extension options.
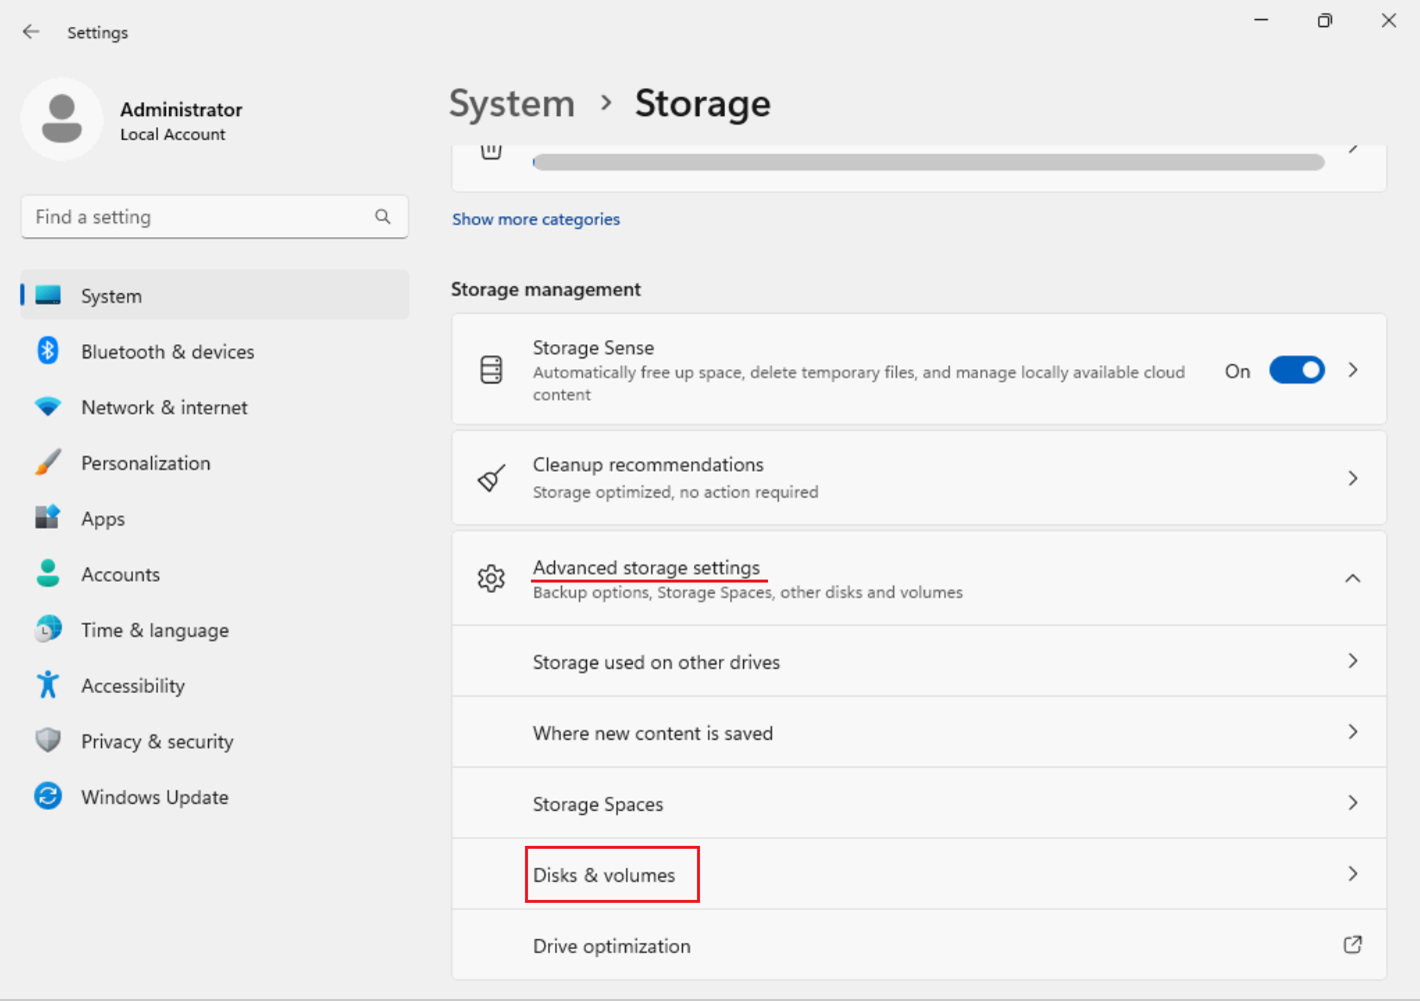
Figure 2. Navigate to Advanced Storage Settings, find Disks & volumes - Navigate to Disks & volumes. Select Create Dev Drive. Existing storage volumes cannot be converted to be a Dev Drive. The Dev Drive designation happens only at the original format time.
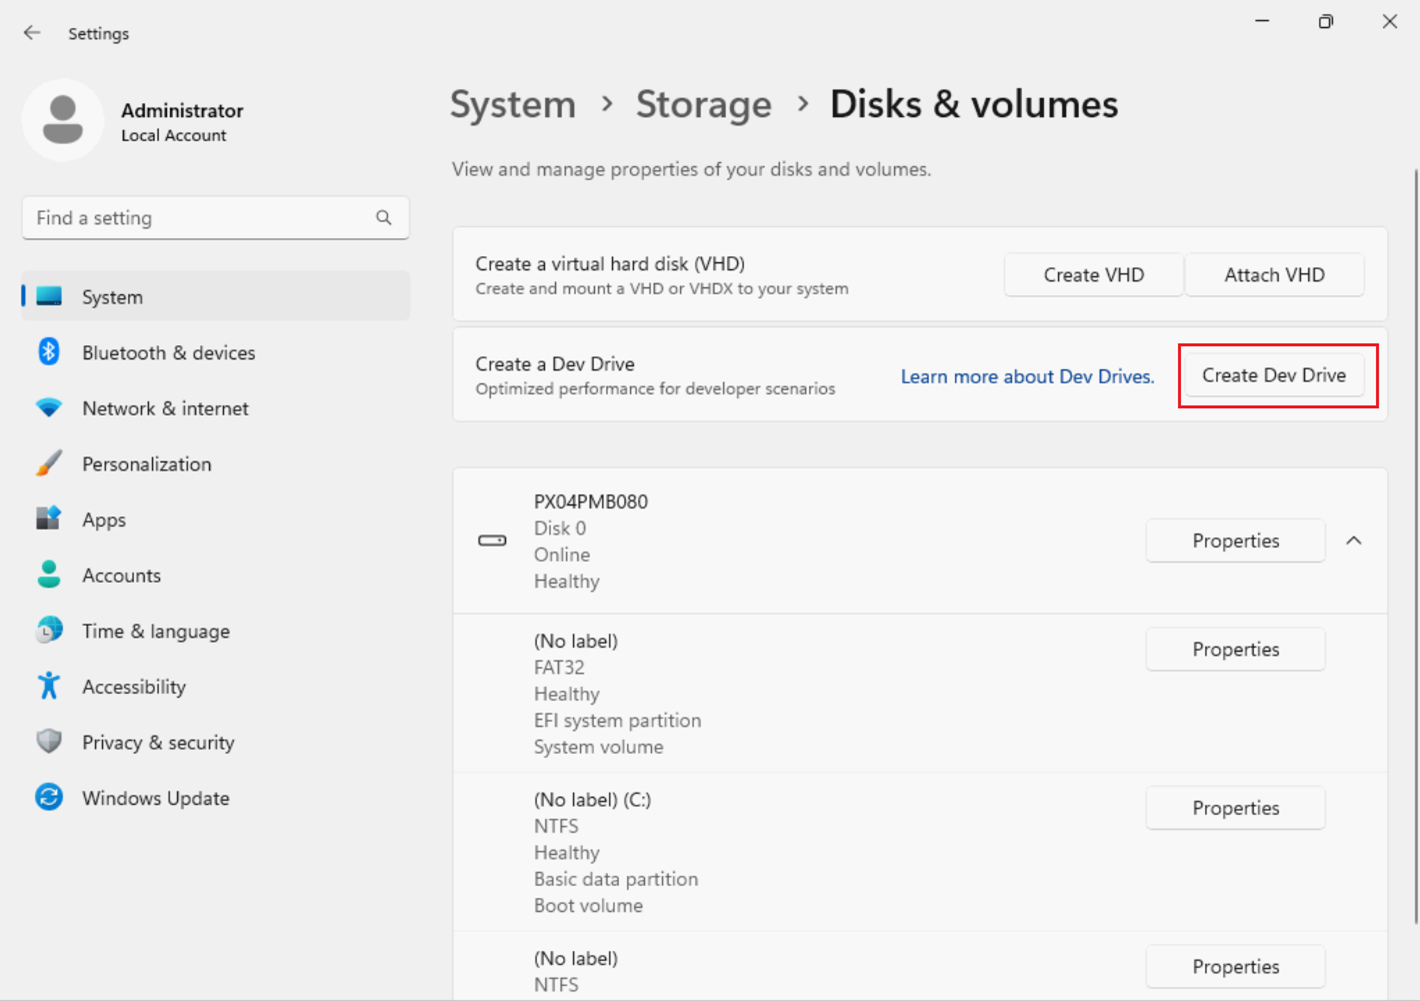
Figure 3. Navigate to Disks & volumes. Select Create Dev Drive - You will be given three options; these are described in the headings below:
- Create a new VHD - Build volume on a new virtual hard disk.
- Resize an existing volume - Create new unallocated space to build on.
- Unallocated space on disk - Use the unallocated space on an existing disk. (This option will only display if you have previously set up the unallocated space in your storage.)
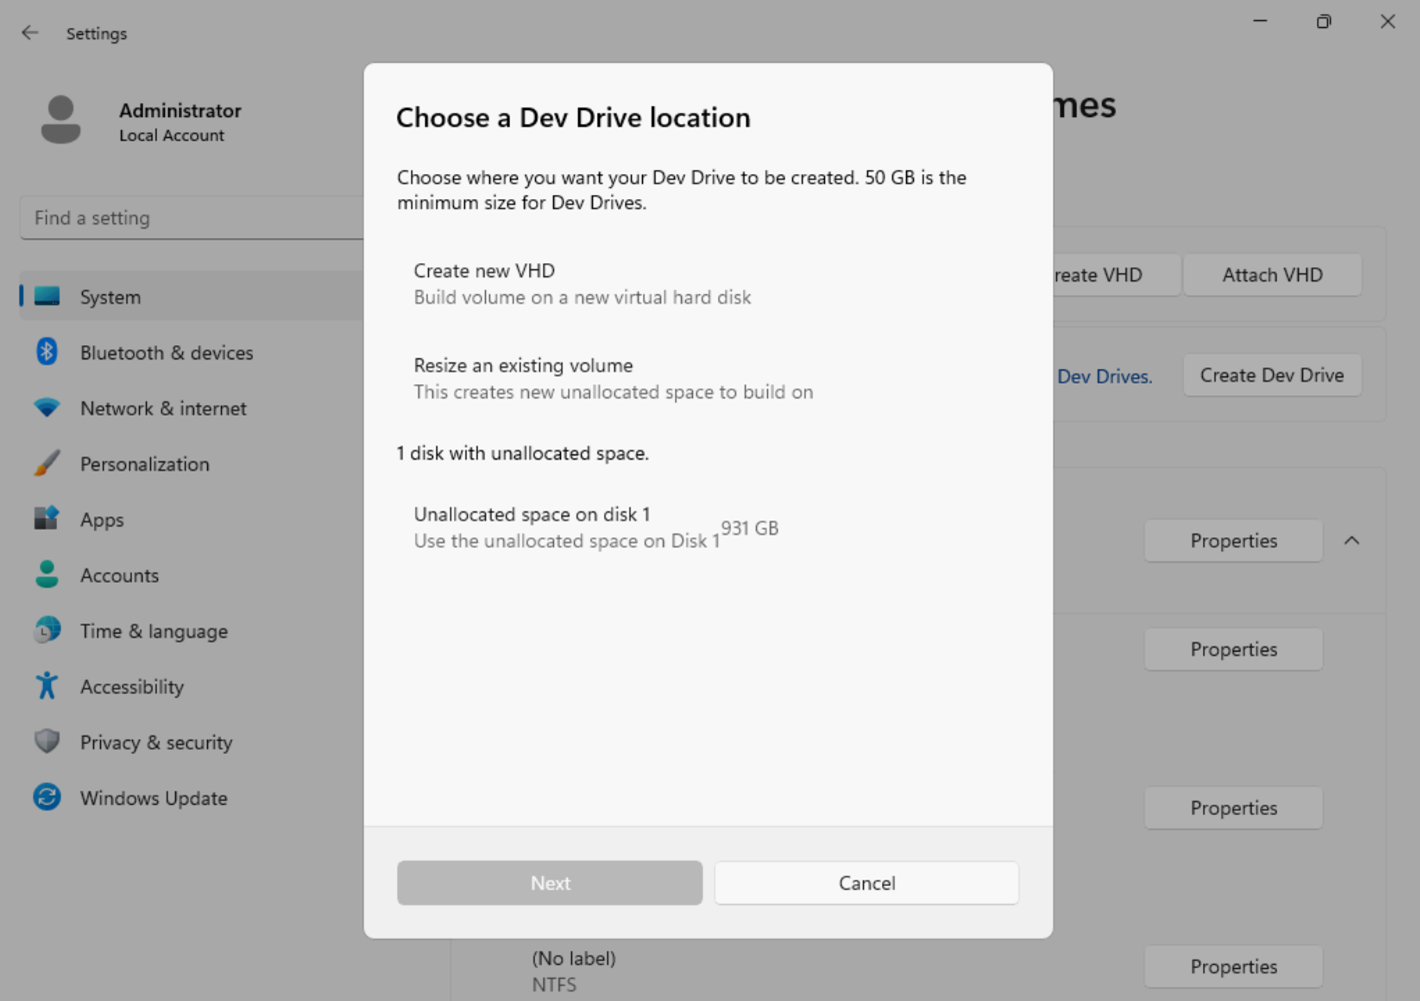
Figure 4. Choose a Dev Drive locationIn the headings below:
How to choose between using a disk partition or VHD
There are considerations when deciding whether to create a disk partition or create a new VHD to store your Dev Drive.
- Create a disk partition: Storing your Dev Drive on a disk partition will generally offer faster performance because it directly uses the physical disk without any additional layers. The trade-offs are that using a partitioned disk will be less flexible since resizing partitions can be more complex and riskier, and less portable since the partition is tied to the physical disk.
- Create a new VHD: Storing your Dev Drive in a Virtual Hard Disk (VHD) may have slightly lower performance due to the overhead of managing the virtual disk layer. The trade-offs are that VHDs offer more flexibility for dynamic resizing (if you need to manage disk space efficiently), moving, or backing up data. VHDs are also highly portable, allowing the VHD file to be transferred to another machine or backup location. However, remember that when a VHD is hosted on a fixed disk (HDD or SSD), it is not recommended to copy the VHD, move it to a different machine, and continue using it as a Dev Drive.
Option 1: Creating a new VHD
To create a VHD, do the following
- Select Create new VHD, click Next to set up a Dev Drive.
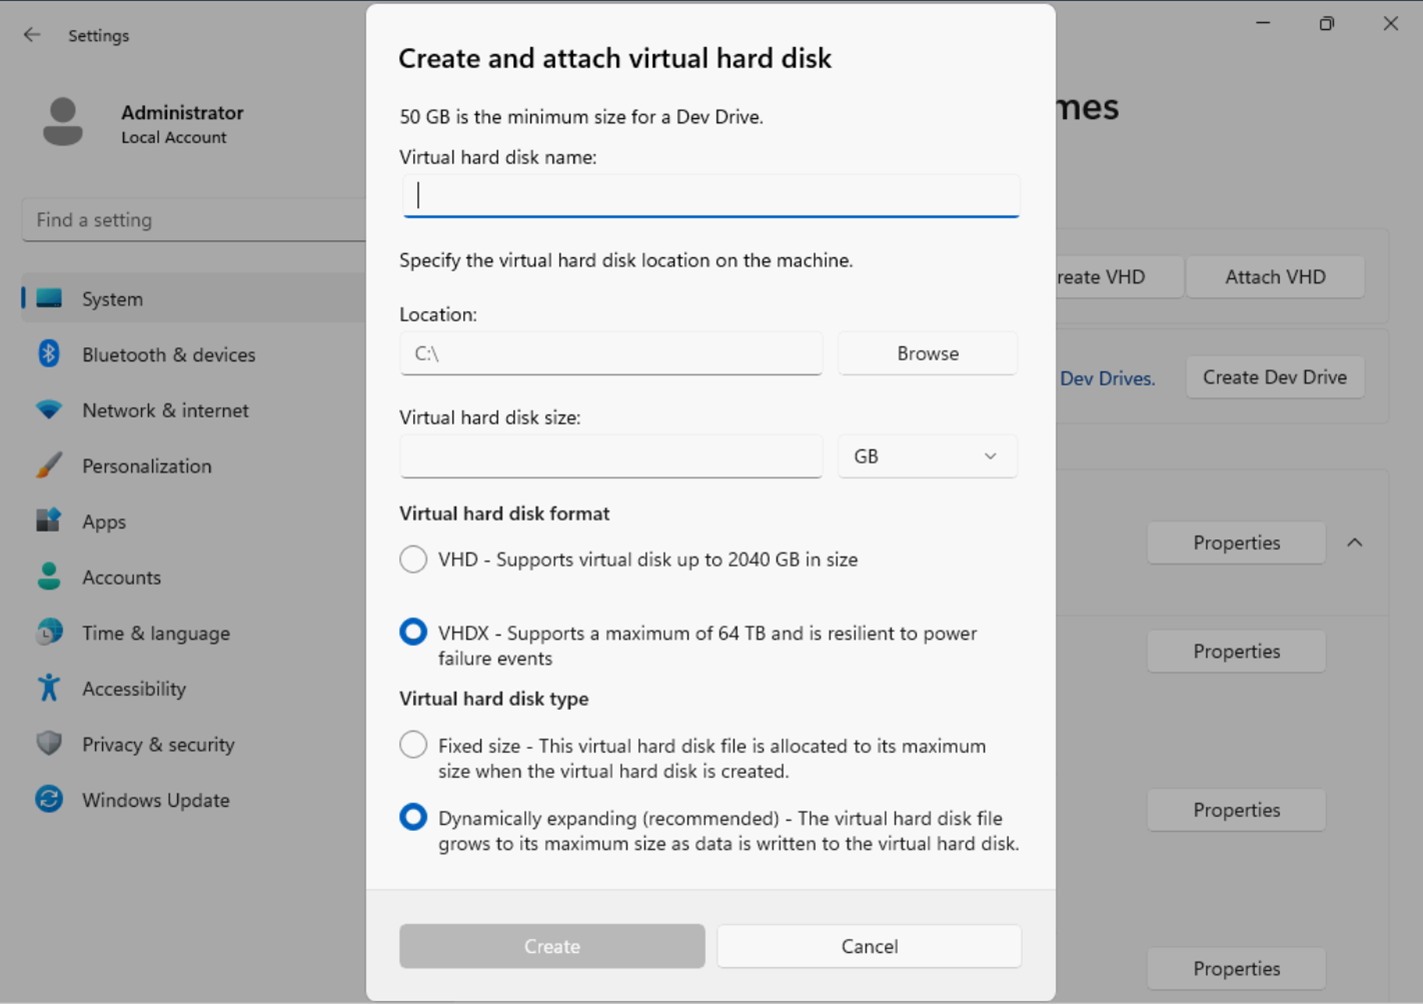
Figure 5. Create and attach virtual hard disk - Specify the following:
- Virtual hard disk name: Give a name to your VHD (Dev Drive).
- Location: Assign a directory path where the Dev Drive VHD will be located on your machine. The default location is C:\, unless you are creating a Dev Drive using Dev Home, in which case the default location is %userprofile%\DevDrives. We recommend using a per-user directory path location to store your Dev Drive to avoid any unintentional sharing.
- Virtual hard disk size: Assign the amount of disk space that will be allocated for the volume to use; the minimum size is 50
- Virtual hard disk format:
- VHD: Supports virtual disks up to 2040 GB in size.
- VHDX (Recommended): Supports a maximum of 64 TB and offers more resilient protection against unexpected IO failure caused by issues like power outage. Learn more about Managing VHDs.
- Disk type:
- Fixed size – This virtual hard disk file is allocated to the maximum size when created.
- Dynamically expanding – The virtual hard disk file grows to its maximum size as data is written to the disk. (Recommended)
Once you complete the process of selecting between these options, your Dev Drive is ready to be created.
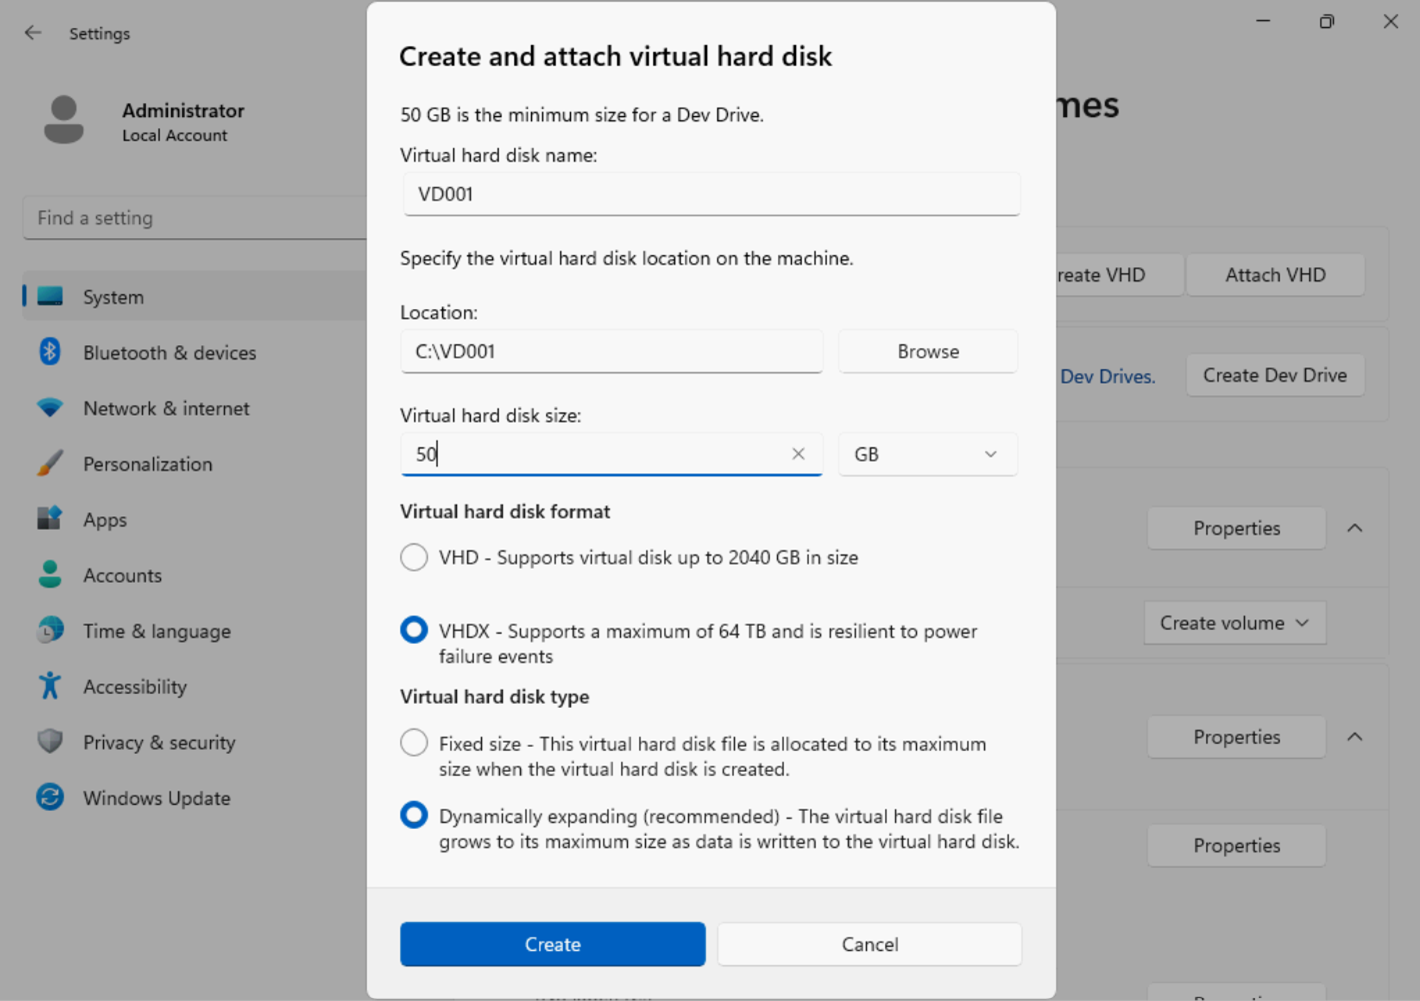
Figure 6. An example of parameter set for creating VHD - Click Create, the screen shows Initialize Disk. You can choose either GPT or MBR for this disk.

Figure 7. Choose the partition style to initialize disk - Click Initialize. You can set the label of the new Dev Drive and format it.
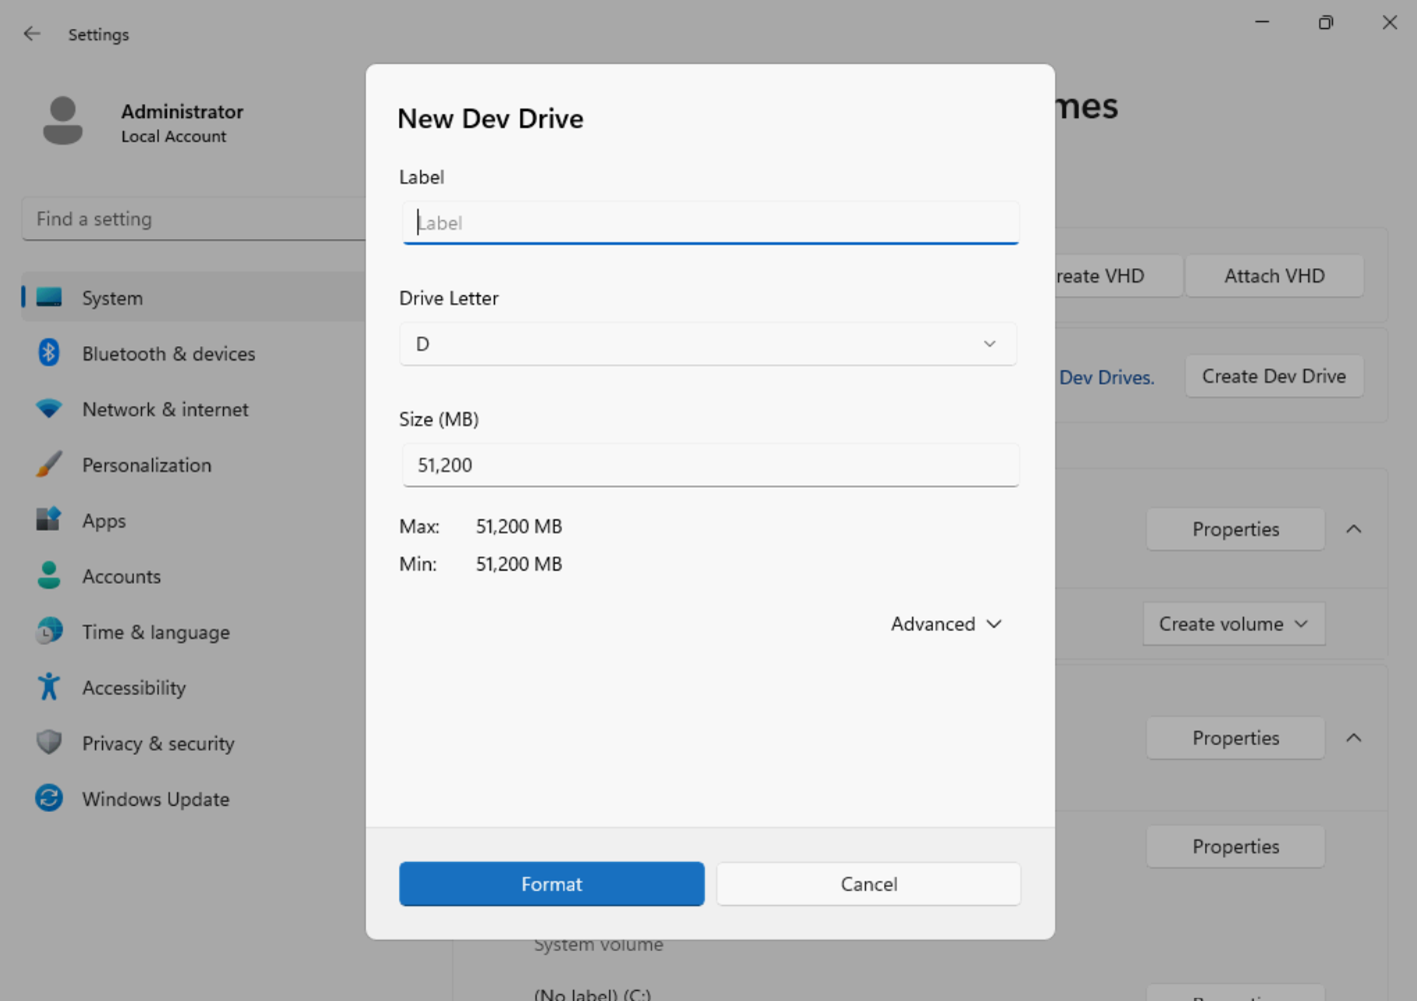
Figure 8. Set label of new Dev Drive - Click Format. The Dev Drive completes format quickly, and it returns to the Disk & volumes page, where you can scroll down to find the Dev Drive you created.
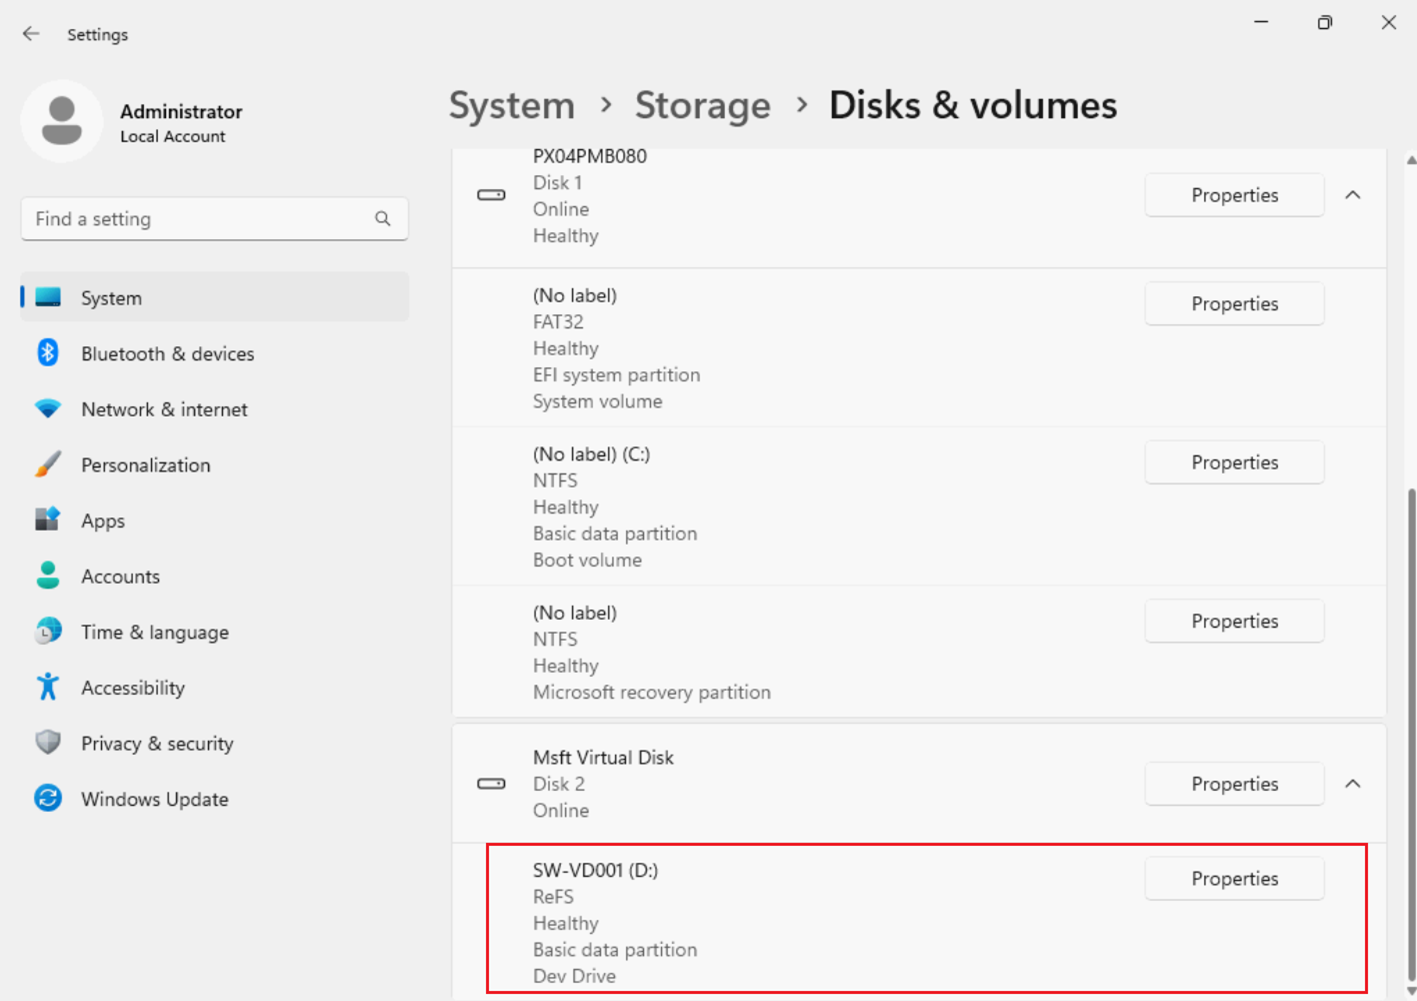
Figure 9. The Dev Drive has been created - Select Properties next to the Dev Drive storage volume that you created. In the drive’s properties, you will find the options to configure the volume.
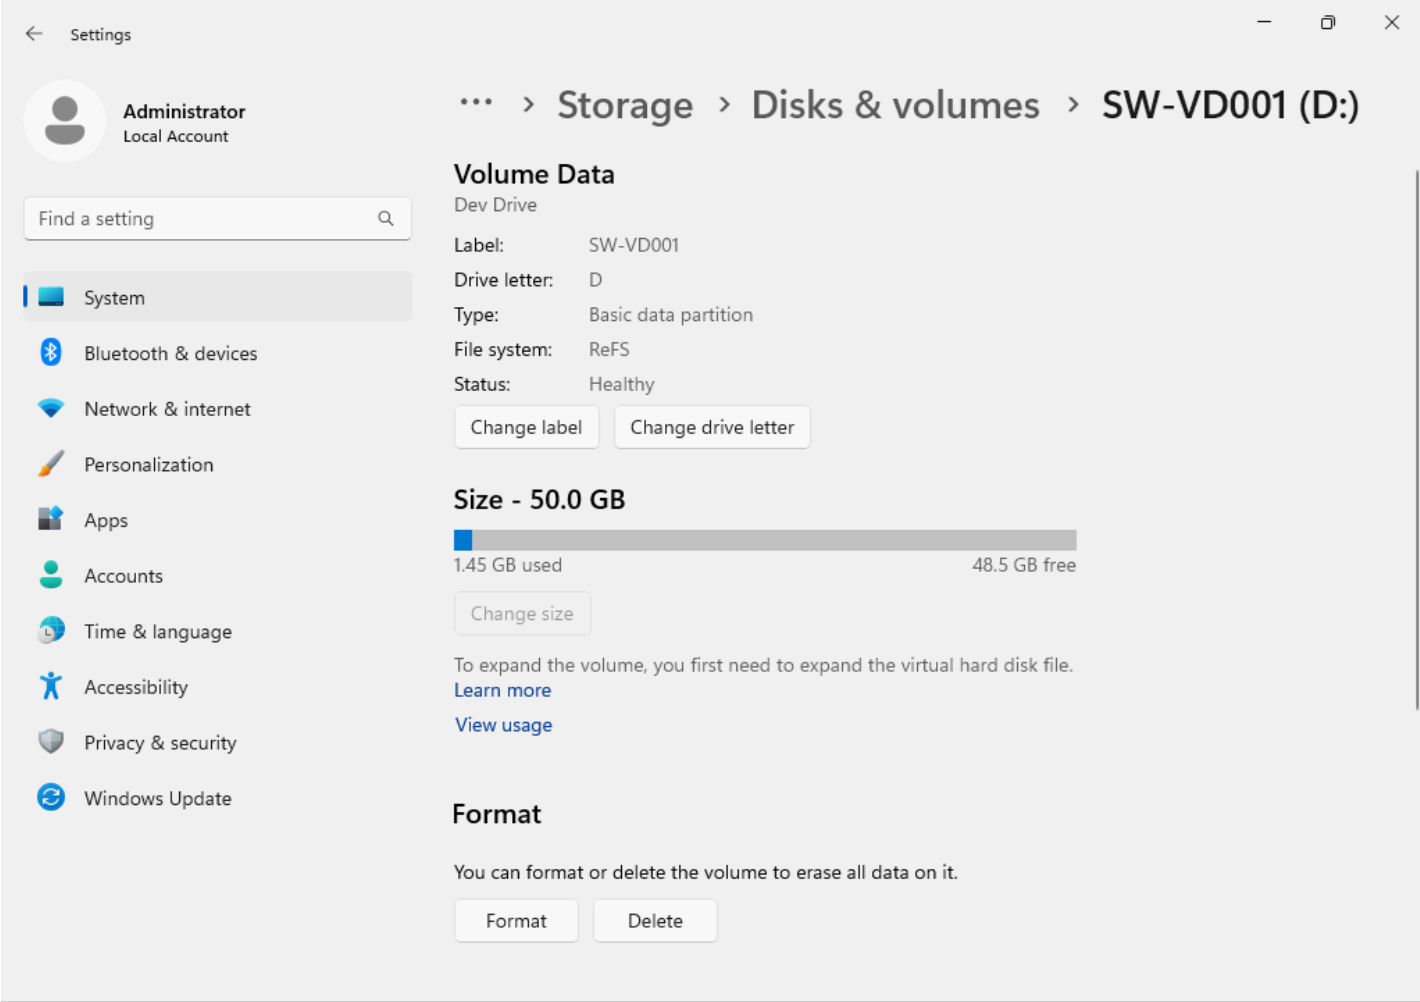
Figure 10. The properties page of Dev Drive -
The Dev Driver is now created and formatted by default. If you want to change the default format settings, you can click Format to reconfigure the Label and Allocation Unit Size.
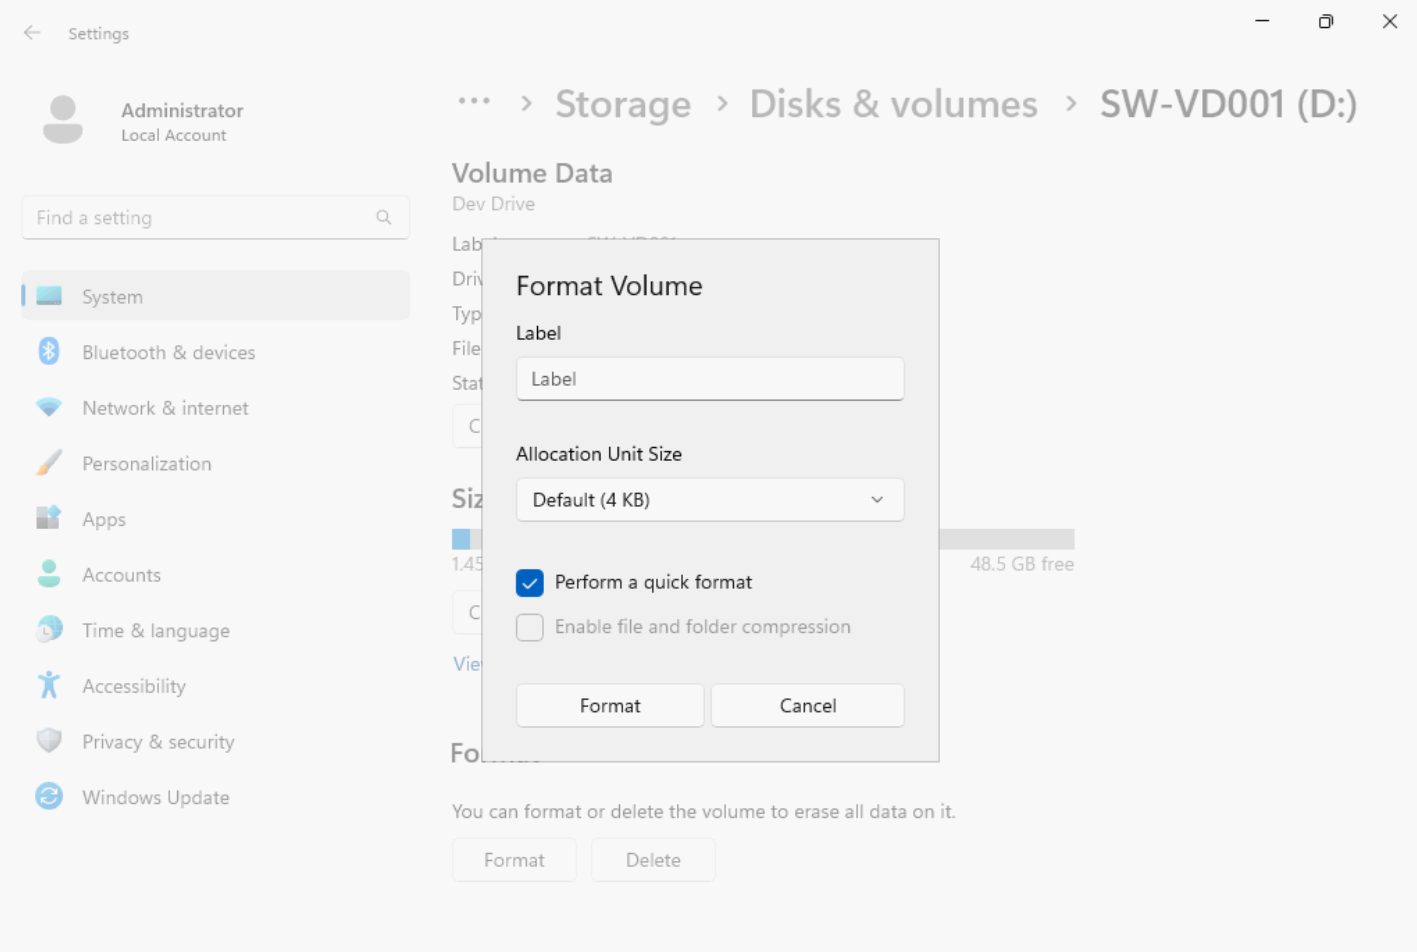
Figure 11. Reformatting the Dev Drive
Option 2: Resizing an existing volume
To resize an existing volume, do the following:
- Click Resize an existing volume, then Next to set up a Dev Drive.
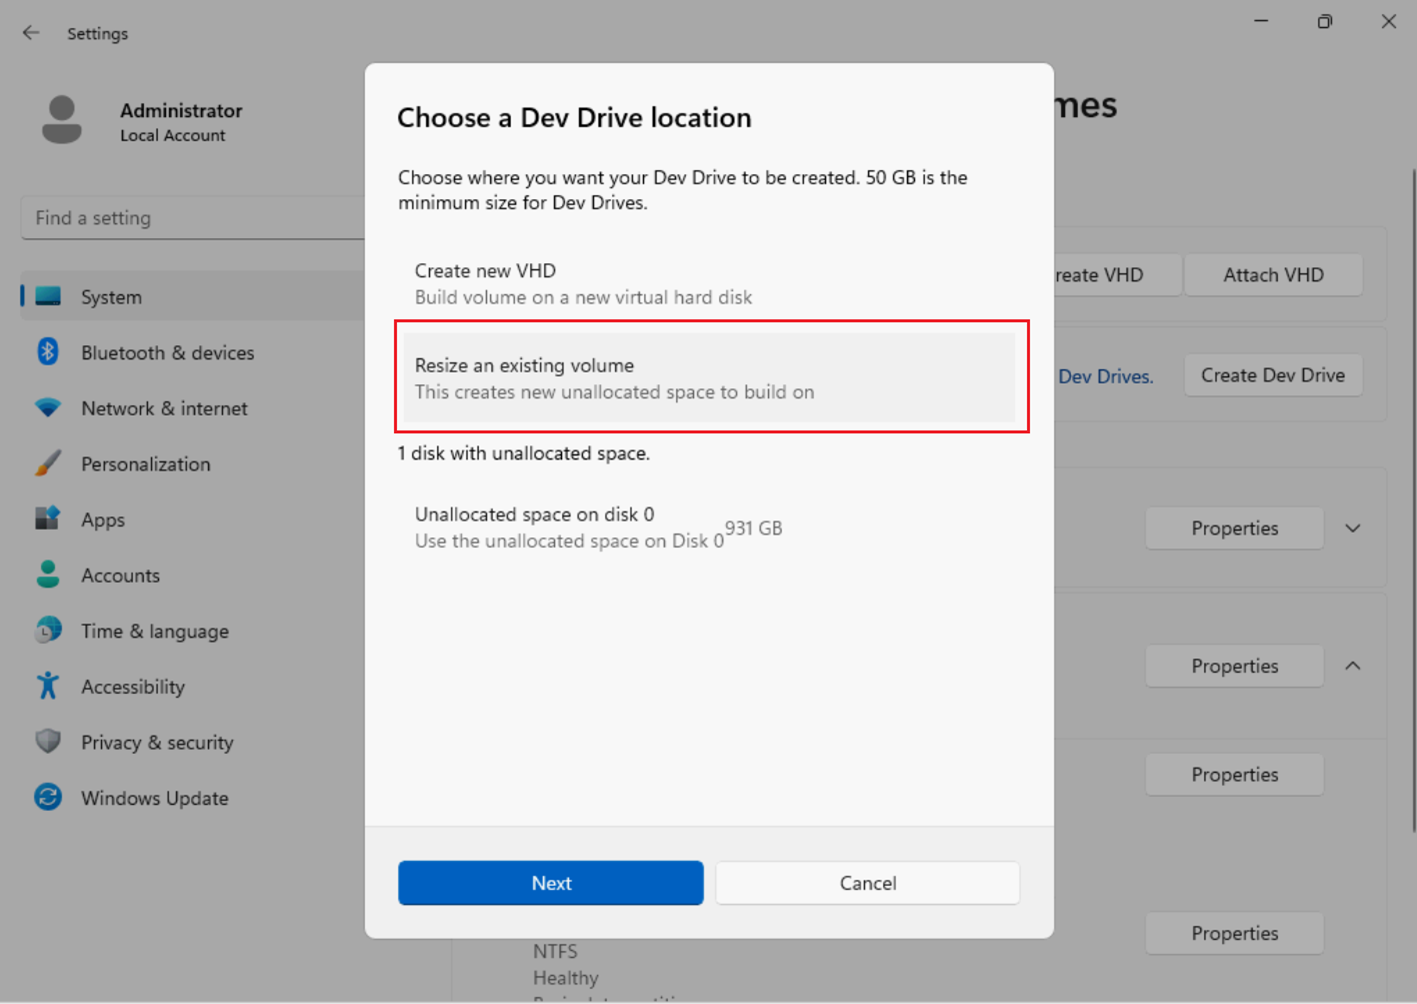
Figure 12. Select Resize an existing volume - Choose a volume to resize, click Next
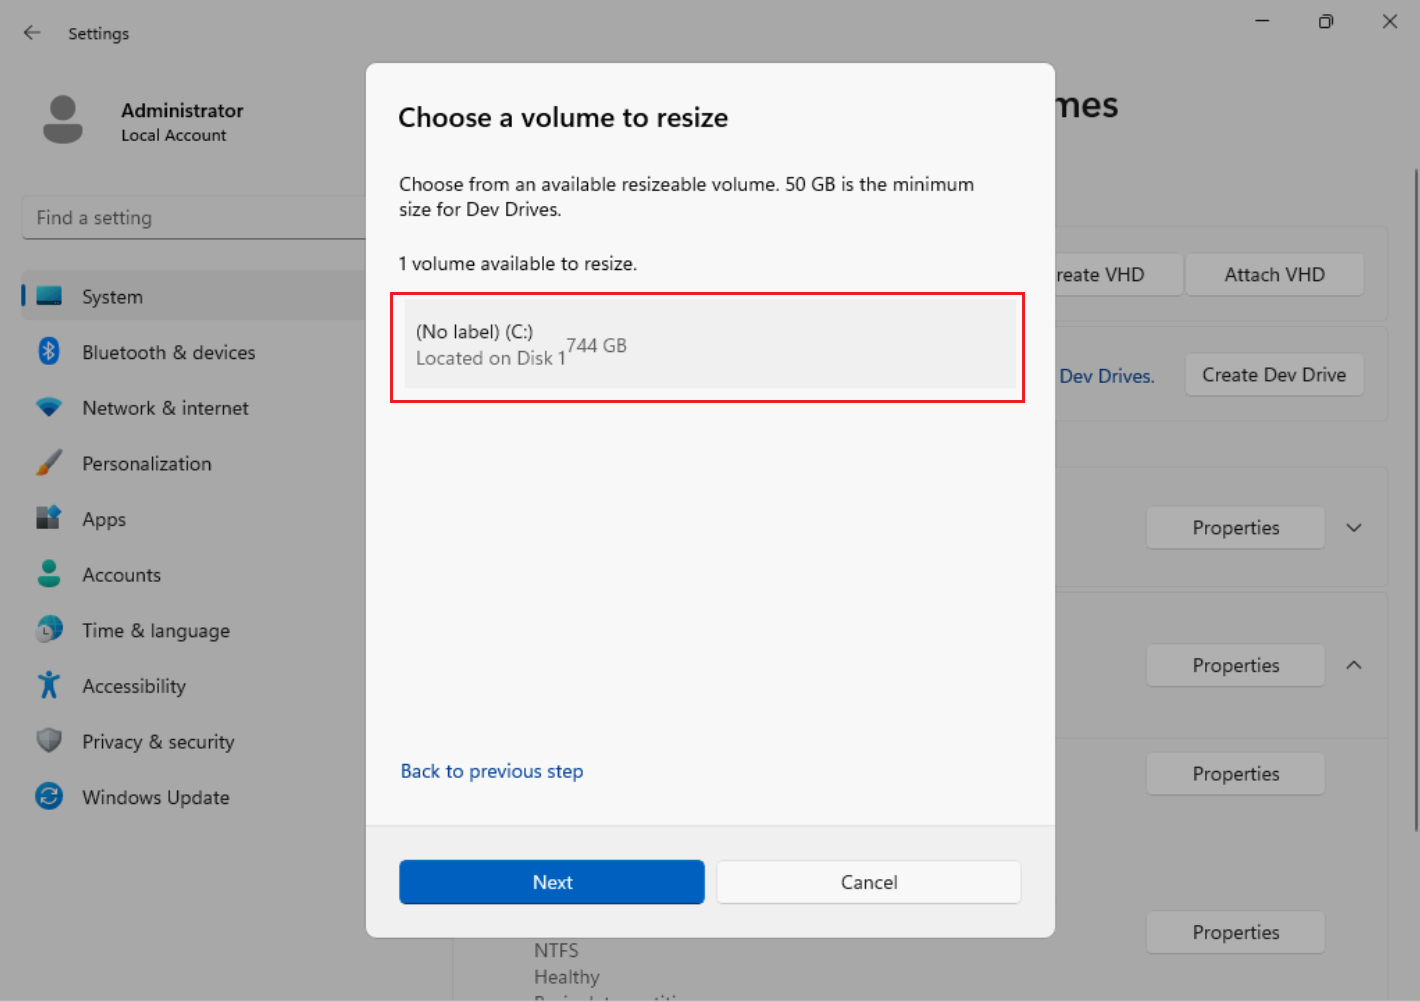
Figure 13. Choose a volume to resize - Choose a new size for the volume.
You will need to have at least 50 GB of unallocated space available, the minimum size needed for a Dev Drive. (In the example, this will be the last size allocated for your partition C:) Once the size is set, click Next.
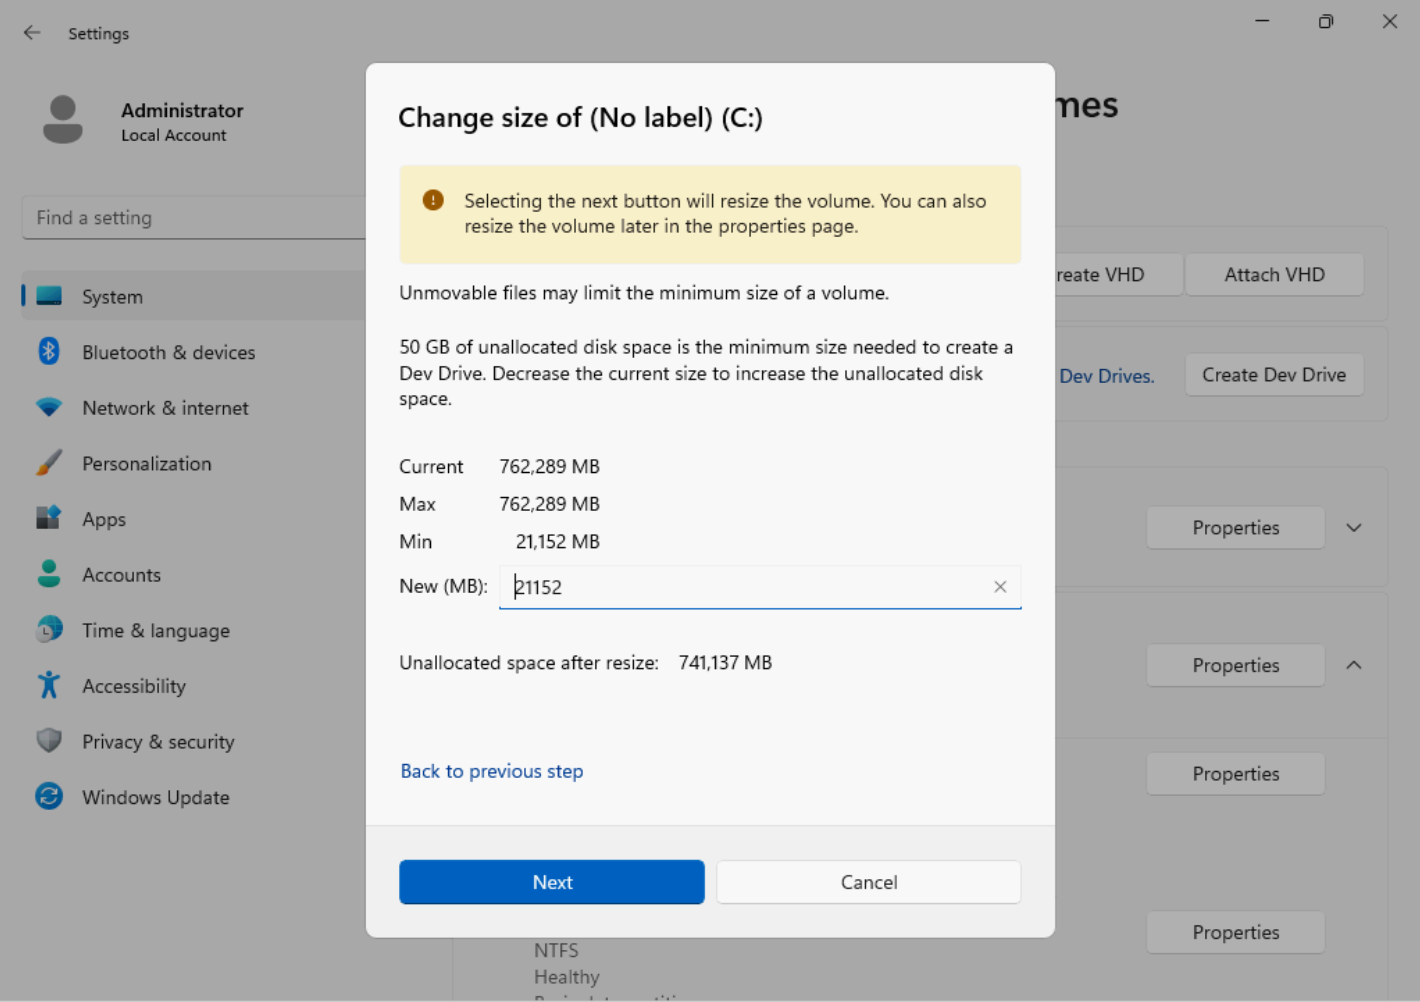
Figure 14. Change the size of partition C: - Format the Dev Drive on the new free space, specify the Label (drive name), Drive Letter, and Size The maximum size will be the amount of free space you allocated in the previous step, the minimum size for a Dev Drive is 50 GB. Click Format.

Figure 15. Set the label, drive letter and size of new Dev Drive - Returns to the Disk & volumes page, where you can scroll down to find the Dev Drive you created.
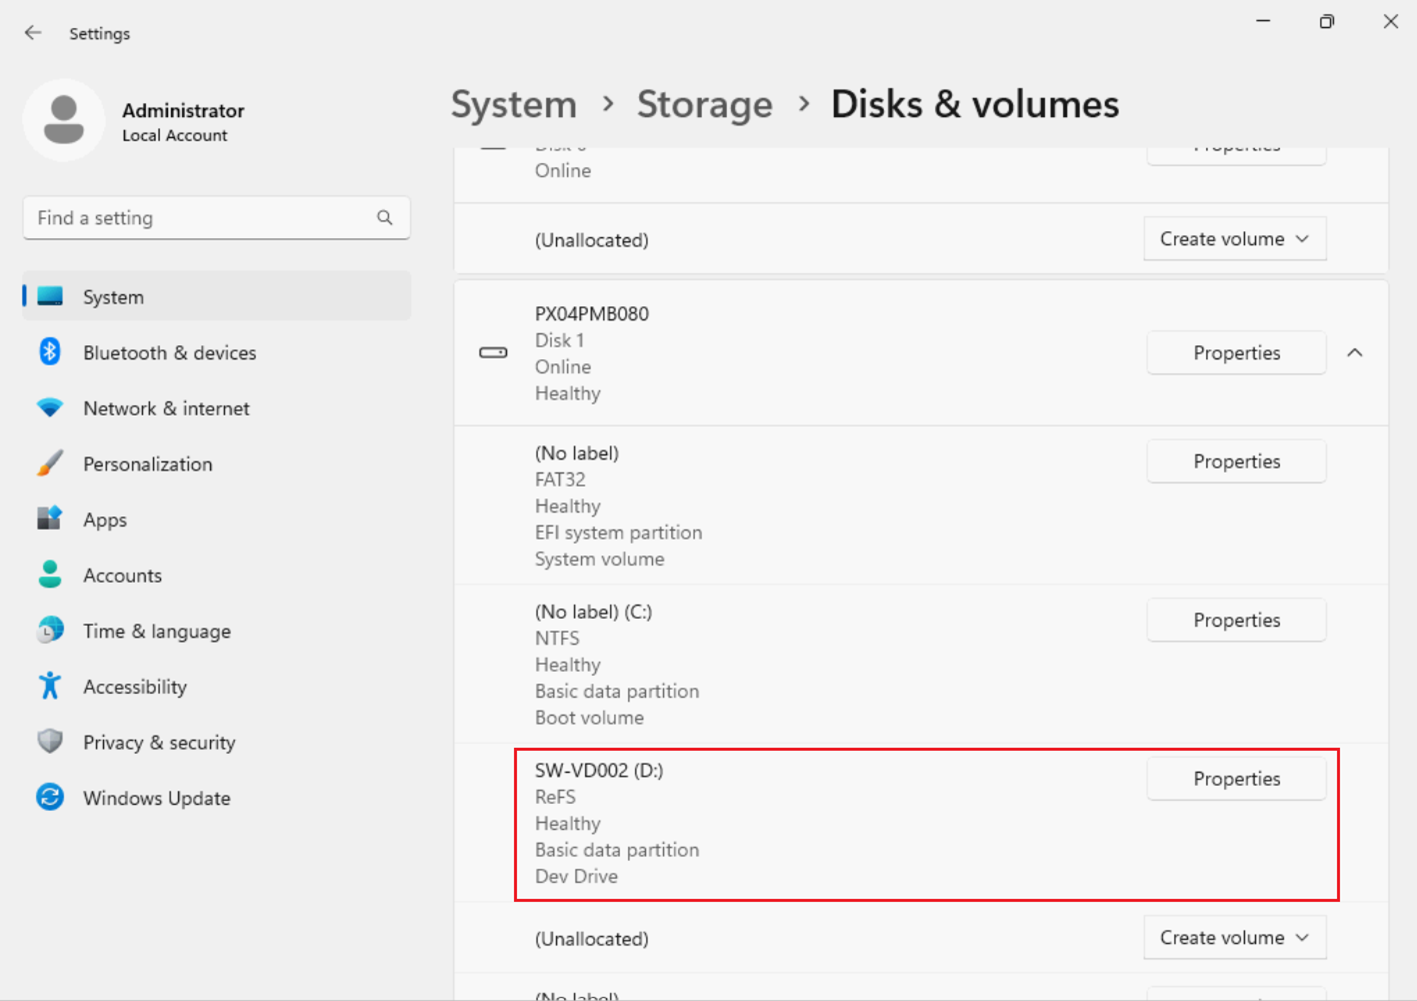
Figure 16. Check the Dev Drive you created
Option 3: Using unallocated space on disk
To create a Dev Drive using unallocated space, do the following:
- To find and use unallocated space on an existing drive,
- open System > Storage > Disks & volumes, look through the page to see whether any storage space is listed as "Unallocated".
- Select Create volume and you will be given the choices to Create Simple Volume (a standard NTFS storage volume) or Create Dev Drive.
- To create a Dev Drive, the steps are the same as Step 4 of Resizing an existing volume. You will need to add a Label (drive name), Drive Letter, and confirm the Size
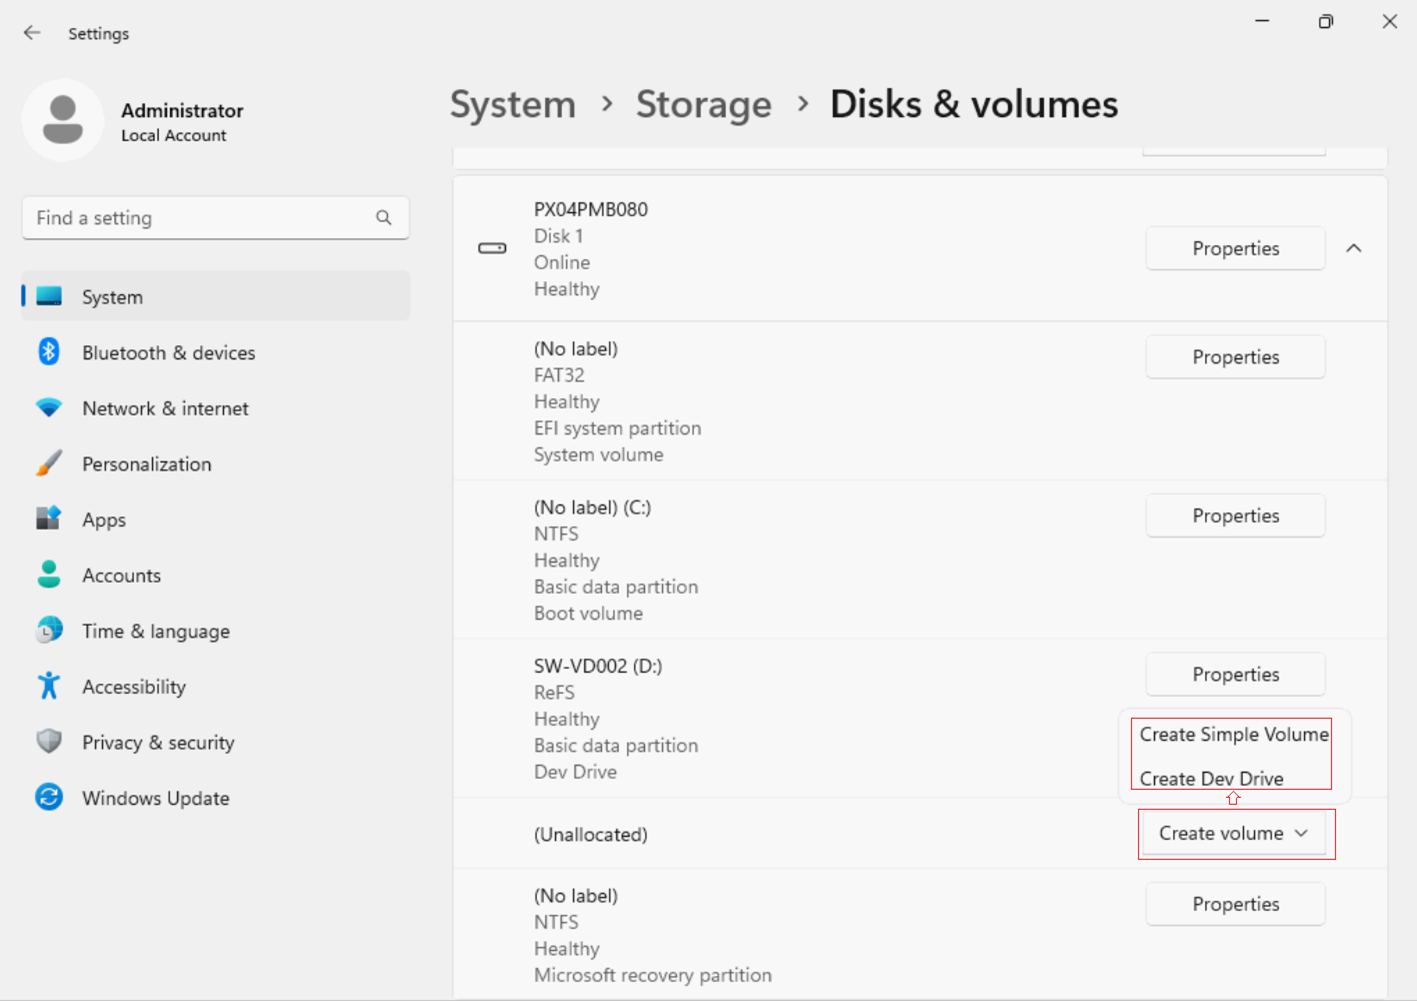
Figure 17. Create Dev Drive by using unallocated space on disk - Format a storage volume as a Dev Drive from the command line.
As an alternative to using Windows Settings, there are two commands you can use from the command line to create a Dev Drive storage volume. Both options require that you open the command line as an Administrator. You must be a member of the Admin group to format a hard drive. These command line formatting methods may be preferred when creating multiple Dev Drives or as an admin for multiple machines.
Option 1: Using the Format command line tool from Windows CMD or PowerShell:
Format D: /DevDrv /Q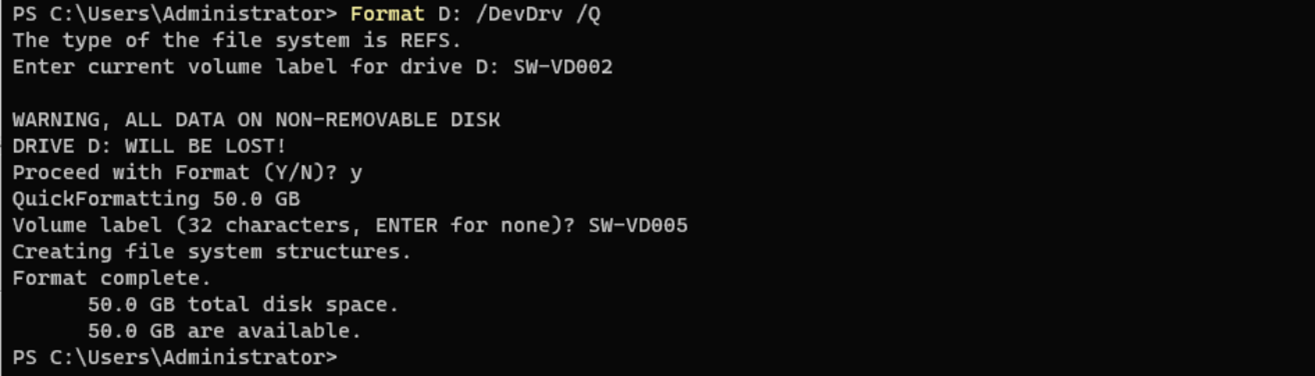
Figure 18. Format a storage volume as a Dev Drive from the command lineOption 2: Using the Format-Volume cmdlet from PowerShell:
Format-Volume -DriveLetter D -DevDrive
Figure 19. Using Format-Volume on PowerShell
Deleting a Dev Drive
You can delete a Dev Drive in the Windows Settings, as follows:
- Open the Windows Settings menu,
- Click Storage, then Advanced Storage Settings, then Disks & volumes, where you will find a list of the storage volumes on your device.
- Select Properties next to the Dev Drive storage volume that you want to delete.
- In the drive's properties, you will find the Delete option under the Format heading.

Figure 20. Delete option on Dev Drive’s properties page - Click Delete, a prompt window will pop up. Confirm the delete action by clicking Delete volume.
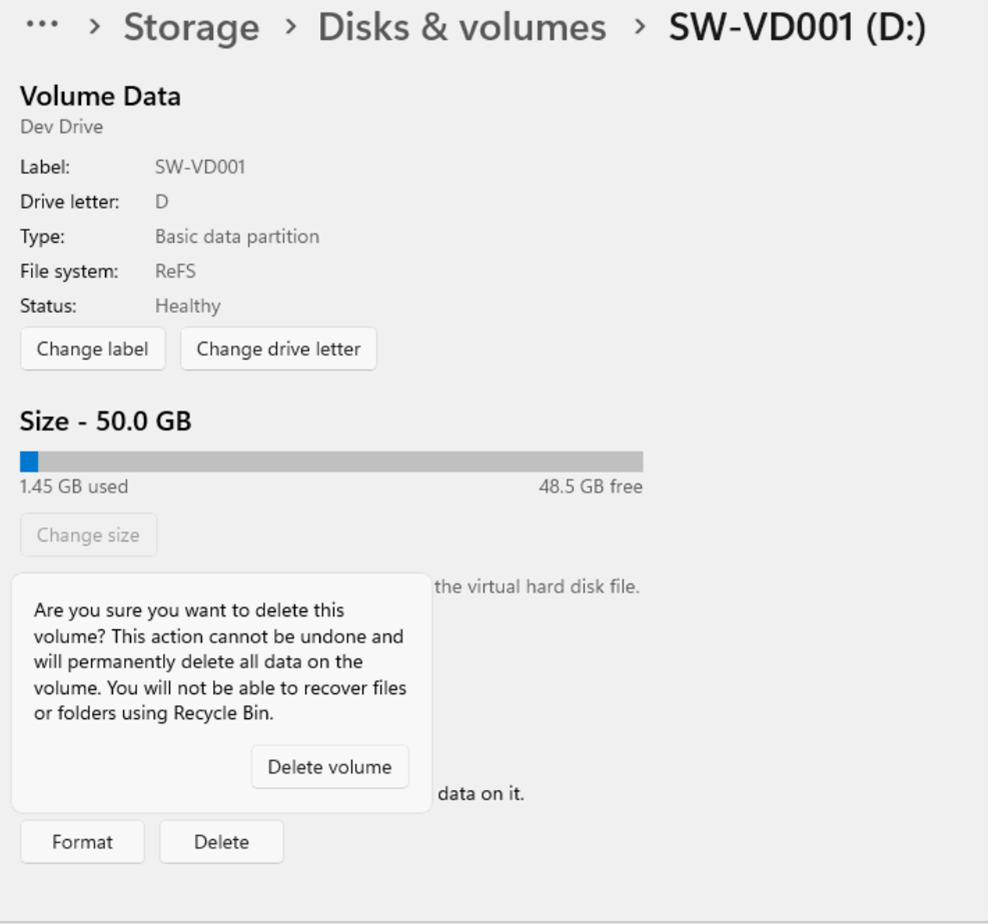
Figure 21. Confirmation popup window - The Dev Drive is now deleted.
If the Dev Drive was created as a new VHD, the VHD will need to be deleted to reclaim the storage space used by that VHD. To accomplish this, you must detach the virtual disk so that the VHD file hosting the Dev Drive can be deleted by continuing to the following steps.
- Open the Disk Management, select the Disk (not the Volume) of the Dev Drive. Right-click the selected Disk hosting the Dev Drive and, from the resulting menu, select Detach VHD.

Figure 22. Detach VHD on Disk Management - A pop-up window will appear, informing you that detaching a virtual hard disk will make it unavailable.
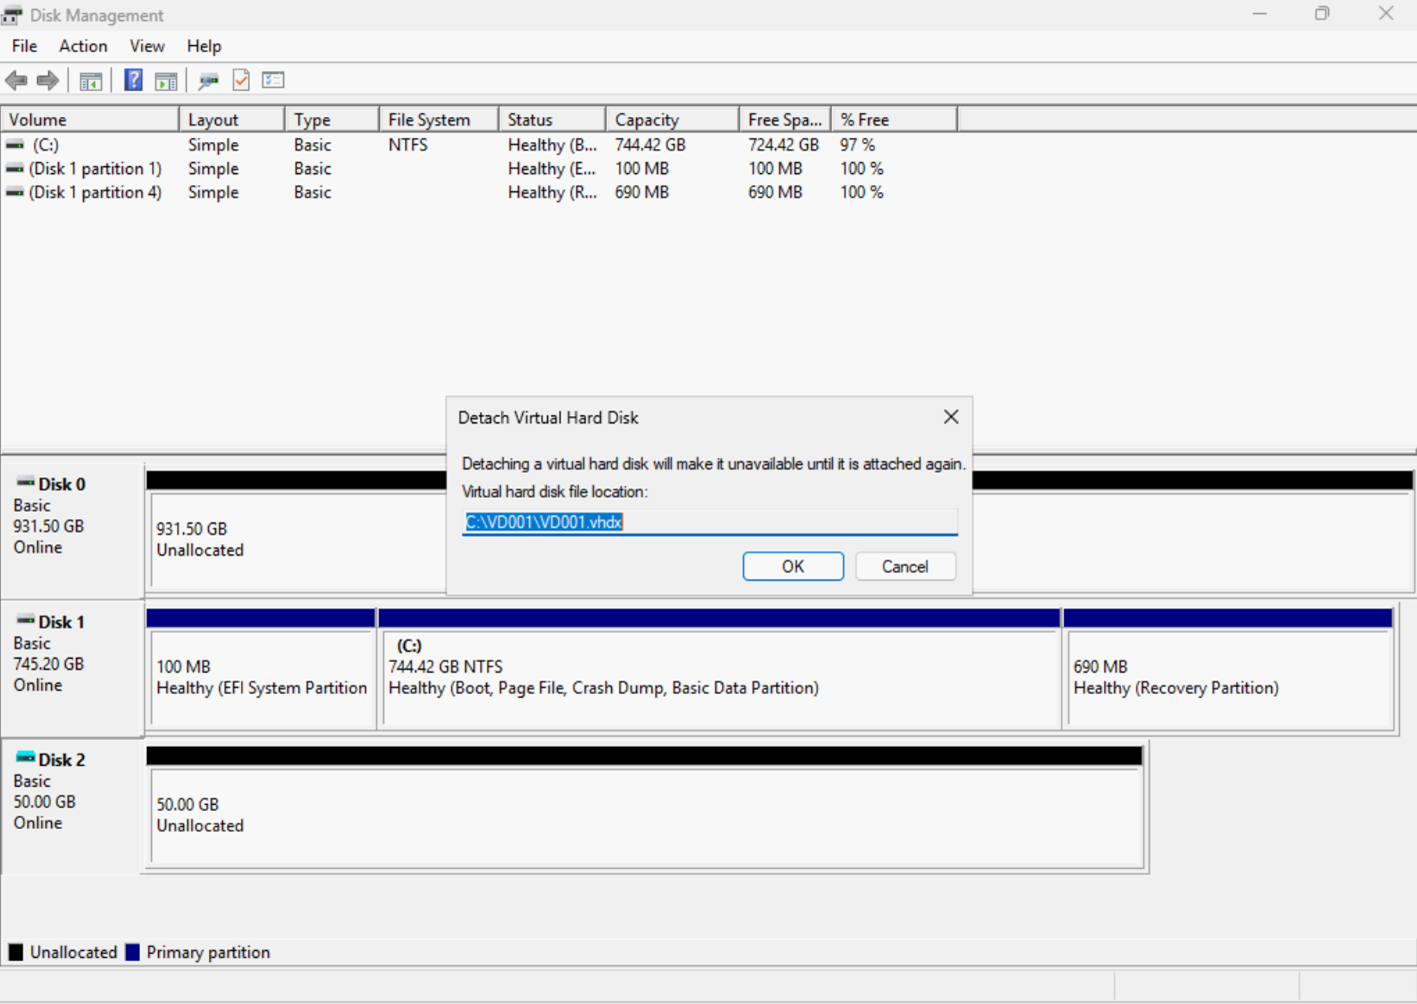
Figure 23. Prompt of Detach VHD - Click OK, the VHD can be deleted.
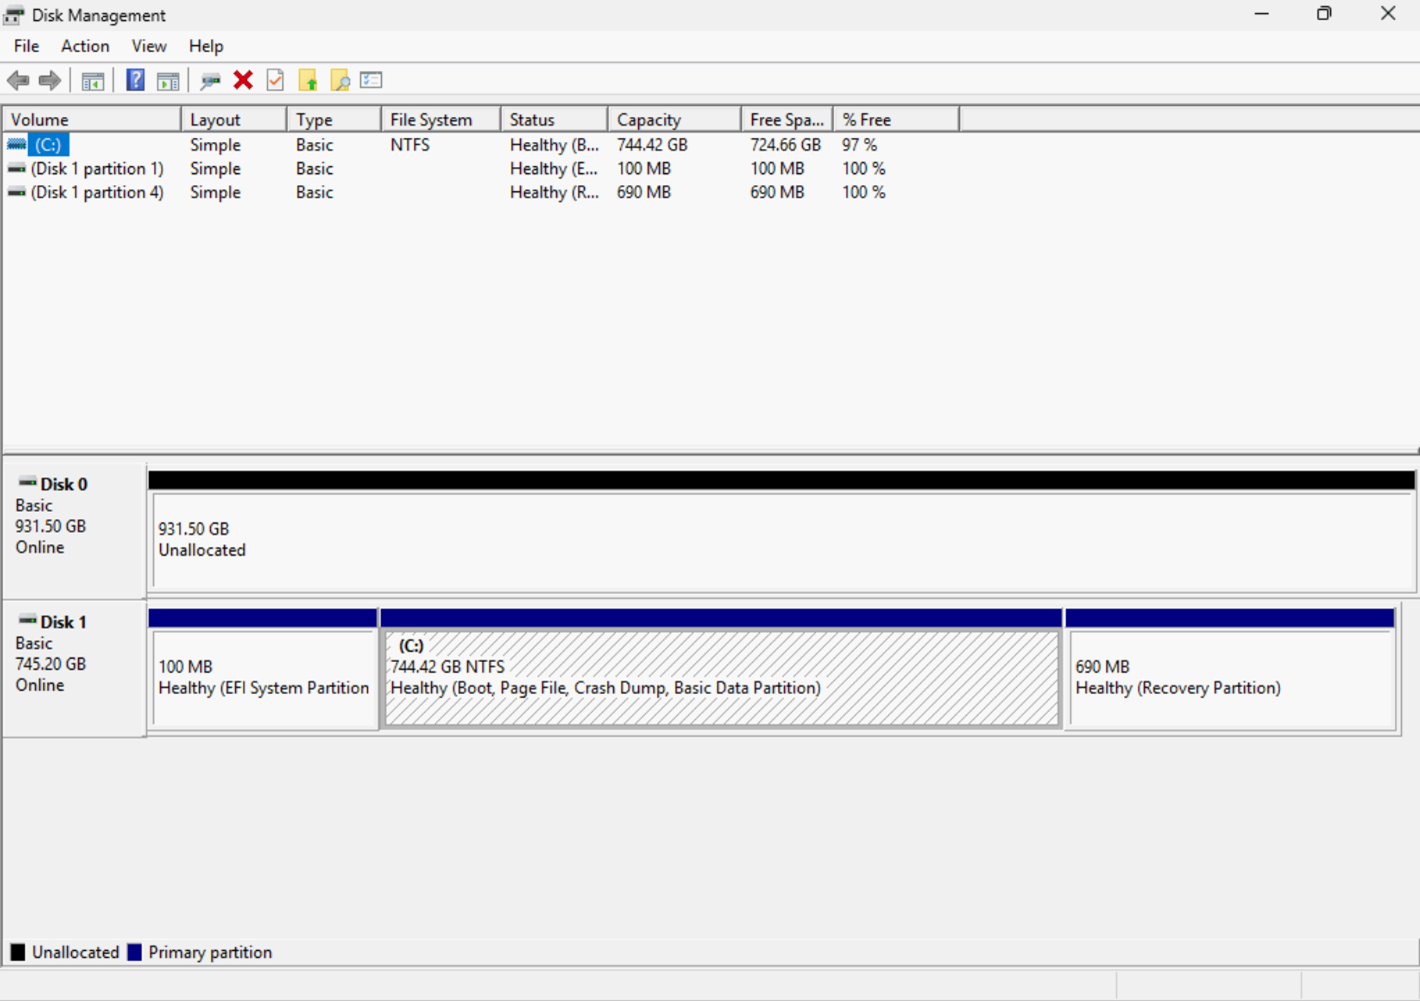
Figure 24. VHD has been deleted
References
For more information, see these resources:
- Microsoft Learn, “Set up a Dev Drive on Windows 11”
https://learn.microsoft.com/en-us/windows/dev-drive/ - Microsoft Learn, “Resilient File System (ReFS) overview"
https://learn.microsoft.com/en-us/windows-server/storage/refs/refs-overview - Microsoft Learn, “How to configure Dev Drive security policy for enterprise business devices”
https://learn.microsoft.com/en-us/windows/dev-drive/group-policy - Microsoft Dev Blogs, “Dev Drive for Performance Improvements in Visual Studio and Dev Boxes”
https://devblogs.microsoft.com/visualstudio/devdrive/
Author
Boyong Li is a Senior Engineer in the Lenovo Infrastructure Solutions Group in Beijing, China. He is an experienced software architecture, BIOS and OS engineer and is responsible for technical support for Windows OSes and overall platform Enablement.
Special thanks to the following people for their contributions and suggestions:
- Guiqing Li, Advisory Engineer, Windows Enablement
- Ronald Arndt Jr, Advisory Engineer, ThinkAgile Development
- Gary Cudak, Principal Engineer, Lenovo OS Architect and WW Technical Lead
- David Watts, Senior Manager, Lenovo Press
Trademarks
Lenovo and the Lenovo logo are trademarks or registered trademarks of Lenovo in the United States, other countries, or both. A current list of Lenovo trademarks is available on the Web at https://www.lenovo.com/us/en/legal/copytrade/.
The following terms are trademarks of Lenovo in the United States, other countries, or both:
Lenovo®
ThinkAgile®
ThinkSystem®
The following terms are trademarks of other companies:
Microsoft, PowerShell, Visual Studio, Windows, and Windows Server are trademarks of Microsoft Corporation in the United States, other countries, or both.
Other company, product, or service names may be trademarks or service marks of others.
Configure and Buy
Please select a locale
Full Change History
Course Detail
Employees Only Content
The content in this document with a is only visible to employees who are logged in. Logon using your Lenovo ITcode and password via Lenovo single-signon (SSO).
The author of the document has determined that this content is classified as Lenovo Internal and should not be normally be made available to people who are not employees or contractors. This includes partners, customers, and competitors. The reasons may vary and you should reach out to the authors of the document for clarification, if needed. Be cautious about sharing this content with others as it may contain sensitive information.
Any visitor to the Lenovo Press web site who is not logged on will not be able to see this employee-only content. This content is excluded from search engine indexes and will not appear in any search results.
For all users, including logged-in employees, this employee-only content does not appear in the PDF version of this document.
This functionality is cookie based. The web site will normally remember your login state between browser sessions, however, if you clear cookies at the end of a session or work in an Incognito/Private browser window, then you will need to log in each time.
If you have any questions about this feature of the Lenovo Press web, please email David Watts at dwatts@lenovo.com.


