

Top
Author
Updated
27 Mar 2026Form Number
LP2353PDF size
23 pages, 4.1 MBSubscribed to LP2353.
Thank you for your feedback.
Abstract
Secure Boot is a security feature within the Unified Extensible Firmware Interface (UEFI) that ensures a system boots using only software trusted by the hardware manufacturer. While essential for modern Windows operating systems, the original 2011 Secure Boot certificates utilized by various versions of Windows Server are set to expire in 2026. Failure to update these certificates prior to expiration will prevent systems from receiving future security updates for the Windows Boot Manager and Secure Boot components. To address this, Lenovo has implemented updates within UEFI firmware to transition to the new 2023 Secure Boot certificates across all Lenovo systems.
This paper describes the procedures required to update Lenovo Windows Server environments to ensure continued operation and receipt of security patches. It details the process of updating the Windows Boot Manager and Boot Certificates and provides steps for creating a bootable WinPE image to verify that all certificates are current. The reader is assumed to have a foundational understanding of Windows Server deployment, UEFI configuration, and a basic working knowledge of WinPE environments.
Change History
Changes in the March 27, 2026 update:
- Added further information about the AvailableUpdates registry key described in Step 3 in Update Boot Manager to Windows UEFI CA 2023
Introduction
Secure Boot is a security feature that helps ensure systems boot using only software that is trusted by the OEM hardware manufacturer. It is part of the Unified Extensible Firmware Interface (UEFI) specification, and is designed to prevent unauthorized firmware, drivers and operating systems from loading during the system boot process. Microsoft adopted Secure Boot beginning with Windows 8, and it is now a core security requirement for Windows operating systems.
When the system starts, the firmware verifies the digital signatures of pre-boot software (including the Windows Boot Manager) against a set of trusted Certificate Authority (CA) stored within the system’s firmware. If the signatures are valid, the system boots, and the firmware hands control over to the Windows boot loader, which is turn verifies requirements, loads into memory, and starts the operation system. This process helps make sure that bootkits, rootkits or other low-level malware cannot be loaded.
Secure Boot provides the first line of defense in system and Windows security. It is built on the UEFI firmware and uses a hierarchy of keys to ensure your system starts in a trusted and verified state every time the system is powered on.
The keys used for Secure Boot are below:
- Platform Key (PK), which establishes system ownership, typically owned by the hardware manufacturer (OEM).
- Key Exchange Key (KEK), which authorizes updates to trust databases, and may include a Microsoft KEK and other OEM KEKs.
- Allowed Signature database (DB), which stores signatures of approved bootloaders and drivers.
- Forbidden Signature Database (DBX), which lists revoked or malicious signatures.
During boot process, the firmware verifies each component’s digital signature against these databases, blocking any untrusted or tampered code before the operating system loads.
All Windows-based devices have carried the same set of Microsoft Secure Boot (CA 2011) certificates within the UEFI KEK and DB since Microsoft first introduced support for Secure Boot in Windows Server 2012 and Windows 8. However, the original CA 2011 Secure Boot certificates will expire in 2026 as noted within the expiration schedule table shown below.
Windows Server versions: All versions of Windows Server are affected by this certification expiration.
When these certificates expire, several repercussions follow:
- Systems will continue to boot initially, but will stop receiving Secure Boot–related security updates once PCA 2011 certificates expire (mid/late-2026).
- Future Windows Boot Manager updates may fail Secure Boot verification.
- Recovery media, WinPE, and installation media created before PCA 2023 adoption may fail to boot on updated firmware.
- Systems may become non-compliant with enterprise security baselines and regulatory frameworks.
Lenovo systems proactively include updated UEFI firmware containing the Microsoft 2023 Secure Boot certificates, allowing customers to transition without disabling Secure Boot or performing manual key enrollment. This minimizes operational risk while maintaining Secure Boot enforcement throughout the transition.
In addition, the new Secure Boot changes also help to reduce the attack surface associated with CVE-2023-24932 (aka. BlackLotus UEFI bootkit vulnerability), a separate security vulnerability related to the Windows Boot Manager which could potentially allow an attacker to bypass the Secure Boot feature.
Therefore, to help minimize the risk of system attacks, Lenovo has already released updated UEFI Firmware which includes the latest Secure Boot CA 2023 Certificates for all Lenovo systems.
In this paper, we focus on the process of updating the Windows Boot Manager, Boot Certificates and the steps for creating a bootable WinPE image. The guidance presented in this paper allows Lenovo Windows Server environments to confirm all Boot Certificates are at the latest version and continue operating as expected and receive regular Secure Boot updates.
Check the current certificate
The first step is to verify that the current boot manager with CA certificate is PCA 2011 signed.
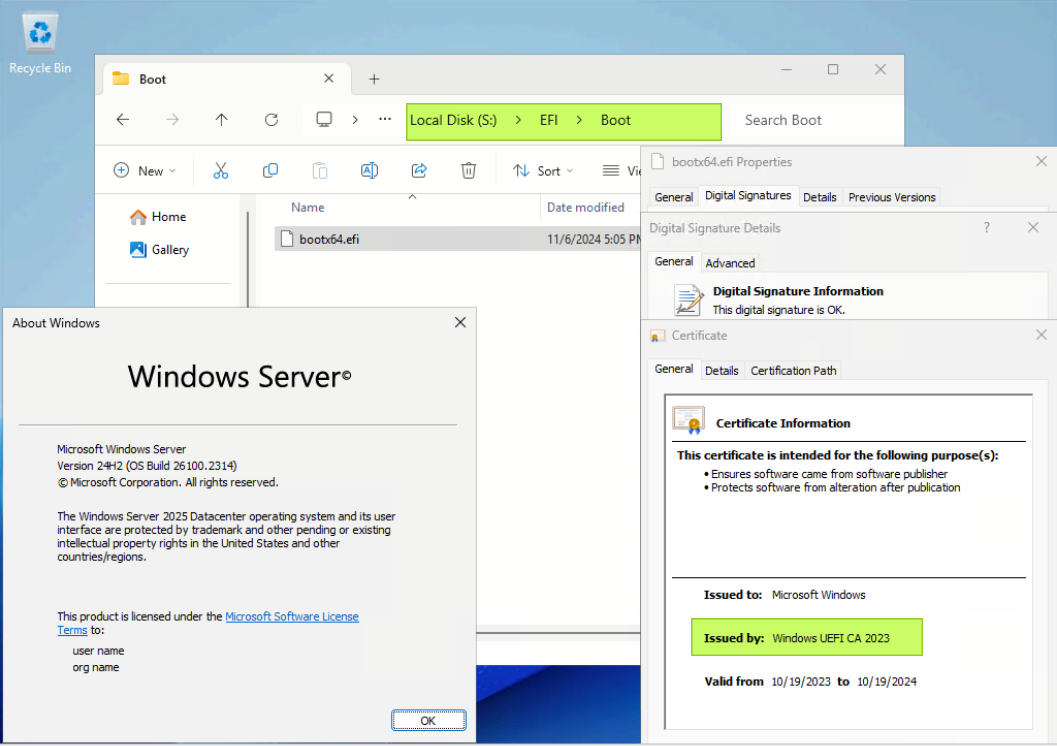
For example, the system below has Windows Server 2025 (Build 26100.2314) installed.
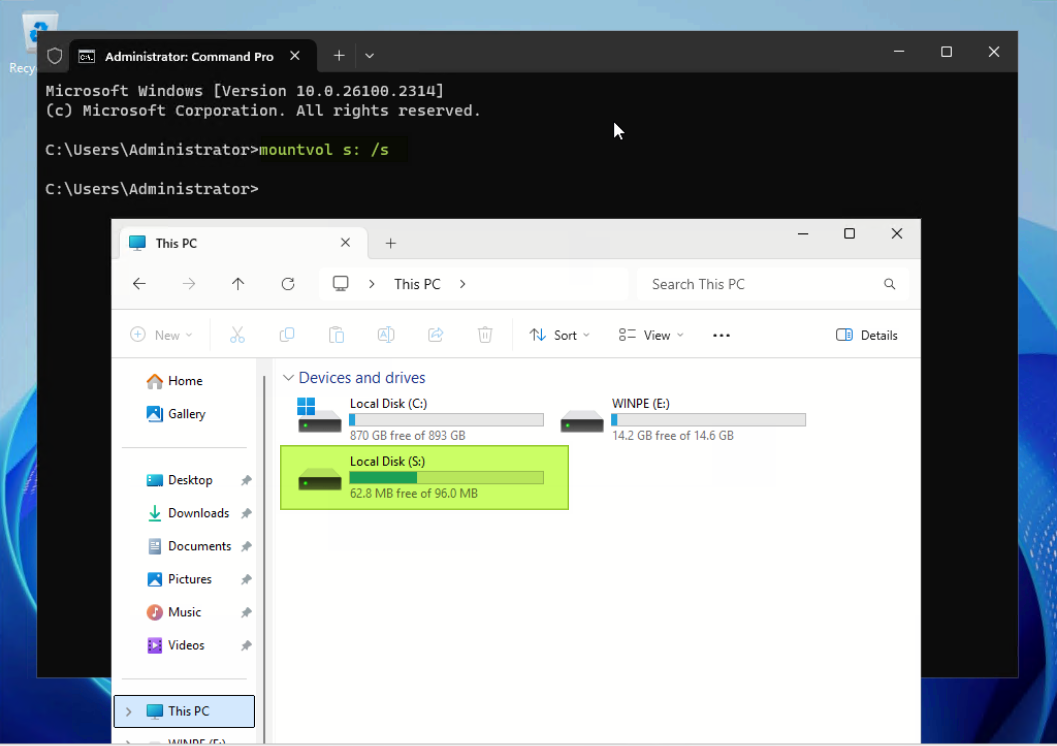
- The EFI System Partition must first be mounted to view Boot Manager file properties. Use the following mountvol command to mount the EFI system partition as a drive letter. The /s parameter mounts the EFI system partition as the specified drive letter (for example S: drive).
mountvol s: /s - Look for the following two EFI files in the folders listed:
- \EFI\Microsoft\Boot\bootmgfw.efi
- \EFI\Boot\bootx64.efi
- Right click on each EFI file and click Properties, and click the Digital Signatures tab. From the Issued by text, we currently see that the Microsoft Windows Production PCA 2011 signed certificate is installed, as shown below.
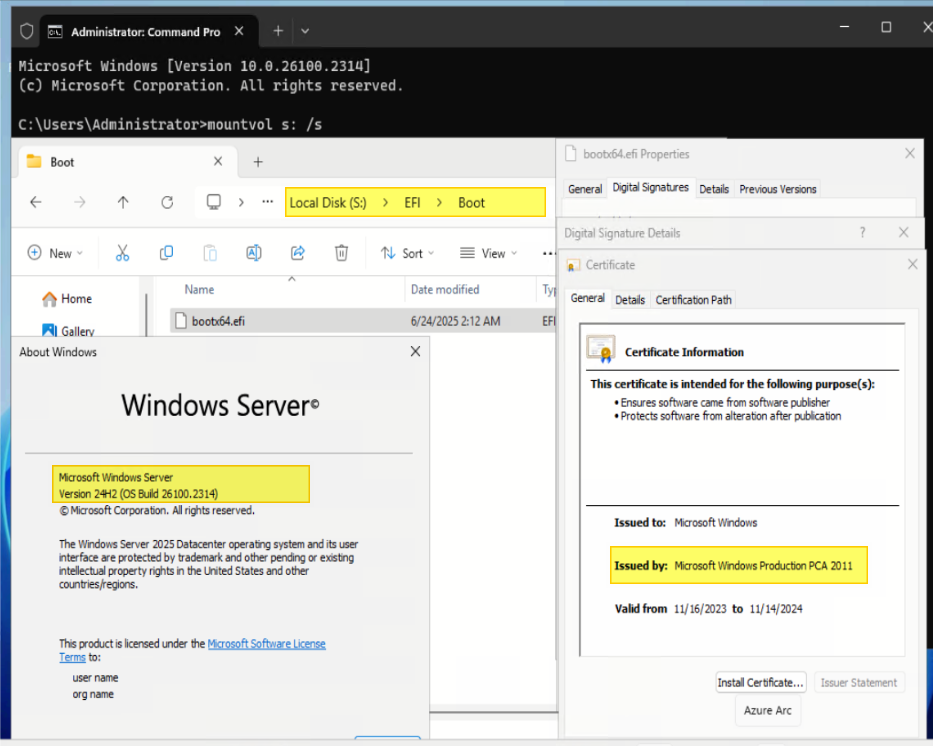
Figure 2. Check the original certificate of the boot manager
We now proceed with updating the boot manager with the CA 2023 signed certificate.
Update Boot Manager to Windows UEFI CA 2023
Follow the steps below to update the Boot Manager with the Windows UEFI CA 2023 signed certificate.
Windows Server 2022: For Windows Server 2022 (20348.2227 and before), make sure all required Windows updates (2025-2B or later) have been installed.
- Perform a set of checks prior to the registry update:
- System firmware is updated to a Lenovo release that includes 2023 CA support.
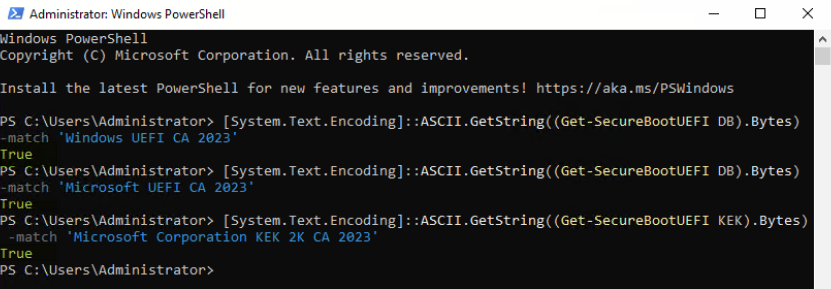
To verify the installed firmware has the 2023 CA certificate, open a PowerShell command prompt as an Administrator, and issue the following commands:
[System.Text.Encoding]::ASCII.GetString((Get-SecureBootUEFI DB).Bytes) -match 'Windows UEFI CA 2023'
[System.Text.Encoding]::ASCII.GetString((Get-SecureBootUEFI DB).Bytes) -match 'Microsoft UEFI CA 2023'
[System.Text.Encoding]::ASCII.GetString((Get-SecureBootUEFI KEK).Bytes) -match 'Microsoft Corporation KEK 2K CA 2023'
If the output is True for each command, then the certificate is included.
- System is fully patched to the required Windows update level. See the following Microsoft support page for the latest updates:
https://learn.microsoft.com/en-us/windows/release-health/windows-server-release-info#windows-server-major-versions-by-servicing-option-- - Secure Boot is Enabled in UEFI.
- BitLocker recovery keys are backed up (standard enterprise best practice).
- System firmware is updated to a Lenovo release that includes 2023 CA support.
- Open Command Prompt as an Administrator.
- To install the “Windows UEFI CA 2023” signed boot manager, issue one of the following commands to set the registry key.
To prioritize updating the Boot Manager, set the AvailableUpdates key to 0x100:
reg add HKEY_LOCAL_MACHINE\SYSTEM\CurrentControlSet\Control\Secureboot /v AvailableUpdates /t REG_DWORD /d 0x100 /fTo prioritize broader certificate compatibility, set the AvailableUpdates key to 0x5944:
reg add HKEY_LOCAL_MACHINE\SYSTEM\CurrentControlSet\Control\Secureboot /v AvailableUpdates /t REG_DWORD /d 0x5944 /fTip: The difference between the registry values 0x100 and 0x5944 under HKLM\SYSTEM\CurrentControlSet\Control\Secureboot\AvailableUpdates lies in their specific functions:
- 0x100 for Boot Manager Deployment is specifically focused on updating the boot manager to the 2023-signed version, making it a critical step in ensuring Secure Boot compliance with the latest standards. For more information, see How to manage the Windows Boot Manager revocations for Secure Boot changes associated with CVE-2023-24932.
- 0x5944 for Coexistence & Compatibility is designed for environments where you want to introduce the new certificates while maintaining backward compatibility with older ones. For more information, see Registry key updates for Secure Boot: Windows devices with IT-managed updates.
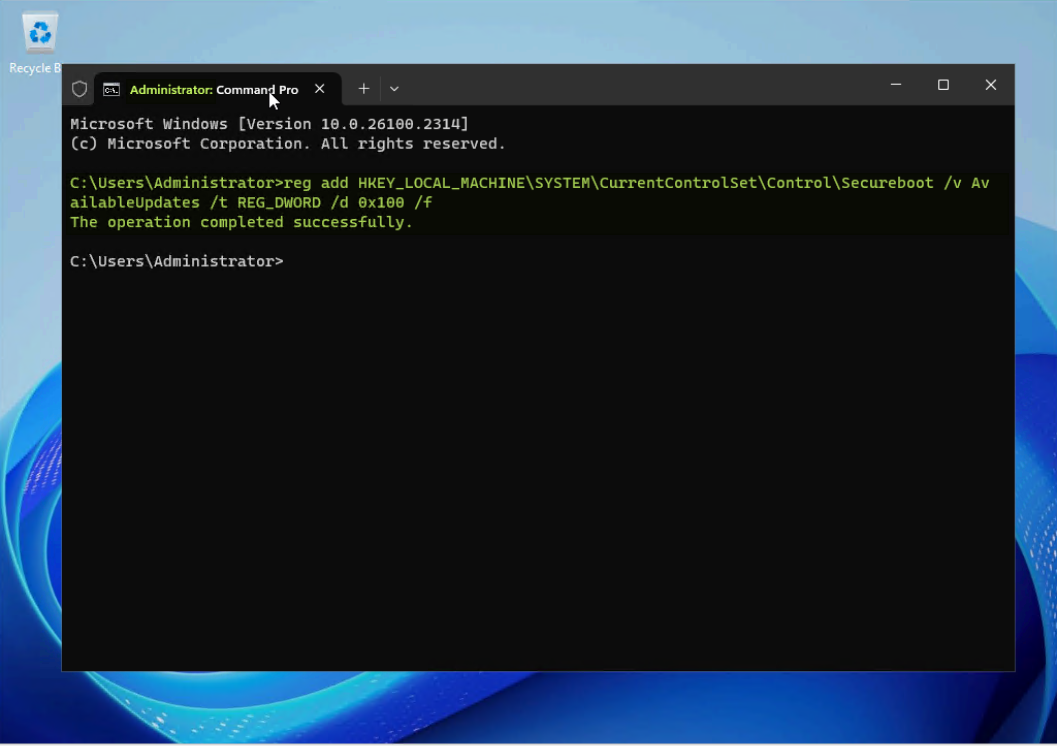
Figure 4. Add a registry key for CA 2023 signed Windows Boot Manager deployment - Open PowerShell as an Administrator and issue the following command to run a task that will add the Windows UEFI CA 2023 certificate to the UEFI Secure Boot Signature Database (DB):
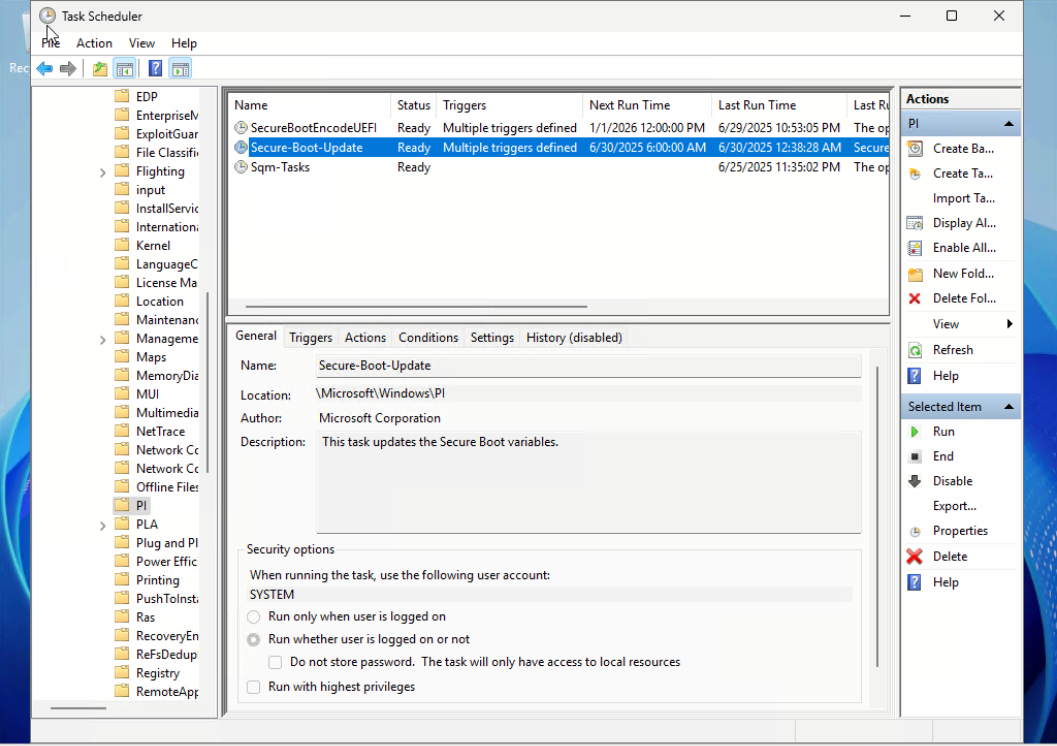
Start-ScheduledTask -TaskName "\Microsoft\Windows\PI\Secure-Boot-Update"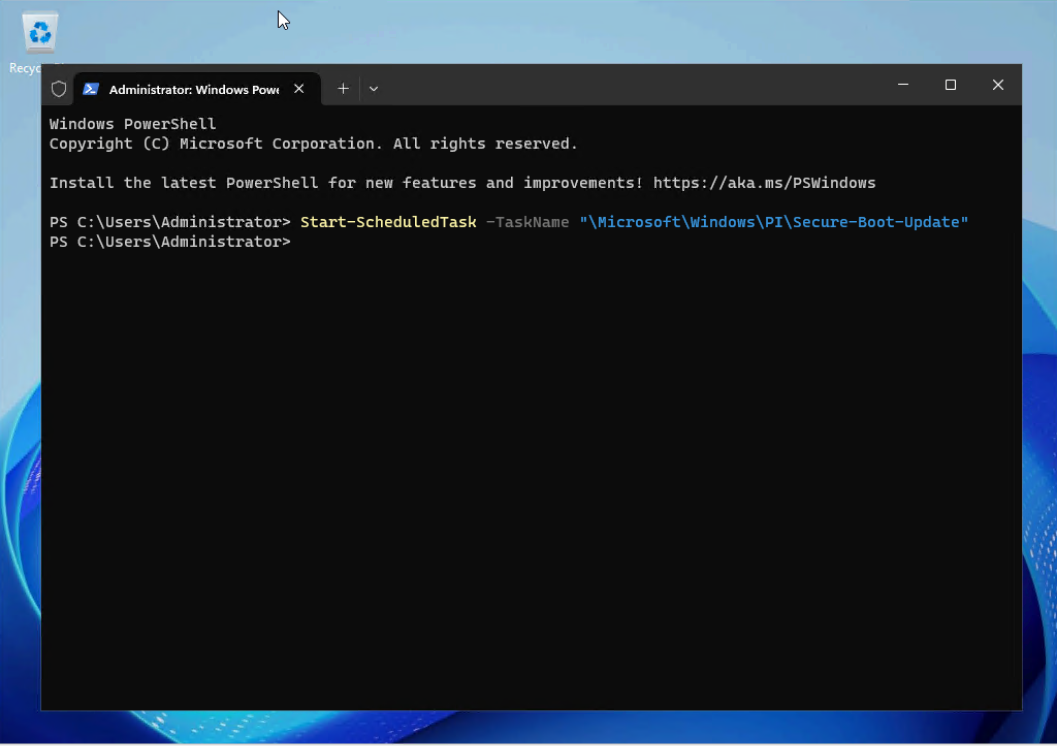
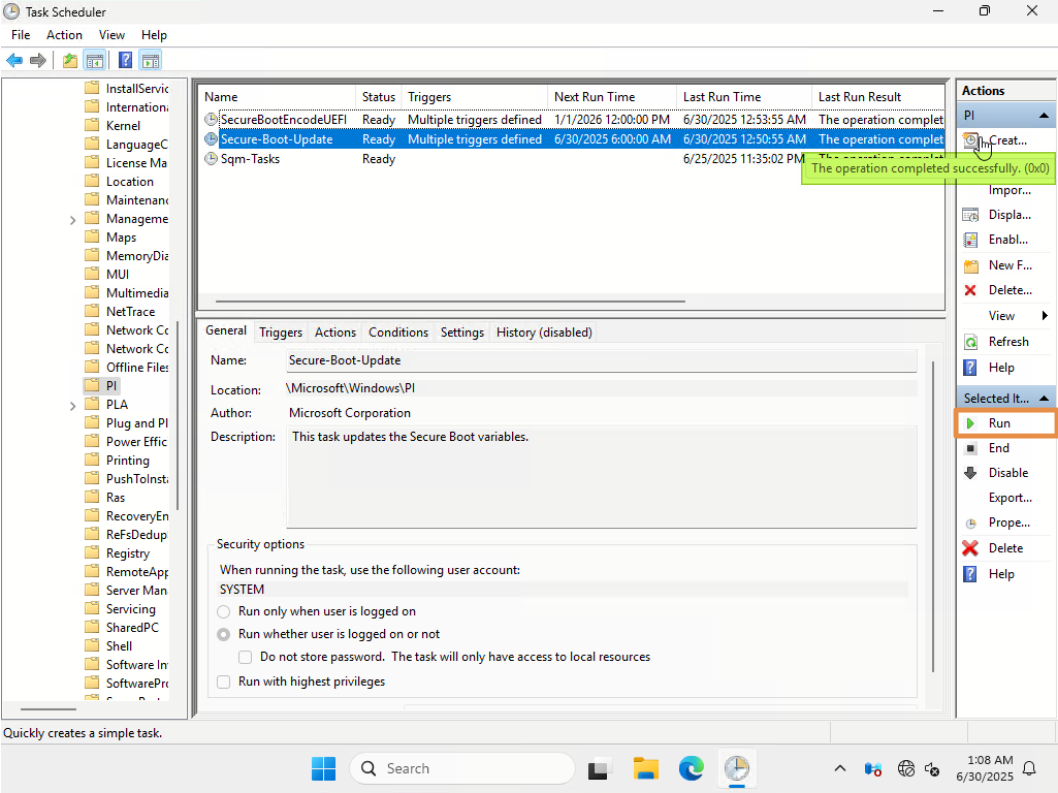
Figure 5. Create a Scheduled Task to add the Windows UEFI CA 2023 signed certificate - Open Task Scheduler to check the task. Verify that the trigger and next run time are set on the task “Secure-Boot-Update” by PowerShell cmdlet “Start-ScheduledTask” as shown below.
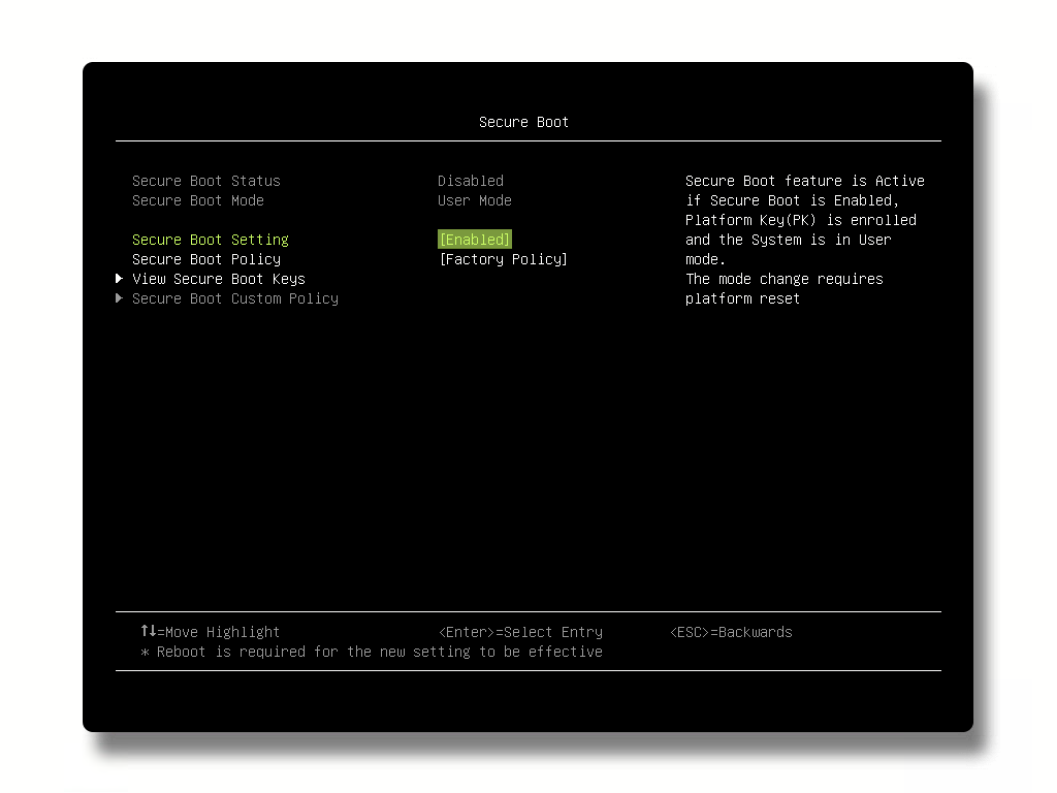
- Reboot the server and enter F1 System Setup.
- Verify that Secure Boot is enabled within the Lenovo UEFI startup menu, as shown below.
In the next section, we explain how to verify the Windows UEFI CA 2023 signed certificate is installed.
Verify the CA 2023 certificate is installed
After completing the update process above, follow the steps below to check if the boot manager displays Windows UEFI CA 2023 signed certificate is installed.
- Mount the EFI system partition using the same mountvol command as before.
mountvol s: /s - Look for the following two EFI files in the folders listed:
- \EFI\Microsoft\Boot\bootmgfw.efi
- \EFI\Boot\bootx64.efi
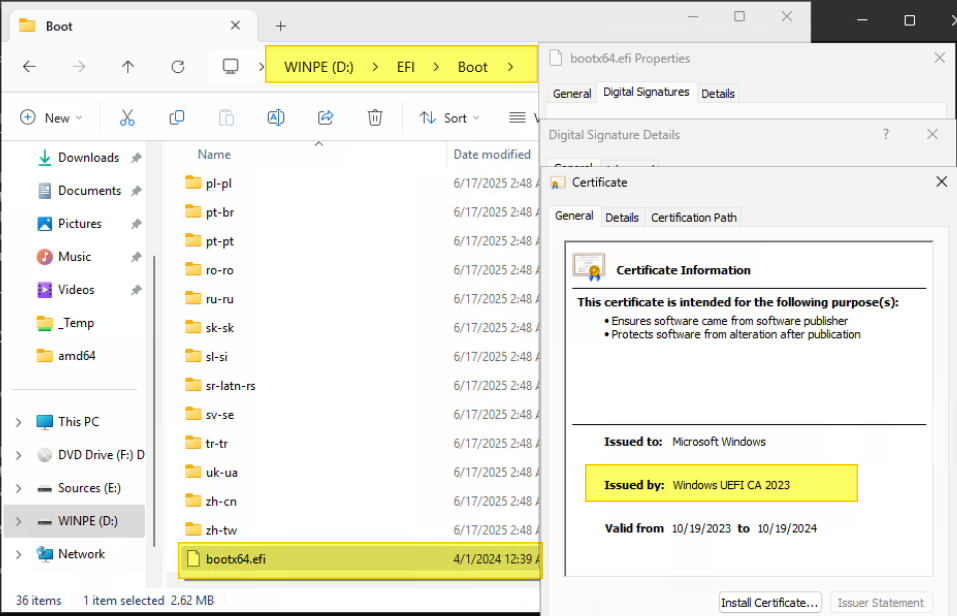
- Right click on each EFI file and click Properties, and click the Digital Signatures tab. From the Issued by text, we currently see that the certificate is now Windows UEFI CA 2023.
Properties of S:\EFI\Microsoft\Boot\bootmgfw.efi file:
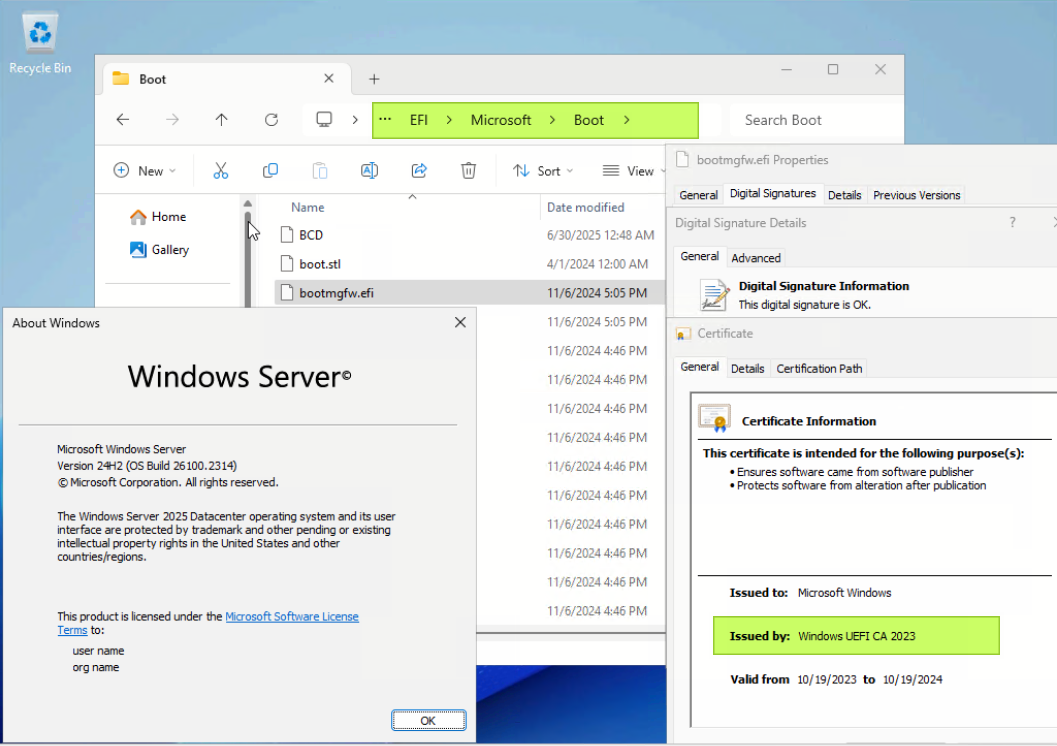
Figure 8. The bootmgfw.efi with CA 2023 signedProperties of S:\EFI\Boot\bootx64.efi file:
If the updated Windows UEFI CA 2023 certificate is not displayed in the Issued by field, you can click “Run” on the right side as shown below to re-run the task "\Microsoft\Windows\PI\Secure-Boot-Update" from Task Scheduler again. The Last Run Result shown in Task Scheduler should be:
The operation completed successfully. (0x0)
Create WinPE bootable media with CA 2023
As we stated in the Introduction, not only Lenovo UEFI and Windows Server must update the certificates to CA 2023, but also deployment environments such as WinPE must be updated. This section describes how to create a bootable WinPE USB thumb drive or ISO file that contains the Windows UEFI CA 2023 signed certificate.
- In Windows Server 2025 (OS Build 26100.3323 or later) environment, install ADK and ADK Windows PE add-on (Current latest released is in Dec, 2024).
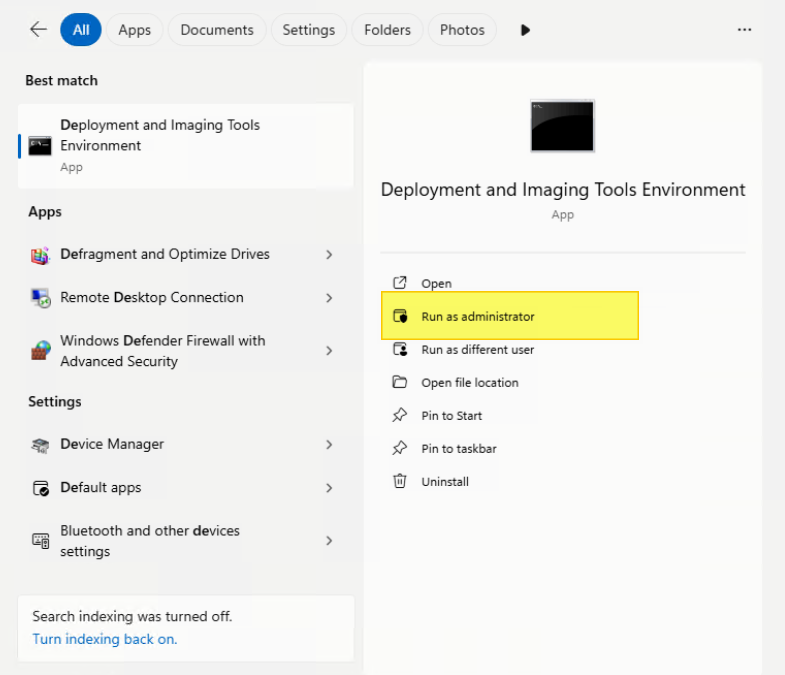
- Start the Deployment and Imaging Tools Environment as an Administrator.
- Navigate to the Windows Preinstallation Environment folder and the processor architecture folder to the "amd64"
cd "..\Windows Preinstallation Environment\amd64"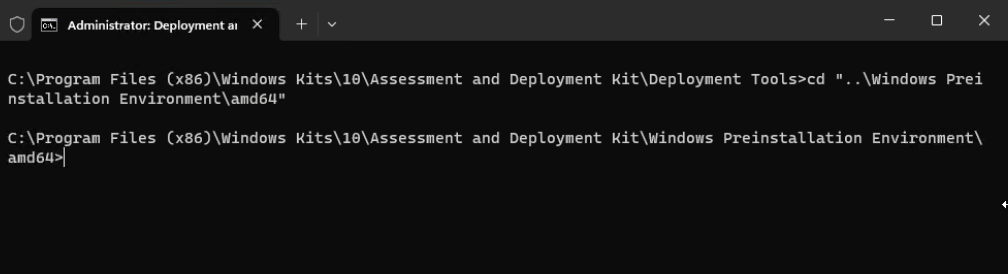
Figure 12. Navigate to the location “..\Windows Preinstallation Environment\amd64”Tip: AMD64 is not just for AMD processors; It is synonymous to the generic x86-64 term for the 64-bit instruction set used on Intel and AMD processors. The processor architecture folder name "amd64" applies equally to Intel processors.
- Mount the WinPE boot image.
md C:\WinPE_amd64\mount DISM /Mount-Image /ImageFile:"en-us\winpe.wim" /index:1 /MountDir:"C:\WinPE_amd64\mount" - While the WinPE boot image is mounted, copy the files noted below to create WinPE boot media with Windows UEFI 2023 CA signed.
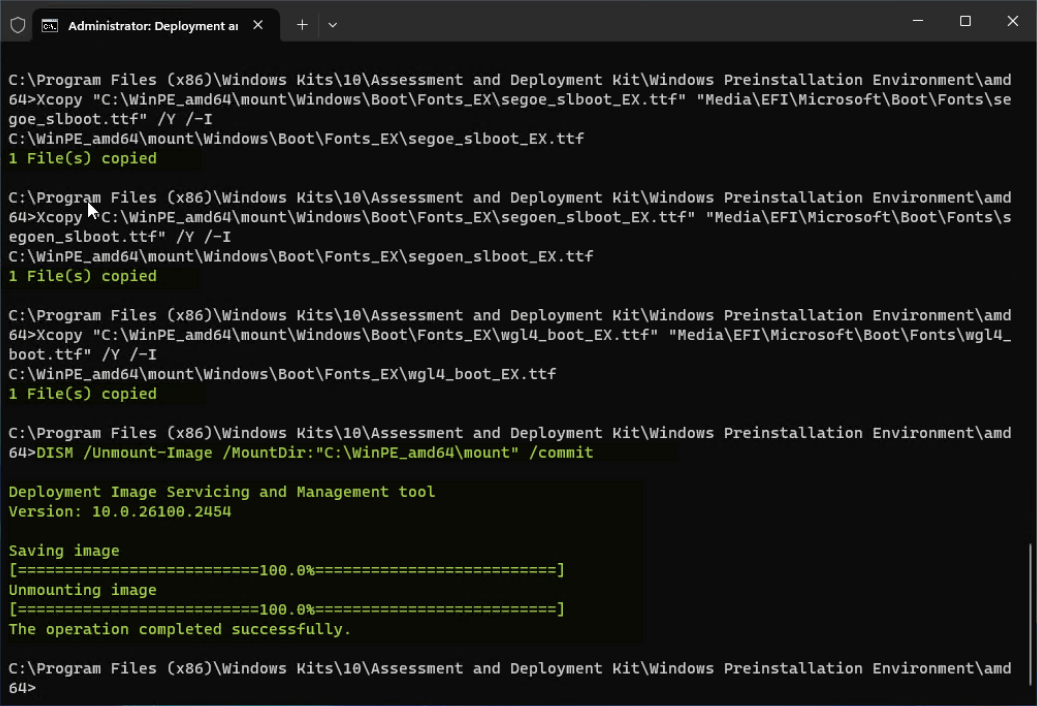
Xcopy "c:\WinPE_amd64\mount\Windows\Boot\EFI_EX\bootmgr_EX.efi" "Media\bootmgr.efi" /Y
Xcopy "c:\WinPE_amd64\mount\Windows\Boot\EFI_EX\bootmgfw_EX.efi" "Media\EFI\Boot\bootx64.efi" /Y
Xcopy "C:\WinPE_amd64\mount\Windows\Boot\Fonts_EX\chs_boot_EX.ttf" "Media\EFI\Microsoft\Boot\Fonts\chs_boot.ttf" /Y /-I
Xcopy "C:\WinPE_amd64\mount\Windows\Boot\Fonts_EX\cht_boot_EX.ttf" "Media\EFI\Microsoft\Boot\Fonts\cht_boot.ttf" /Y /-I
Xcopy "C:\WinPE_amd64\mount\Windows\Boot\Fonts_EX\jpn_boot_EX.ttf" "Media\EFI\Microsoft\Boot\Fonts\jpn_boot.ttf" /Y /-I
Xcopy "C:\WinPE_amd64\mount\Windows\Boot\Fonts_EX\kor_boot_EX.ttf" "Media\EFI\Microsoft\Boot\Fonts\kor_boot.ttf" /Y /-I
Xcopy "C:\WinPE_amd64\mount\Windows\Boot\Fonts_EX\malgun_boot_EX.ttf" "Media\EFI\Microsoft\Boot\Fonts\malgun_boot.ttf" /Y /-I
Xcopy "C:\WinPE_amd64\mount\Windows\Boot\Fonts_EX\malgunn_boot_EX.ttf" "Media\EFI\Microsoft\Boot\Fonts\malgunn_boot.ttf" /Y /-I
Xcopy "C:\WinPE_amd64\mount\Windows\Boot\Fonts_EX\meiryo_boot_EX.ttf" "Media\EFI\Microsoft\Boot\Fonts\meiryo_boot.ttf" /Y /-I
Xcopy "C:\WinPE_amd64\mount\Windows\Boot\Fonts_EX\meiryon_boot_EX.ttf" "Media\EFI\Microsoft\Boot\Fonts\meiryon_boot.ttf" /Y /-I
Xcopy "C:\WinPE_amd64\mount\Windows\Boot\Fonts_EX\msjh_boot_EX.ttf" "Media\EFI\Microsoft\Boot\Fonts\msjh_boot.ttf" /Y /-I
Xcopy "C:\WinPE_amd64\mount\Windows\Boot\Fonts_EX\msjhn_boot_EX.ttf" "Media\EFI\Microsoft\Boot\Fonts\msjhn_boot.ttf" /Y /-I
Xcopy "C:\WinPE_amd64\mount\Windows\Boot\Fonts_EX\msyh_boot_EX.ttf" "Media\EFI\Microsoft\Boot\Fonts\msyh_boot.ttf" /Y /-I
Xcopy "C:\WinPE_amd64\mount\Windows\Boot\Fonts_EX\msyhn_boot_EX.ttf" "Media\EFI\Microsoft\Boot\Fonts\msyhn_boot.ttf" /Y /-I
Xcopy "C:\WinPE_amd64\mount\Windows\Boot\Fonts_EX\segmono_boot_EX.ttf" "Media\EFI\Microsoft\Boot\Fonts\segmono_boot.ttf" /Y /-I
Xcopy "C:\WinPE_amd64\mount\Windows\Boot\Fonts_EX\segoe_slboot_EX.ttf" "Media\EFI\Microsoft\Boot\Fonts\segoe_slboot.ttf" /Y /-I
Xcopy "C:\WinPE_amd64\mount\Windows\Boot\Fonts_EX\segoen_slboot_EX.ttf" "Media\EFI\Microsoft\Boot\Fonts\segoen_slboot.ttf" /Y /-I
Xcopy "C:\WinPE_amd64\mount\Windows\Boot\Fonts_EX\wgl4_boot_EX.ttf" "Media\EFI\Microsoft\Boot\Fonts\wgl4_boot.ttf" /Y /-I
Figure 14. Copy all latest CA signed files to WinPE boot image - Unmount the WinPE image, committing the changes.
DISM /Unmount-Image /MountDir:"C:\WinPE_amd64\mount" /commit - Re-start the Deployment and Imaging Tools Environment as an Administrator.
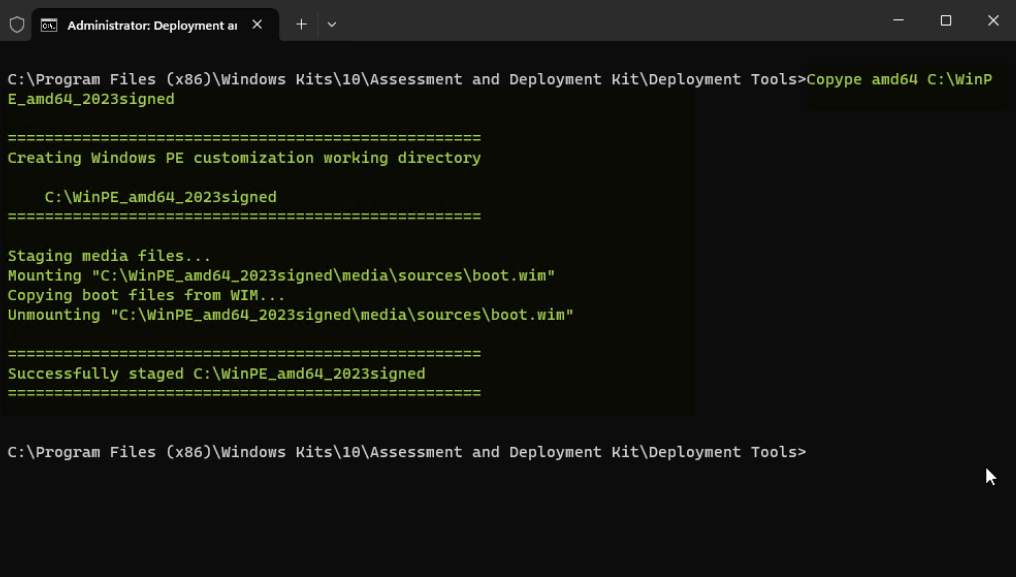
- Run copype to create a working copy of the WinPE boot image files.
copype amd64 C:\WinPE_amd64_2023signed - The type of WinPE media created depends upon the scenario requirements. Creation of two types of bootable WinPE media (USB and ISO) images are outlined below.
- Create a bootable WinPE USB drive
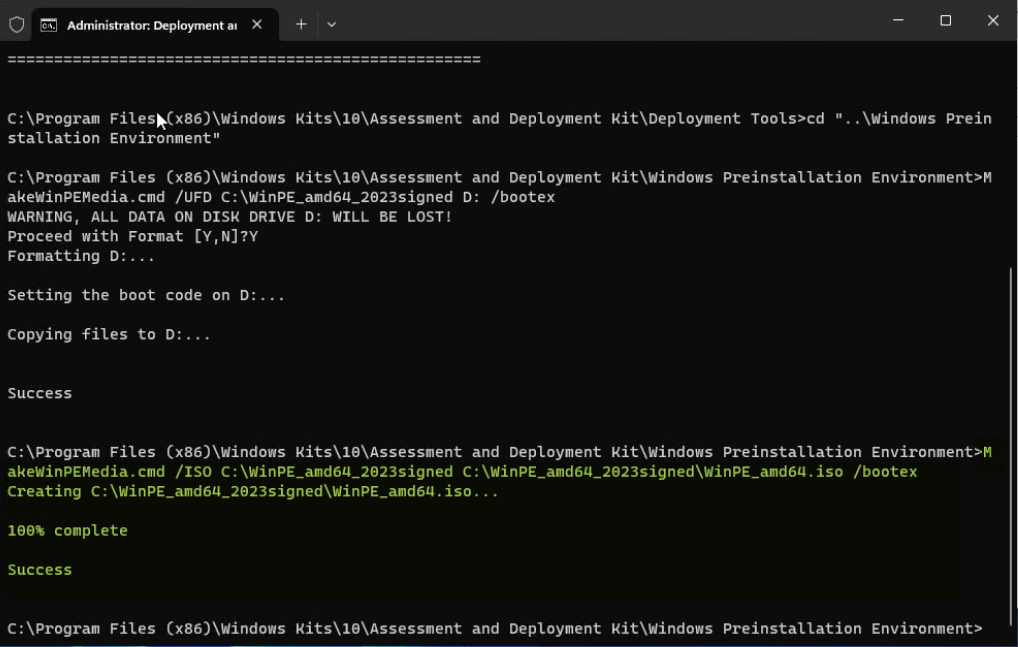
To create a bootable WinPE to a USB drive, use MakeWinPEMediawith the /UFD option to format and install WinPE to the USB drive, specifying the USB key's drive letter. Note that /bootex option is necessary for CA 2023 signed.
cd "..\Windows Preinstallation Environment"
MakeWinPEMedia /UFD C:\WinPE_amd64_2023signed [USB drive letter]: /bootex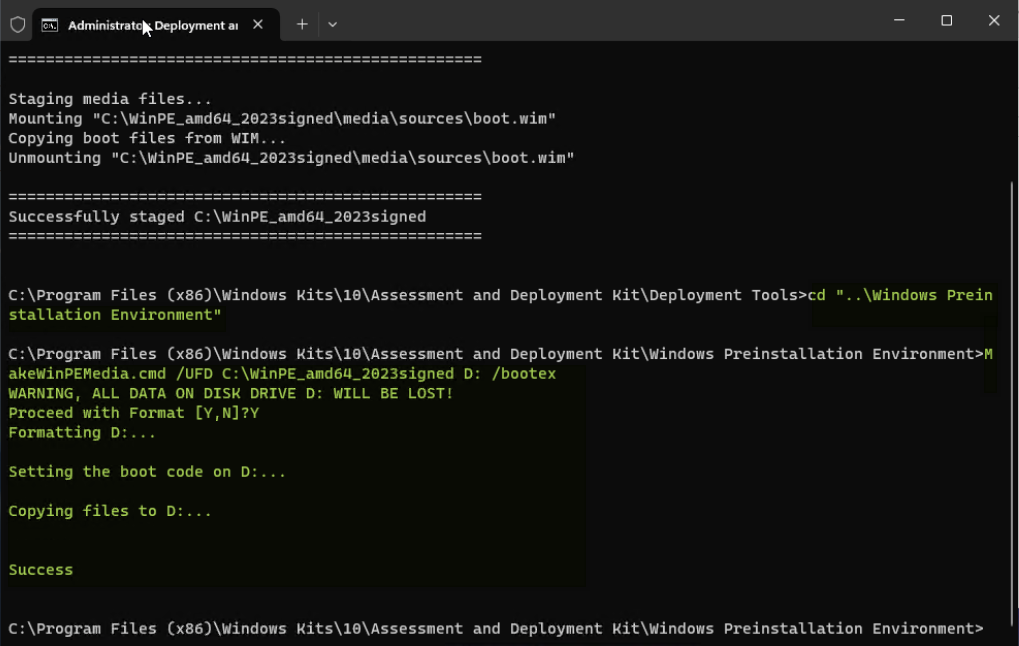
Figure 17. Create a bootable WinPE USB driveNotes:
- This process will reformat your USB drive. Before running MakeWinPEMedia, please make sure there are no important file on your target USB drive.
- MakeWinPEMedia will format your target USB Windows PE drive as FAT32. If you want to be able to store files larger than 4GB on your WinPE USB drive, you can create a multi-partition USB drive that has an additional partition formatted as NTFS. See Create a multipartition USB drive for instructions.
- Create a WinPE ISO
To create a bootable WinPE ISO image file, use MakeWinPEMedia with the /ISO option to create an ISO file containing the Windows PE files. Note that applying the /bootex option is necessary for CA 2023 signed certificate.
cd "..\Windows Preinstallation Environment"
MakeWinPEMedia /ISO C:\WinPE_amd64_2023signed C:\WinPE_amd64_2023signed\WinPE_amd64.iso /bootex
- Create a bootable WinPE USB drive

Verify the WinPE bootable media
After creating the bootable thumb drive as describe in the previous section, you can follow the steps below to check if the current certificate has been updated to the Windows UEFI CA 2023 certificate.
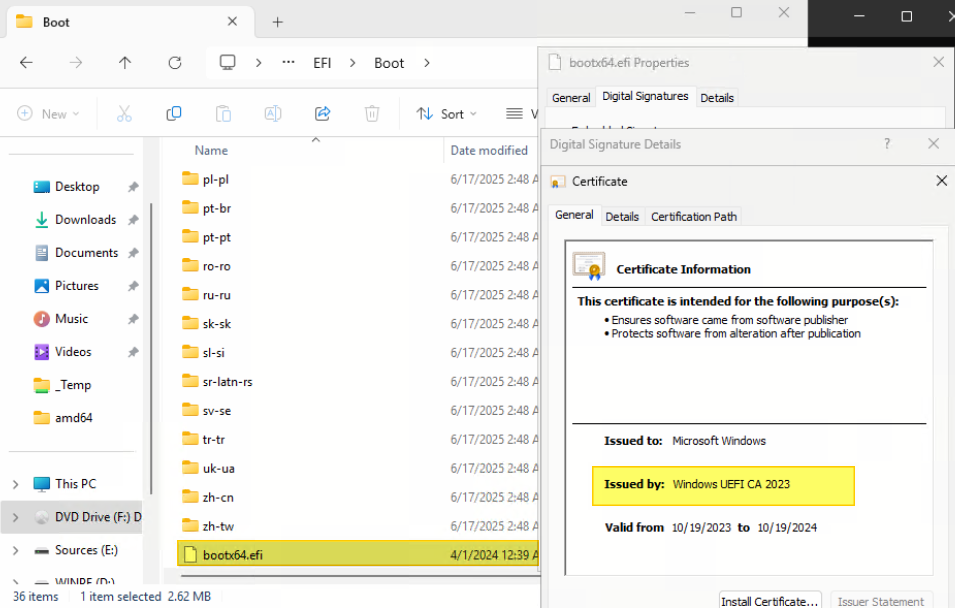
If you chose to create a USB thumb drive:
- Insert the USB thumb drive
- Navigate to the file \EFI\Boot\bootx64.efi on the USB drive
- Right click on the file and click Properties.
- Verify that the Issued by field says Windows UEFI CA 2023.
If you chose to create an ISO image:
References
For more information, see these resources:
- Microsoft Support, “Windows Secure Boot certificate expiration and CA updates,”
https://support.microsoft.com/en-us/topic/windows-secure-boot-certificate-expiration-and-ca-updates-7ff40d33-95dc-4c3c-8725-a9b95457578e - Microsoft Learn, “Windows Secure Boot Key Creation and Management Guidance,”
https://learn.microsoft.com/en-us/windows-hardware/manufacture/desktop/windows-secure-boot-key-creation-and-management-guidance?view=windows-11#14-signature-databases-db-and-dbx - Microsoft Support, “How to manage the Windows Boot Manager revocations for Secure Boot changes associated with CVE-2023-24932,”
https://support.microsoft.com/en-us/topic/how-to-manage-the-windows-boot-manager-revocations-for-secure-boot-changes-associated-with-cve-2023-24932-41a975df-beb2-40c1-99a3-b3ff139f832d - Microsoft Support, “Updating Windows bootable media to use the PCA2023 signed boot manager,”
https://support.microsoft.com/en-us/topic/updating-windows-bootable-media-to-use-the-pca2023-signed-boot-manager-d4064779-0e4e-43ac-b2ce-24f434fcfa0f - Microsoft Support, “Enterprise Deployment Guidance for CVE-2023-24932,”
https://support.microsoft.com/en-us/topic/enterprise-deployment-guidance-for-cve-2023-24932-88b8f034-20b7-4a45-80cb-c6049b0f9967#id0ebbl=overview&id0ebbj=overview&id0ebbh=overview&id0ebbf=overview - Microsoft Support, “Secure Boot DB and DBX variable update events,”
https://support.microsoft.com/en-us/topic/secure-boot-db-and-dbx-variable-update-events-37e47cf8-608b-4a87-8175-bdead630eb69
Author
Wewe Chang is a Windows Engineer in the Lenovo Infrastructure Solutions Group, based in Taipei, Taiwan. She has more than 10 years of experience with Windows kernel and user mode debugging.
Special thanks to the following people for their contributions and suggestions:
- Ronald Arndt Jr, Advisory Engineer, ThinkAgile Development
- Gary Cudak, Principal OS Engineer, ThinkAgile Development
- Boyong Li, Senior Engineer, OS Enablement
- David Watts, Lenovo Press
Trademarks
Lenovo and the Lenovo logo are trademarks or registered trademarks of Lenovo in the United States, other countries, or both. A current list of Lenovo trademarks is available on the Web at https://www.lenovo.com/us/en/legal/copytrade/.
The following terms are trademarks of Lenovo in the United States, other countries, or both:
Lenovo®
ThinkAgile®
The following terms are trademarks of other companies:
AMD is a trademark of Advanced Micro Devices, Inc.
Intel®, the Intel logo is a trademark of Intel Corporation or its subsidiaries.
Microsoft, BitLocker, PowerShell, Windows, and Windows Server are trademarks of Microsoft Corporation in the United States, other countries, or both.
Other company, product, or service names may be trademarks or service marks of others.
Configure and Buy
Please select a locale
Full Change History
Changes in the March 27, 2026 update:
- Added further information about the AvailableUpdates registry key described in Step 3 in Update Boot Manager to Windows UEFI CA 2023
First published: January 12, 2026
Course Detail
Employees Only Content
The content in this document with a is only visible to employees who are logged in. Logon using your Lenovo ITcode and password via Lenovo single-signon (SSO).
The author of the document has determined that this content is classified as Lenovo Internal and should not be normally be made available to people who are not employees or contractors. This includes partners, customers, and competitors. The reasons may vary and you should reach out to the authors of the document for clarification, if needed. Be cautious about sharing this content with others as it may contain sensitive information.
Any visitor to the Lenovo Press web site who is not logged on will not be able to see this employee-only content. This content is excluded from search engine indexes and will not appear in any search results.
For all users, including logged-in employees, this employee-only content does not appear in the PDF version of this document.
This functionality is cookie based. The web site will normally remember your login state between browser sessions, however, if you clear cookies at the end of a session or work in an Incognito/Private browser window, then you will need to log in each time.
If you have any questions about this feature of the Lenovo Press web, please email David Watts at dwatts@lenovo.com.


