

Top
Author
Published
17 Feb 2026Form Number
LP2370PDF size
20 pages, 1.4 MBSubscribed to LP2370.
Thank you for your feedback.
Table of Contents
Abstract
This paper provides a detailed guide for installing and configuring Python and necessary libraries on Windows to manage Lenovo XClarity Controller (XCC) via Python scripts, including downloading Lenovo-specific scripts from GitHub, editing configuration files to connect to XCC, and examples of running scripts to gather server information, along with references to additional resources and update instructions.
This document is designed for first time users of Python, scripting and interacting with the Lenovo XCC.
Introduction
Python is a high‑level, general‑purpose programming language designed to be readable, flexible, and efficient. In the context of data centers, Python becomes a powerful automation engine. It can execute scripts that interact with servers, network devices, storage systems, and cloud platforms. Through libraries such as Ansible modules, and REST API clients, Python can remotely connect to servers, issue commands, transfer files, gather metrics, and orchestrate multi‑step workflows. These features enables administrators to automate repetitive tasks, enforce configuration consistency, and manage thousands of machines with predictable, repeatable processes.
Python’s strengths become even more pronounced when paired with Lenovo’s data‑center ecosystem, especially the Lenovo XClarity Controller (XCC) and Lenovo XClarity Administrator (LXCA). These platforms expose rich, well‑structured REST APIs that Python can interact with seamlessly, turning routine server management into fully automated workflows. Lenovo offers a large library of scripts that can be used to interact with the XCC. The Lenovo scripts in the GitHub repository section at the end of this document has a complete list of the Lenovo Python scripts.
Trying to get all the items needed to use Python scripts under Windows is not always straightforward, especially if you are unfamiliar with the process. This guide will assist you with installing the correct tools for the first time.
This document is focused on Python in a Windows environment. The main site for where the scripts are located is the following:
https://github.com/lenovo/python-redfish-lenovo
Note: Lenovo supports other methods to access the XCC, including Redfish, PowerShell, or a web browser, however we only cover Python in this paper.
The the following are the latest releases, as of January 9, 2026:
- Python for Windows 3.14.2 (64-bit)
- PIP 25.3
- Redfish 3.3.4
- Configparser 7.2.0
- PIP requests, various versions
- GitHub Desktop app 3.5.4 (64-bit)
By following this document you will perform the following tasks:
- Install and configure Python and the PIP applications in Windows
- Install Redfish, configparser, requests
- Install the Lenovo .py files to access the XCC
- Edit the default configuration file to talk to the XCC
- Explore communicating to the XCC
Throughout the document, there are commands listed for each step. You can copy and paste those in your command prompt shell.
Installing Python and libraries
This section describes how to install Python as well as the libraries that are needed to run the Lenovo scripts.
Install Python as follows:
- Download Python from https://www.python.org/downloads/windows/
Install from Microsoft Store: If you prefer, you can install Python using the Python Install Manager from the Microsoft store.
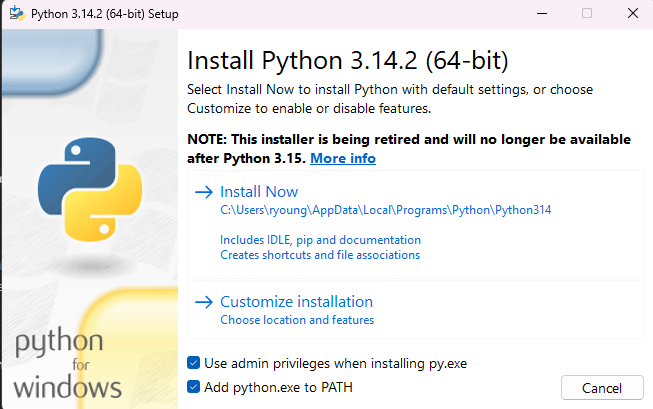
- Run the installer. The following figure shows the key installation dialog.
- Follow instructions for specific version.
- Select Add python.exe to PATH in the Setup wizard when promted
- Depending on your environment, you might need to run with Administrator permissions by right-clicking on the installer and selecting Run as Administrator.
- At the end of the installation, you'll see the following windows. Optionally click Disable path length limit if you want to run Python from a folder other than the installation directory.
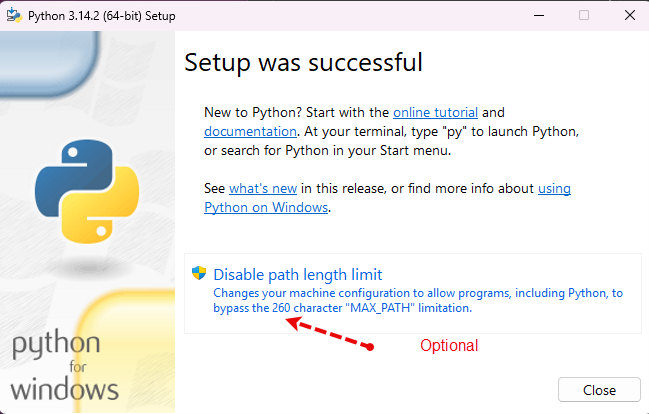
Figure 2. Install completion - Reboot the OS after the installation.
Verify that Python and PIP (Python package installer) were installed correctly:
- Open a Command Prompt window.
- Enter the command python without parameters. If installation was successful, you will see the following:
python
Figure 3. Issuing the python command to verify installationIf you see an error, or the Microsoft Store is launched, then this could be a path issue. To test, change to the directory that was used in the install and re-type the command. Also, verify you rebooted after the install.
- Enter the command py without parameters:
py - By default, the Python package installer PIP should be installed. Enter the following pip command:
pip --versionIf the pip command can't be found, verify that you rebooted after the Python install.


Install the three additional Python libraries that we will need:
- Install the python redfish library:
pip install redfishYou will see several items being installed and should see successfully installed at the end.
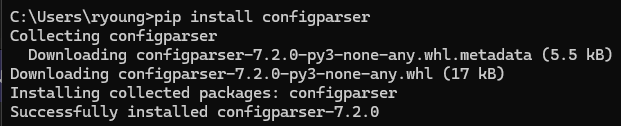
- Install configparser:
pip install configparserThe configparser library only supports python3 starting from configparser 5.0.0. If you are using python2.7, please specify version 4.0.2 while installing using the following command:
pip install configparser==4.0.2A successful configparser install looks like the following:
- Install requests:
pip install requestsA successful installation looks like the following:

Installing Lenovo specific .py files
Now that Python and the associated libraries are installed, the next step is to install the custom Lenovo scripts.
The following steps will download and install the specific Lenovo related files to communicate with your servers. You can perform this task in one of three ways:
- Use the GitHub desktop application
- Use the GitHub web site
- Manually download the required items
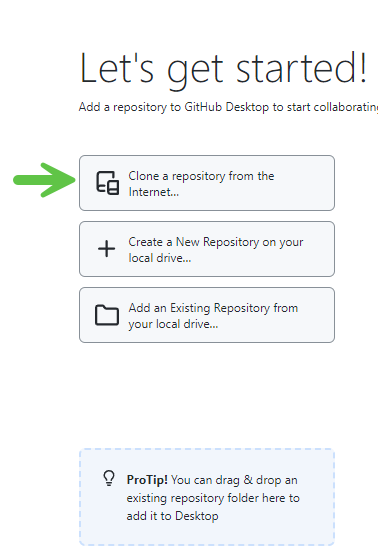
We will use the GitHub desktop application, because it makes it easier to download the required files.
Following these steps to download the python-redfish-lenovo script repository from GitHub using the GitHub desktop app:
- Download and install GitHub from: https://desktop.github.com/download/
- You will be asked to sign into your GitHub account, create an account, or skip. Select which one is best for your situation. More details on these options can be found on the GitHub site under Help or Documentation.
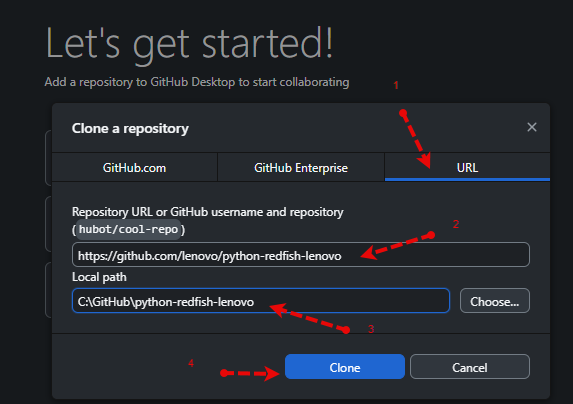
- Open the GitHub app and click Clone a repository from the Internet as shown below:
- The following window will be displayed; Follow the steps as indicated in the figure below:
- Click URL to show that tab
- Enter this link under the Repository URL: https://github.com/lenovo/python-redfish-lenovo
- Change the Local Path if needed
- Click Clone
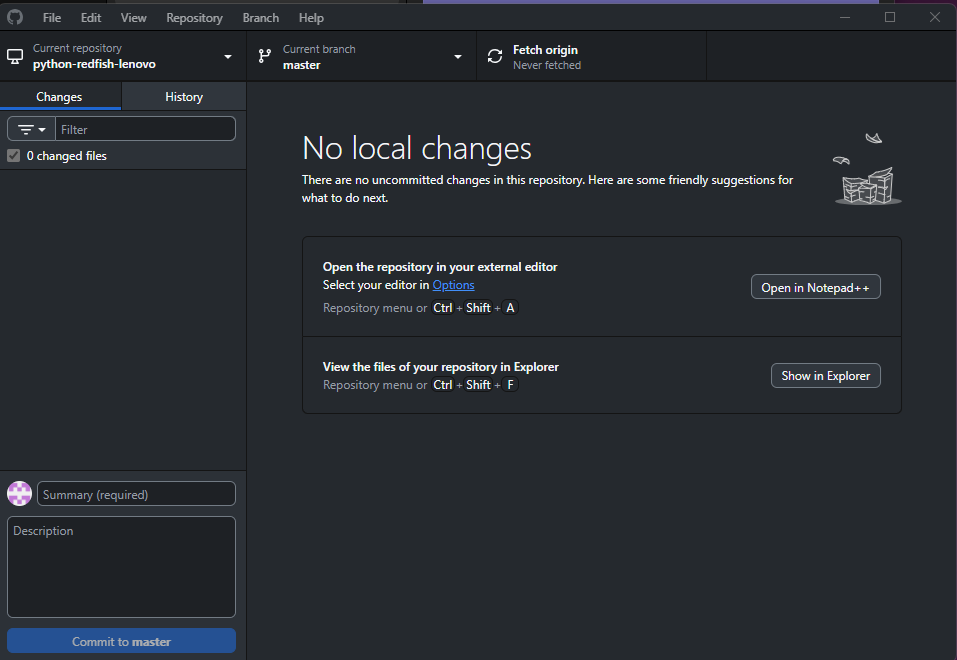
- GitHub will download the files and bring you back to the GitHub Desktop App screen. You can close the application.
- Reboot the OS
For a list of the Lenovo Python scripts included in the package, see the Appendix at the end of this document.
Modifying the config.ini file
To run the Python scripts against a single XCC, you will need to edit the config.ini file. By default, the file will be in the /examples folder where you previously downloaded the Python scripts. For more details review the “README.md” and “products_supported.txt” files located in the Lenovo GitHub folder.
There are 3 entries in the config.ini file that you will need to change to allow the script to communicate with the XCC. These will need to match the XCC you are trying to access.
- BmcIp - IP address of XCC
- BmcUsername - User name of the XCC user
- BmcUserpassword - Pasword of the XCC user
The following figure shows the default file.
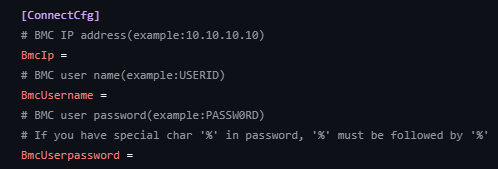
Figure 11. default config file
The following figure shows an example of one that has been edited.
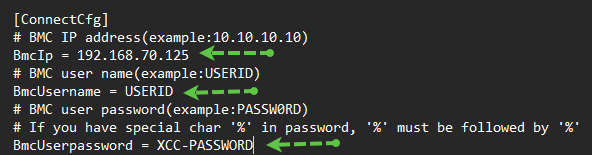
Figure 12. Example of edited config.ini file
There are additional items that can be altered in the file, including doing more with configuration files, the use of virtual media mounts, etc. This document doesn’t go into that level of detail; the three parameters above are the basic parameters needed to connect to a remote XCC.
Important security note: The config.ini file saves your XCC password in plain text. Ensure that the script is saved in a secure location and that you will be running it on a secure network
Running the Lenovo scripts
After completing the above steps, you are ready to run the various scripts. The Appendix: Lenovo scripts in the GitHub repository at the end of this document has a complete list of the Lenovo Python scripts.
This section shows a few examples and the output from each.
- Example 1. Gather all the BIOS attributes from the server
- Example 2. Gather data on the CPUs installed in the server
- Example 3. Gather data on firmware levels in the server
- Example 4. Gather and save the FFDC log file
Some commands such as get_all_bios_attributes.py return a lot of data; our screenshots only show a subset of the output.
If you want to save the output to a text file versus being displayed in the console window, add >filename.txt to the end of the command. You can use a filename that makes sense for you. For example:
py get_cpu_inventory.py >cpu.txt
Note: We use the py command to launch these scripts. You could also use the python command if desired.
To run the scripts, start by opening a Command Prompt window. Depending on your privileges, you may need to open the command prompte as an Administrator.
Example 1. Gather all the BIOS attributes from the server
This script will gather all the available options in uEFI and display the current status of each entery. This can be helpful to compare settings from 2 servers when you want to verify they are the same values.
py get_all_bios_attributes.py
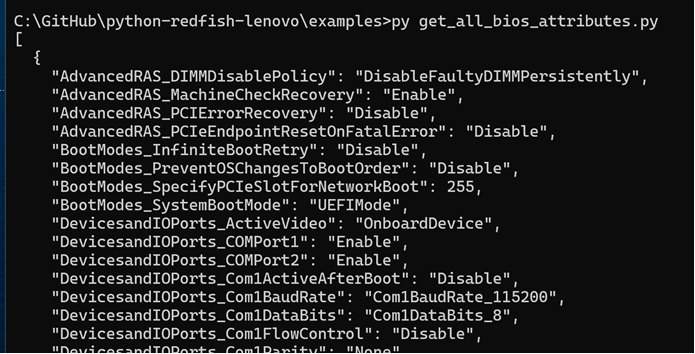
Figure 13. Example of BIOS details
Example 2. Gather data on the CPUs installed in the server
This script will gather all the details around the processor installed in the server. In the example below, you can see it’s an Intel Xeon Gold 6240M processor running at 2.60 GHz.
py get_cpu_inventory.py
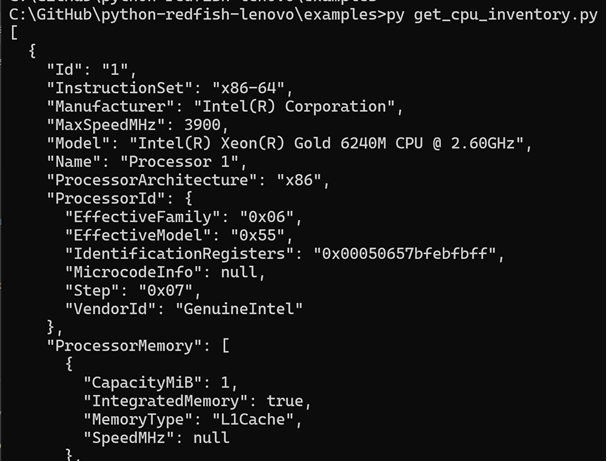
Figure 14. Example of Processor details
Example 3. Gather data on firmware levels in the server
The following script will show you the various firmware levels since the last inventory was completed during the POST process. Using more advanced scripting, this can be used to check a server and then update the firmware if downlevel from your approved level(s). Note, this list can be large as it includes all known firmware for the hardware installed.
This list can be large as it includes all known firmware for the hardware installed.
py get_fw_inventory.py
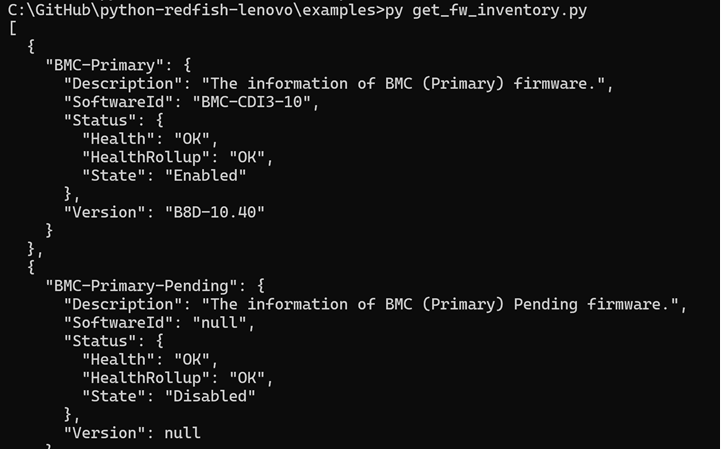
Figure 15. Example of firmware levels
Additional data from above command listing the uEFI firmware level.
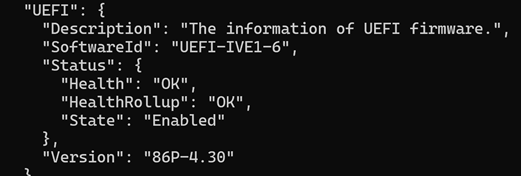
Figure 16. Example of UEFI firmware level
Example 4. Gather and save the FFDC log file
This script allows you to collect the First Failure Data Capture (FFDC) data so it can be uploaded to Lenovo Support.
py lenovo_export_ffdc_data.py

Updating Python
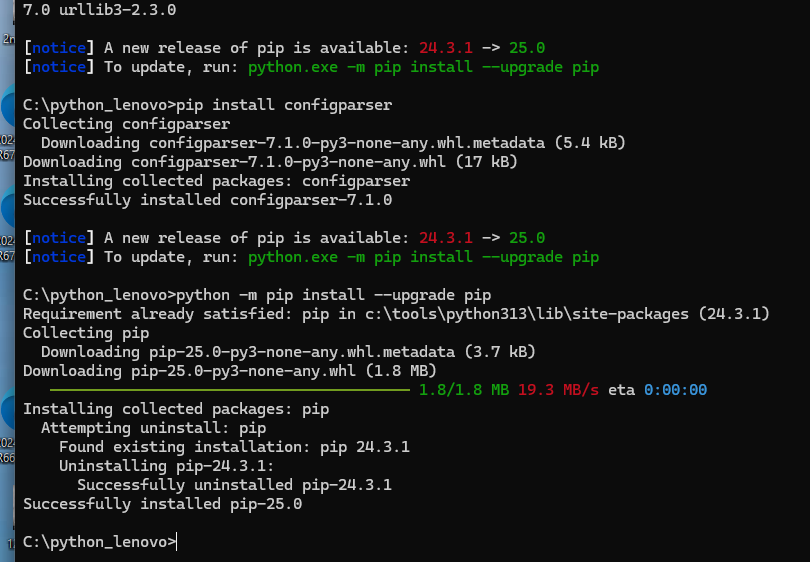
As with every application, there could be updates released for the various items installed above. Please review the individual applications and update them as necessary. Here is an example of how you can upgrade PIP.
python -m pip install --upgrade pip
The following figure shows an example of a system that needed to be updated.
Updating the Lenovo scripts
There are two different ways you can update the Lenovo scripts:
Option 1
Update using the GitHub application:
- Go to the GitHub site listed in the Installing Lenovo specific .py files section. Verify that you have the “python-redfish-lenovo” selected in your current repository.
- Click Fetch origin near the top of the screen as shown below.
- If there are updates you can download them and update the directory.

Figure 19. Update using GitHub desktop application
Option 2
Download the zip file containing all the script files manually, unzip the downloaded file.
- Go to the following web site in your browser: https://github.com/lenovo/python-redfish-lenovo
- Click the green Code button
- In the dropdown menu, click Download ZIP.

Figure 20. Update scripts via website
Once downloaded, you can exact the files to the directory you want to use.
Tip: If you overwrite the exiting folder, make sure to make the necessary changes to the config.ini file. Consider creating a new folder, edit the config.ini file there, in case you need to revert back to the previous version.
Final thoughts
The above are just a few examples to help you get started. If you want to explore more ways to use Python and interact with your Lenovo servers, please see the additional links below.
Additional links to various documentation sites that can be of help when interacting with the XCC:
- XCC Rest API Pubs site:
https://pubs.lenovo.com/xcc-restapi/tools_for_redfish - Main GitHub site:
https://github.com/lenovo/ - XCC Users Guide
https://pubs.lenovo.com/xcc/ - XCC2 Users Guide
https://pubs.lenovo.com/xcc2/ - XCC3 Users Guide
https://pubs.lenovo.com/xcc3/
Appendix: Lenovo scripts in the GitHub repository
The following is the list of all the scripts included in the python-redfish-lenovo script repository, at the time of writing.
Caution when making changes: The add, delete and set commands change XCC settings, and providing the wrong parameters may result in unexpected results. Example, entering the wrong IPV4 address might stop you from communicating to the XCC. We recommend you use the get command to retrieve the current value of the setting first. This will then ensure you use the correct parameter when making the change.
Some of the scripts below may work on a subset of server models / XCC versions. To see how these commands are grouped and what commands are supported by each server family, review the “products_supported.txt” file located in the main directory where you stored the files. The following figure shows a portion of this file.
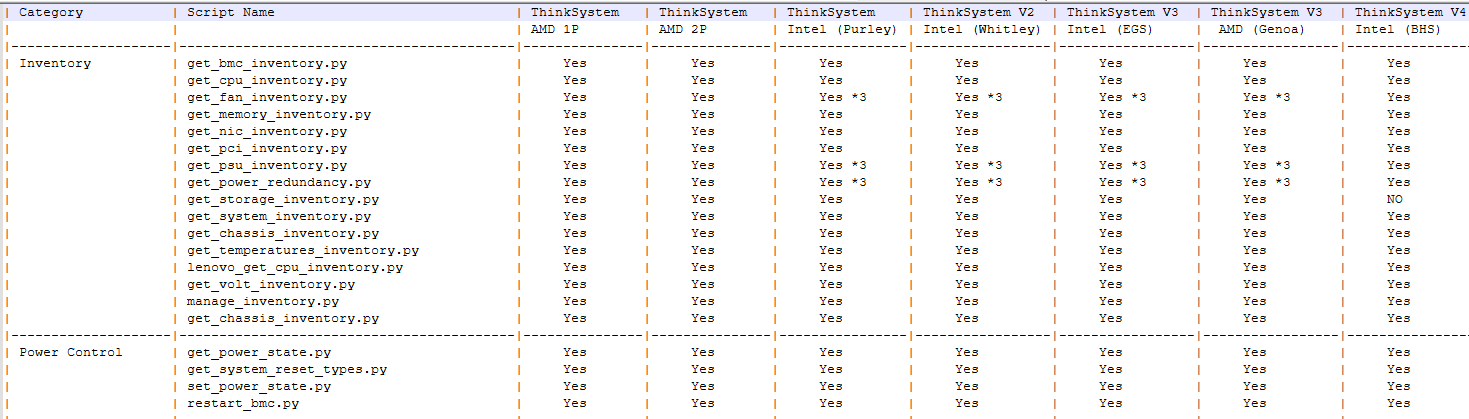
Figure 21. Sample of the products_supported.txt file showing grouping and supported servers
The following is the list of scripts currently available:
- Inventory
- get_bmc_inventory.py
- get_cpu_inventory.py
- get_fan_inventory.py
- get_memory_inventory.py
- get_nic_inventory.py
- get_pci_inventory.py
- get_psu_inventory.py
- get_power_redundancy.py
- get_storage_inventory.py
- get_system_inventory.py
- get_chassis_inventory.py
- get_temperatures_inventory.py -
- lenovo_get_cpu_inventory.py
- get_volt_inventory.py
- manage_inventory.py
- get_chassis_inventory.py
- Power Control
- get_power_state.py
- get_system_reset_types.py
- set_power_state.py
- restart_bmc.py
- Event Log
- get_system_log.py
- clear_system_log.py
- lenovo_export_ffdc_data.py
- Event subscription
- get_event_subscriptions.py
- add_event_subscriptions.py
- del_event_subscriptions.py
- send_test_event.py
- lenovo_add_alert_recipient.py
- lenovo_del_alert_recipient.py
- lenovo_get_alert_recipients.py
- BIOS settings
- get_all_bios_attributes.py
- get_bios_attribute.py
- set_bios_attribute.py
- get_bios_attribute_metadata.py
- reset_bios_default.py
- get_bios_bootmode.py
- set_bios_bootmode_legacy.py
- set_bios_bootmode_uefi.py
- lenovo_get_bios_boot_order.py
- lenovo_set_bios_boot_order.py
- get_server_boot_once.py
- get_server_boot_once_types.py
- set_server_boot_once.py
- get_secure_boot_status.py
- disable_secure_boot.py
- enable_secure_boot.py
- reset_secure_boot.py
- set_bios_password.py
- lenovo_set_amt.py
- User Management
- lenovo_get_bmc_user_accounts.py
- lenovo_create_bmc_user.py
- lenovo_delete_bmc_user.py
- update_bmc_user_password.py
- lenovo_get_bmc_user_global.py
- lenovo_set_bmc_user_global.py
- disable_bmc_user.py
- enable_bmc_user.py
- Light Path
- get_chassis_indicator_led.py
- set_chassis_indicator_led.py
- Power Management
- get_power_limit.py
- set_power_limit.py
- get_power_metrics.py
- BMC Configuration
- get_bmc_ntp.py
- set_bmc_ntp.py
- lenovo_set_bmc_dns.py
- get_networkprotocol_info.py
- set_networkprotocol.py
- lenovo_bmc_config_backup.py
- lenovo_bmc_config_restore.py
- get_serial_interfaces.py
- set_serial_interfaces.py
- lenovo_set_serial_interfaces.py
- get_hostinterface.py
- set_bmc_timezone.py
- set_bmc_vlanid.py
- lenovo_set_bmc_config_default.py
- set_bmc_ipv4.py
- lenovo_generate_snmp_engineid.py
- lenovo_get_snmp_global.py
- lenovo_set_snmp_global.py
- update_bmc_user_snmpinfo.py
- set_bmc_hostname.py
- lenovo_callhome_setting.py
- lenovo_callhome_getinfo.py
- Virtual Media
- get_virtual_media.py
- mount_virtual_media.py
- umount_virtual_media.py
- lenovo_mount_virtual_media.py
- lenovo_umount_virtual_media.py
- RAID Configuration
- lenovo_create_raid_volume.py
- lenovo_delete_raid_volume.py
- lenovo_update_raid_volume.py
- set_raid_encryption_mode.py
- FW Update
- get_fw_inventory.py
- update_firmware.py
- lenovo_update_firmware.py
- firmware_startupdate.py
- Telemetry
- get_metric_definition_report.py
- send_test_metric.py
- Session
- get_sessions.py
- clear_sessions.py
- License
- lenovo_bmc_license_delete.py
- lenovo_bmc_license_export.py
- lenovo_bmc_license_getinfo.py
- lenovo_bmc_license_import.py
- LDAP
- lenovo_get_bmc_external_ldap.py
- lenovo_set_bmc_external_ldap.py
- lenovo_ldap_certificate_disable.py
- lenovo_ldap_certificate_enable.py
- lenovo_get_bmc_user_ldap_policy.py
- lenovo_set_bmc_user_ldap_policy.py
- lenovo_ldap_certificate_add.py
- Security
- lenovo_eklm_keyserver_config.py
- lenovo_eklm_keyserver_getinfo.py
- lenovo_eklm_certificate_generate_csr.py
- lenovo_eklm_certificate_import.py
- lenovo_ekms_localcache_setting.py
- lenovo_ssl_certificate_getinfo.py
- lenovo_ssl_certificate_generate_csr.py
- lenovo_ssl_certificate_import.py
- lenovo_get_ssh_pubkey.py
- lenovo_import_ssh_pubkey.py
- lenovo_delete_ssh_pubkey.py
- lenovo_httpfs_certificate_import.py
- lenovo_httpfs_certificate_getinfo.py
- lenovo_httpfs_certificate_enable.py
- lenovo_httpfs_certificate_disable.py
- lenovo_httpfs_certificate_delete.py
- Other
- set_server_asset_tag.py
- get_all_tasks.py
- del_tasks.py
- get_schema.py
- set_system_name.py
- raw_command_get.py
- raw_command_patch.py
- raw_command_post.py
Author
Ron Young is a Senior Lenovo Solutions Architect working in the Lenovo Infrastructure Solutions Group (ISG) based in Minneapolis, Minnesota. He has more than 27 years of experience with Infrastructure solutions in his career at both IBM and Lenovo.
Thanks to the following people for reviewing and providing feedback on this document:
- Ted Tansill
- Terry Flickinger
Trademarks
Lenovo and the Lenovo logo are trademarks or registered trademarks of Lenovo in the United States, other countries, or both. A current list of Lenovo trademarks is available on the Web at https://www.lenovo.com/us/en/legal/copytrade/.
The following terms are trademarks of Lenovo in the United States, other countries, or both:
Lenovo®
XClarity®
The following terms are trademarks of other companies:
Intel®, the Intel logo and Xeon® are trademarks of Intel Corporation or its subsidiaries.
Microsoft, PowerShell, and Windows are trademarks of Microsoft Corporation in the United States, other countries, or both.
Other company, product, or service names may be trademarks or service marks of others.
Configure and Buy
Please select a locale
Full Change History
Course Detail
Employees Only Content
The content in this document with a is only visible to employees who are logged in. Logon using your Lenovo ITcode and password via Lenovo single-signon (SSO).
The author of the document has determined that this content is classified as Lenovo Internal and should not be normally be made available to people who are not employees or contractors. This includes partners, customers, and competitors. The reasons may vary and you should reach out to the authors of the document for clarification, if needed. Be cautious about sharing this content with others as it may contain sensitive information.
Any visitor to the Lenovo Press web site who is not logged on will not be able to see this employee-only content. This content is excluded from search engine indexes and will not appear in any search results.
For all users, including logged-in employees, this employee-only content does not appear in the PDF version of this document.
This functionality is cookie based. The web site will normally remember your login state between browser sessions, however, if you clear cookies at the end of a session or work in an Incognito/Private browser window, then you will need to log in each time.
If you have any questions about this feature of the Lenovo Press web, please email David Watts at dwatts@lenovo.com.


