

Top
Author
- Mary Hailu
Updated
27 Mar 2026Form Number
LP2383PDF size
21 pages, 488 KBSubscribed to LP2383.
Thank you for your feedback.
Abstract
NVIDIA Confidential Computing uses hardware-enforced isolation technologies, including Intel Trusted Domain Extensions (TDX) and AMD Secure Encrypted Virtualization (SEV), to establish trusted execution environments that enhance workload confidentiality and integrity.
This paper provides implementation guidance for configuring Secure AI on Lenovo ThinkSystem servers equipped with NVIDIA Hopper GPUs. It focuses on platform prerequisites, configuration steps, and validation considerations. Detailed architectural design and background information are available in the NVIDIA Confidential Computing whitepaper and the Canonical TDX GitHub repository.
Change History
Changes in the March 27, 2026 update:
- Corrected the VBIOS version for HGX Firmware 1.7.0 - Table 1
Introduction
Confidential computing protects data and code while they are actively executing, preventing unauthorized access or modification during runtime. Traditional security mechanisms primarily safeguard data at rest and in transit, such as when stored on persistent media or transmitted over the network. However, these mechanisms do not fully address the risk of data exposure while it is being processed within the CPU or system memory.
NVIDIA Confidential Computing addresses this gap by leveraging hardware-enforced isolation technologies, including Intel Trusted Domain Extensions (TDX) and AMD Secure Encrypted Virtualization (SEV), to establish trusted execution environments that enhance workload confidentiality and integrity.
This paper provides implementation guidance for configuring Secure AI on Lenovo ThinkSystem servers equipped with NVIDIA Hopper GPUs. It focuses on platform prerequisites, configuration steps, and validation considerations. Detailed architectural design and background information are available in the NVIDIA Confidential Computing whitepaper and the Canonical TDX GitHub repository.
Hardware and software requirements
The required VBIOS, kernel, and NVIDIA driver versions for enabling confidential computing are documented in the Release Notes section of the NVIDIA Trusted Compute Solutions website. These requirements define the minimum software components necessary for proper functionality.
The table below summarizes the specific versions that have been validated and tested on Lenovo servers.
To configure the system for confidential computing, the system BIOS must be set to enable the required features and security options. Lenovo has validated confidential computing on platforms utilizing both Intel and AMD processors. The following section outlines the BIOS settings and system configuration procedures necessary to ensure proper enablement and operation.
Configuring servers with Intel processors
This section explains how to configure ThinkSystem servers with Intel processors. We cover the BIOS settings and system configuration procedures necessary to ensure proper enablement and operation.
Enable Intel TDX in UEFI
Specific UEFI settings are required to enable confidential computing using Intel Trust Domain Extension (TDX).
Enter System Setup by pressing F1 when prompted during the boot sequence.
Set the following parameters in the System Settings > Processors page:
- Total Memory Encryption (TME) > Enabled
Note: Total Memory Encryption, which is a prerequisite for Multikey Total Memory Encryption - Total Memory Encryption (TME) Bypass > Auto
Note: Intel TME bypass mode allows memory outside of Intel MK-TME. Intel SGX enclaves, and Intel TDX trust domains to be unencrypted to improve the performance of non-confidential software. - Multikey Total Memory Encryption (MK -TME) > Enabled
Note: MK-TME is used by Intel TDX for the main memory encryption. - Trust Domain Extension (TDX) > Enabled
Note: Intel’s newest confidential computing technology - TDX Secure Arbitration Mode Loader > Enabled
Note: Defines from where the Intel TDX module is loaded. - Disable excluding Mem below 1MB in CMR > Auto
- TME-MT/TDX key split > 1
Note: how many keys are used for Intel MK-TME and how many for Intel TDX - SW Guard Extensions (SGX) > Enabled
Note: SGX is used by Intel TDX for remote attestation. - Limit CPU PA to 46 bits > Disabled
Save the changes and reboot the server.
Enable Intel TDX in the Host OS
The following steps prepare the host operating system for confidential computing. The primary host setup instructions can be found at: https://github.com/canonical/tdx/
- Download the required files and GitHub packages using the following commands:
$ sudo apt update $ sudo apt upgrade $ sudo reboot #if required $ git clone https://github.com/NVIDIA/gpu-admin-tools $ wget https://github.com/canonical/tdx/archive/refs/tags/3.3.zip $ unzip 3.3.zip $ mv tdx-3.3 tdx - Configure the host using the following commands:
$ cd tdx $ vim setup-tdx-config #Enable the following settings TDX_SETUP_ATTESTATION=1 TDX_SETUP_NVIDIA_H100=1 TDX_SETUP_INTEL_KERNEL=1 TDX_SETUP_APPS_OLLAMA=1 $ sudo ./setup-tdx-host.sh - Reboot the server
$ reboot - Verify Intel TDX is enabled on Host OS. The following dmesg output is displayed when TDX is enabled in UEFI.
$ sudo dmesg | grep -i tdx
[    9.555378] virt/tdx: BIOS enabled: private KeyID range [32, 64)
[    9.555380] virt/tdx: Disable ACPI S3. Turn off TDX in the BIOS to use ACPI S3.
[   37.564651] virt/tdx: TDX module: attributes 0x0, vendor_id 0x8086, major_version 1, minor_version 5, build_date 20240725, build_num 784
[   37.564665] virt/tdx: CMR: [0x100000, 0x77800000)
[   37.564672] virt/tdx: CMR: [0x100000000, 0x1003e000000)
[   37.564677] virt/tdx: CMR: [0x10080000000, 0x20040000000)
[   46.665769] virt/tdx: 8396820 KB allocated for PAMT
[   46.665779] virt/tdx: module initialized
Configuring GPUs for the Guest VM
There are two supported GPU usage configurations:
- Confidential Compute (CC) mode: Each GPU can be assigned to a single Confidential VM (CVM).
- Protected PCIe (PPCIe) mode: All GPUs must be assigned to a single Confidential VM (CVM).
These are described in the following subsections.
Configure the GPU for Confidential Compute (CC) Mode
Configure the GPUs using the following commands:
$ cd gpu-admin-tools

#Ensure GPUs are not in PPCIe mode
$ for i in $(seq 0 $(($(lspci -nn | grep -c "10de") - 1))); do sudo python3 ./nvidia_gpu_tools.py --set-ppcie-mode=off --reset-after-ppcie-mode-switch --gpu=$i; done

# Set GPUs into CC mode
$ for i in $(seq 0 $(($(lspci -nn | grep -c "10de") - 1))); do sudo python3 ./nvidia_gpu_tools.py --set-cc-mode=on --reset-after-cc-mode-switch --gpu=$i; done
Configure the GPU for Protected PCIe (PPCIe) Mode
Configure the GPUs using the following commands:
$ cd gpu-admin-tools

#Ensure GPUs are not in CC mode
$ for i in $(seq 0 $(($(lspci -nn | grep -c "10de") - 1))); do sudo python3 ./nvidia_gpu_tools.py --set-cc-mode=off --reset-after-cc-mode-switch --gpu=$i; done

#Set the GPUs and NVSwitches into Protected PCIe mode
$ for i in $(seq 0 $(($(lspci -nn | grep -c "10de") - 1))); do sudo python3 ./nvidia_gpu_tools.py --set-ppcie-mode=on --reset-after-ppcie-mode-switch --gpu=$i; done
Create and Setup the Guest VM with KVM/QEMU (Intel)
After enabling confidential compute mode, the GPUs are ready for direct assignment to the confidential virtual machine (CVM). This configuration persists across reboots and power cycles.
Note: As an alternative to step 1 below, if you have an existing Ubuntu 24.04 or 25.04 VM image, you can enable the Intel TDX feature by starting the guest VM and issuing the following commands:
$ git clone git@github.com:canonical/tdx.git
$ cd tdx
$ sudo ./setup-tdx-guest.sh
$ shutdown
- A TD image based on Ubuntu 24.04 can be generated with below command. This might take more than 15 minutes
$ cd tdx/guest-tools/image $ sudo ./create-td-image.sh -v 24.04 - Run setup-gpus.sh to see the GPUs to pass to the CVM – this step is mandatory
$ cd tdx/gpu-cc/h100 $ sudo ./setup-gpus.sh ================================ List of NVIDIA GPUs (PCI BDFs): 0000:18:00.0 0000:29:00.0 0000:3a:00.0 0000:4b:00.0 0000:9a:00.0 0000:aa:00.0 0000:ba:00.0 0000:ca:00.0 - Pass the GPU to the CVM
$ cd tdx/guest-tools $ sudo ./run_td --image=image/tdx-guest-ubuntu-24.04-intel.qcow2 --gpus=0000:18:00.0 Clean VM Run VM Image: image/tdx-guest-ubuntu-24.04-intel.qcow2 Passthrough GPUs: ['0000:18:00.0'] TD started by QEMU with PID: 33233. To log in with the non-root user (default: tdx / password: 123456), as specified in setup-tdx-config, use: $ ssh -p 10022 @localhost To log in as root (default password: 123456), use: $ ssh -p 10022 root@localhost - ssh to the guest vm
$ ssh -p 10022 root@localhost - Verify Intel TDX is enabled in TD
tdx@tdx-guest:~$ sudo dmesg | grep -i tdx [ 0.000000] tdx: Guest detected [ 0.000000] DMI: QEMU Standard PC (Q35 + ICH9, 2009), BIOS 2024.02-3+tdx1.0 07/03/2024 [ 2.507446] process: using TDX aware idle routine [ 2.670836] Memory Encryption Features active: Intel TDX [ 8.991340] systemd[1]: Detected confidential virtualization tdx. [ 9.006635] systemd[1]: Hostname set to . tdx@tdx-guest:~$ root@tdx-guest:~# lspci | grep -i nvidia 00:04.0 3D controller: NVIDIA Corporation GH100 [H100 SXM5 80GB] (rev a1) - Install dkms
root@tdx-guest:~# apt install dkms linux-headers-$(uname -r) - Download and install NVIDIA and CUDA
root@tdx-guest:~# wget https://developer.download.nvidia.com/compute/cuda/repos/ubuntu2404/x86_64/cuda-keyring_1.1-1_all.deb --2025-07-14 17:08:36-- https://developer.download.nvidia.com/compute/cuda/repos/ubuntu2404/x86_64/cuda-keyring_1.1-1_all.deb Resolving developer.download.nvidia.com (developer.download.nvidia.com)... 23.46.239.97, 23.46.239.91 Connecting to developer.download.nvidia.com (developer.download.nvidia.com)|23.46.239.97|:443... connected. HTTP request sent, awaiting response... 200 OK Length: 4328 (4.2K) [application/x-deb] Saving to: ‘cuda-keyring_1.1-1_all.deb’ cuda-keyring_1.1-1_all.deb 100%[=================================>] 4.23K --.-KB/s in 0s 2025-07-14 17:08:37 (103 MB/s) - ‘cuda-keyring_1.1-1_all.deb’ saved [4328/4328] root@tdx-guest:~# ls cuda-keyring_1.1-1_all.deb root@tdx-guest:~# root@tdx-guest:~# dpkg -i cuda-keyring_1.1-1_all.deb (Reading database ... 122899 files and directories currently installed.) Preparing to unpack cuda-keyring_1.1-1_all.deb ... Unpacking cuda-keyring (1.1-1) over (1.1-1) ... Setting up cuda-keyring (1.1-1) ... - Install the toolkit
root@tdx-guest:~# apt -get -y install cuda-toolkit-12-8 - Install the driver
root@tdx-guest:~# apt install nvidia-driver-570-open - Install and enable fabricmanager for PPCIe Multi-GPU mode
root@tdx-guest:~# apt install nvidia-fabricmanager-570
root@tdx-guest:~# systemctl enable nvidia-fabricmanager
root@tdx-guest:~# systemctl start nvidia-fabricmanager
root@tdx-guest:~# systemctl status nvidia-fabricmanager
Setup the NVIDIA Driver Persistence Mode
To setup the NVIDIA Driver Persistence Mode, perform the following steps:
- Issue the following commands in the guest OS:
root@tdx-guest:~# systemctl daemon-reload root@tdx-guest:~# systemctl enable nvidia-persistenced.service - Reboot the guest OS:
root@tdx-guest:~# reboot
- Verify driver setup:
root@tdx-guest:~# nvidia-smi Tue Jul 29 17:28:58 2025 +---------------------------------------------------------------------------------------+ | NVIDIA-SMI 570.172.08 Driver Version: 570.172.08 CUDA Version: 12.8 | +-----------------------------------------+----------------------+----------------------+ | GPU Name Persistence-M | Bus-Id Disp.A | Volatile Uncorr. ECC | | Fan Temp Perf Pwr:Usage/Cap | Memory-Usage | GPU-Util Compute M. | | | | MIG M. | +=========================================+======================+======================+ | 0 NVIDIA H100 80GB HBM3 On | 00000000:01:00.0 Off | 0 | | N/A 30C P0 67W / 700W | 145MiB / 81559MiB | 0% Default | | | | N/A | +-----------------------------------------+----------------------+----------------------+ +---------------------------------------------------------------------------------------+ | Processes: | | GPU GI CI PID Type Process name GPU Memory | | ID ID Usage | +=======================================================================================+ | No running processes found | +---------------------------------------------------------------------------------------+ - Verify the GPU Confidential Computing status:
root@tdx-guest:~# nvidia-smi conf-compute -f
CC status: ON
root@tdx-guest:~#
Configuring servers with AMD processors
This section explains how to configure ThinkSystem servers with AMD processors. We cover the BIOS settings and system configuration procedures necessary to ensure proper enablement and operation.
Enable AMD SEV-SNP in UEFI
Specific UEFI settings are required to enable confidential computing using AMD SEV-SNP.
Enter System Setup by pressing F1 when prompted during the boot sequence.
Set the following parameters in the System Settings > Memory > System Memory Details page:
- SMEE > Enabled
Note: main memory encryption - SEV-SE ASID Space limit > 100
Note: AMD SEV-ES encrypts CPU registers when a VM stops, preventing data leakage and detecting tampering.
Set the following parameters in the System Settings > Processors page:
- SVM Mode> Enabled
Note: Secure Virtual Machine - SEV-SNP Support > Enabled
Note: SEV-SNP protects memory integrity and prevents hypervisor attacks. - SNP Memory (RMP Table) Coverage > Enabled
- Secured-Cored >IOMMU > Enabled
Save the changes and reboot the server.
Enable AMD SEV-SNP and prepare the Host OS
The following steps prepare the host operating system for confidential computing.
- Boot the system to the host OS and issue the following commands:
$ sudo apt update $ sudo apt upgrade - Validate the kernel that was configured with the proper CC options and ensure the kernel version is 6.14+
$ uname -r 6.14.0-35-generic $ grep CONFIG_CRYPTO_EC /boot/config-6.14.0-35-generic CONFIG_CRYPTO_ECC=y CONFIG_CRYPTO_ECDH=y CONFIG_CRYPTO_ECDSA=m CONFIG_CRYPTO_ECRDSA=m CONFIG_CRYPTO_ECB=y CONFIG_CRYPTO_ECHAINIV=m - Verify kernel detects the SEV-SNP
root@monaco:~# dmesg | grep -i -e rmp -e sev [ 0.000000] SEV-SNP: RMP table physical range [0x000000152a6e0000 - 0x000000153faeffff] [ 0.004978] SEV-SNP: Reserving start/end of RMP table on a 2MB boundary [0x000000153fae0000] [ 23.736786] ccp 0000:54:00.5: sev enabled [ 23.748935] ccp 0000:d1:00.5: sev enabled [ 31.074307] ccp 0000:54:00.5: SEV API:1.55 build:65 [ 31.074330] ccp 0000:54:00.5: SEV-SNP API:1.55 build:65 [ 31.095300] kvm_amd: SEV enabled (ASIDs 100 - 1006) [ 31.095304] kvm_amd: SEV-ES enabled (ASIDs 1 - 99) [ 31.095305] kvm_amd: SEV-SNP enabled (ASIDs 1 - 99) - Enable IOMMU and VFIO. First Identify the PCI IDs.
You will want to have the following PCI IDs:
- GPU VID:DID (Vendor ID : Device ID)
- GPU SVID:SSID (Sub-Vendor ID : Sub-System ID)
- NVSwitch VID:DID (Vendor ID : Device ID)
Here are steps for how to identify these IDs:
- Identify VID:DID for GPU and NVSwitch with the following command:
$ lspci -nn | grep NVIDIA 2c:00.0 3D controller [0302]: NVIDIA Corporation GH100 [H200 SXM 141GB] [10de:2335] (rev a1) 55:00.0 3D controller [0302]: NVIDIA Corporation GH100 [H200 SXM 141GB] [10de:2335] (rev a1) 5d:00.0 3D controller [0302]: NVIDIA Corporation GH100 [H200 SXM 141GB] [10de:2335] (rev a1) 66:00.0 3D controller [0302]: NVIDIA Corporation GH100 [H200 SXM 141GB] [10de:2335] (rev a1) 84:00.0 3D controller [0302]: NVIDIA Corporation GH100 [H200 SXM 141GB] [10de:2335] (rev a1) 8b:00.0 3D controller [0302]: NVIDIA Corporation GH100 [H200 SXM 141GB] [10de:2335] (rev a1) d3:00.0 3D controller [0302]: NVIDIA Corporation GH100 [H200 SXM 141GB] [10de:2335] (rev a1) d6:00.0 Bridge [0680]: NVIDIA Corporation GH100 [H100 NVSwitch] [10de:22a3] (rev a1) d7:00.0 Bridge [0680]: NVIDIA Corporation GH100 [H100 NVSwitch] [10de:22a3] (rev a1) d8:00.0 Bridge [0680]: NVIDIA Corporation GH100 [H100 NVSwitch] [10de:22a3] (rev a1) d9:00.0 Bridge [0680]: NVIDIA Corporation GH100 [H100 NVSwitch] [10de:22a3] (rev a1) e1:00.0 3D controller [0302]: NVIDIA Corporation GH100 [H200 SXM 141GB] [10de:2335] (rev a1) - Pick the PCI BDF (Bus-Device-Function) for one of the GPUs. In the example for our lab installation, we use the first GPU's BDF, 2c:00.0.
- Run another command as below, to identify the SVID:SSID :
$ lspci -nnvs 2c:00.0 | grep Subsystem
        Subsystem: NVIDIA Corporation Device [10de:18be]
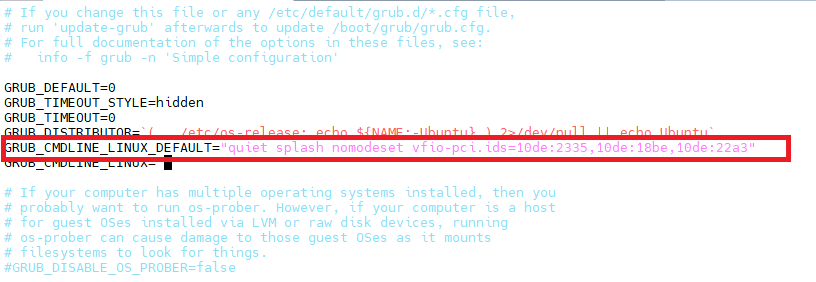
- Edit the GRUB configuration and add the NVIDIA GPU and NVSwitch bridge PCI IDs:
$ vim /etc/default/grubIn our example we edited the line as follows:
GRUB_CMDLINE_LINUX_DEFAULT="quiet splash nomodeset vfio-pci.ids=10de:2335,10de:18be,10de:22a3" - Update the existing initramfs image
$ update-initramfs -u - Reboot the server:
$ reboot - Add the PCI IDs to vfio-pci for device binding
$ echo 10de 2335 > /sys/bus/pci/drivers/vfio-pci/new_id $ echo 10de 22a3 >> /sys/bus/pci/drivers/vfio-pci/new_id - Verify the binding using the following command: the kernel driver in use should be vfio-pci as highlighted in red text:
$ lspci -vvs
...
              Region 3: Memory at 0000084000000000 (64-bit, prefetchable)
                VF Migration: offset: 00000000, BIR: 0
        Capabilities: [2a4 v1] Vendor Specific Information: ID=0001 Rev=1 Len=014
        Capabilities: [2b8 v1] Power Budgeting
        Capabilities: [2f0 v1] Device Serial Number ea-b2-06-2d-07-2d-b0-48
        Kernel driver in use: vfio-pci
        Kernel modules: nvidiafb, nouveau
Create and Setup the Guest VM with KVM/QEMU (AMD)
Follow these steps to create and setup the Guest VM:
- Run the following command to download an ISO of Ubuntu
$ wget https://releases.ubuntu.com/noble/ubuntu-24.04.3-live-server-amd64.iso - Create a blank VM drive
$ qemu-img create -f qcow2 ubuntu.qcow2 500G - Download the launch_vm.sh script from the attachment section, update the VDD_IMAGE, CDROM, and host (NVIDIA GPU PCI bus id) entries as needed, and then execute it to create the QEMU virtual machine
$ chmod +x launch_vm.sh - Launch the VM with cc disabled
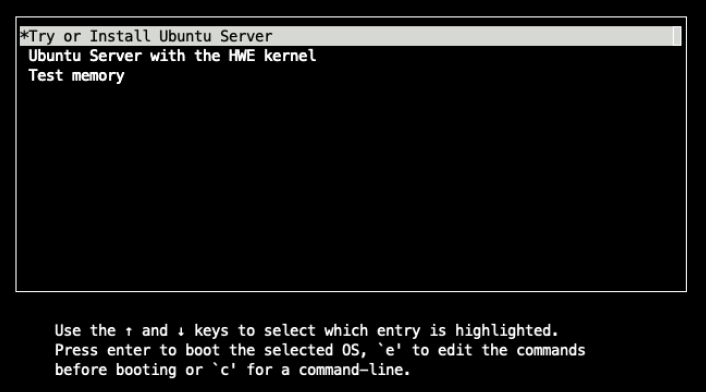
$ sudo ./launch_vm.sh -x - The above command starts the installation. Press e to edit the boot commands, as prompted below
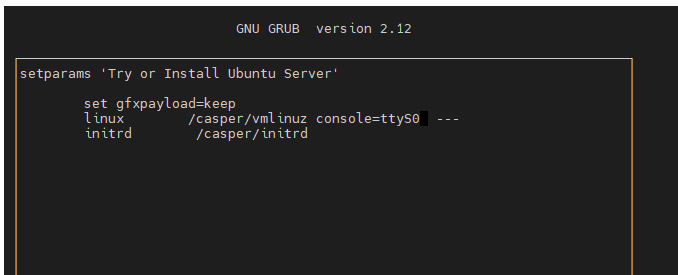
- Modify the Linux boot parameters to print output to the local console, add console=ttyS0. Press Ctrl +X to continue the boot process
- After the installation completes and the guest VM reboots, the VM will terminate.
- Edit the launch_vm.sh to remove the following line:
cdrom $CDROM - Run the script to log in to the VM
$ sudo ./launch_vm.sh -x

Configure PCIe BAR Remapping
Issue the following commands on the guest VM to configure PCIe BAR Remapping:
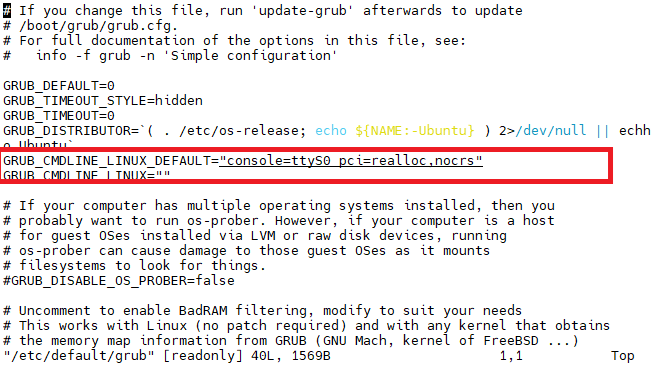
- Edit the grub configuration file on the guest VM:
$ sudo vim /etc/default/grubEdit the lines highlighted in the figure below.
- Regenerate the grub configuration file and reboot
$ sudo update-grub $ reboot - After the configuration is complete and the guest VM reboots, QEMU will terminate. From the host operating system, enable the confidential compute mode and relaunch the VM using launch_vm.sh. On the host, issue the following commands:
$ sudo git clone https://github.com/NVIDIA/gpu-admin-tools $ cd gpu-admin-tools $ sudo for i in $(seq 0 $(($(lspci -nn | grep -c "10de") - 1))); do sudo python3 ./nvidia_gpu_tools.py --set-cc-mode=on --reset-after-cc-mode-switch --gpu=$i; done $ cd<launch_vm.sh script directory>$ sudo ./launch_vm.sh -c sev-snp - Validate that the guest is running in confidential VM mode by issuing the following commands and comparing the output to what is shown here.
root@qemuvm:~# dmesg | grep -i sev [ 5.843653] Memory Encryption Features active: AMD SEV SEV-ES SEV-SNP [ 6.062527] SEV: APIC: wakeup_secondary_cpu() replaced with wakeup_cpu_via_vmexit() [ 7.114514] SEV: Using SNP CPUID table, 29 entries present. [ 7.817302] SEV: SNP guest platform device initialized. [ 12.403053] sev-guest sev-guest: Initialized SEV guest driver (using vmpck_id 0) [ 12.617408] kvm_amd: KVM is unsupported when running as an SEV guest root@qemuvm:~# lspci | grep -i nvidia 01:00.0 3D controller: NVIDIA Corporation GH100 [H200 SXM 141GB] (rev a1) - Install the NVIDIA drivers
$ wget https://developer.download.nvidia.com/compute/cuda/repos/ubuntu2404/x86_64/cuda-keyring_1.1-1_all.deb $ dpkg -i cuda-keyring_1.1-1_all.deb $ apt-get update $ apt-get -y install cuda-toolkit-13-0 $ apt-get install nvidia-driver-580-open - Reboot the server
$ reboot - After rebooting, relaunch the guest VM by issuing the following command on the host:
$ sudo ./launch_vm.sh -c sev-snp - Verify driver setup:
root@vm2024:~# nvidia-smi Tue Dec 9 19:44:04 2025 +-----------------------------------------+----------------------+----------------------+ +---------------------------------------------------------------------------------------+ | NVIDIA-SMI 580.105.08 Driver Version: 580.105.08 CUDA Version: 13.0 | +-----------------------------------------+----------------------+----------------------+ | GPU Name Persistence-M| Bus-Id Disp.A | Volatile Uncorr. ECC | | Fan Temp Perf Pwr:Usage/Cap| Memory-Usage | GPU-Util Compute M. | | | | MIG M. | +=========================================+======================+======================+ | 0 NVIDIA H200 On | 00000000:01:00.0 Off | 0 | | N/A 27C P0 72W / 700W | 0MiB / 143771MiB | 0% Default | | | | N/A | +-----------------------------------------+----------------------+----------------------+ +---------------------------------------------------------------------------------------+ | Processes: | | GPU GI CI PID Type Process name GPU Memory | | ID ID Usage | +=======================================================================================+ | No running processes found | +---------------------------------------------------------------------------------------+ - Issue the command shown below to verify that SEV is still enabled. Compare the output to what is shown here.
root@vm2024:~# dmesg | grep -i sev [ 5.792348] Memory Encryption Features active: AMD SEV SEV-ES SEV-SNP [ 6.008333] SEV: APIC: wakeup_secondary_cpu() replaced with wakeup_cpu_via_vmexit() [ 7.002523] SEV: Using SNP CPUID table, 38 entries present. [ 7.869956] SEV: SNP guest platform device initialized. [ 11.785211] sev-guest sev-guest: Initialized SEV guest driver (using vmpck_id 0) [ 12.000821] kvm_amd: KVM is unsupported when running as an SEV guest - Verify the GPU Confidential Computing status:
root@vm2024:~# nvidia-smi conf-compute -f
CC status: ON
root@vm2024:~# nvidia-smi conf-compute -d
DevTools Mode: OFF
root@vm2024:~# nvidia-smi conf-compute -mgm
Multi-GPU Mode: None
Problem determination
This section describes potential issues you might encounter and suggested resolution.
AMD servers: No device found / RmInitAdapter failed
Issue:
In the guest VM, after installing the NVIDIA driver, nvidia-smi displays “No device were found”; and the dmesg log reports an “RmInitAdapter failed!” error.
$ nvidia-smi

[   15.127657] systemd-random-seed[306]: Successfully saved random seed.
[   24.449657] systemd-journald[439]: /var/log/journal/9f6a34eba3354d0caef29a31f602019c/user-1000.journal: Journal file uses a different sequence number ID, rotating.
[   36.545054] NVRM: confComputeConstructEngine_IMPL: GPU confidential compute capability is not enabled.
[   36.545066] NVRM: NvAssertFailedNoLog: Assertion failed: 0 @ conf_compute.c:146
[   36.545094] NVRM: osInitNvMapping: *** Cannot attach gpu
[   36.545097] NVRM: RmInitAdapter: osInitNvMapping failed, bailing out of RmInitAdapter
[   36.545124] NVRM: GPU 0000:01:00.0: RmInitAdapter failed! (0x22:0x3f:763)
[   36.546926] NVRM: GPU 0000:01:00.0: rm_init_adapter failed, device minor number 0
Resolution:
Confirm that confidential compute mode is enabled on the GPUs; if not, enable confidential compute mode on the GPUs.
On the guest:
$ shutdown -r now
On the host, set all NVIDIA GPUs to CC mode:
$sudo for i in $(seq 0 $(($(lspci -nn | grep -c "10de") - 1))); do sudo python3 ./nvidia_gpu_tools.py --set-cc-mode=on --reset-after-cc-mode-switch --gpu=$i; done
AMD servers: Failed to start NVIDIA Persistence Daemon
Issue: The NVIDIA driver fails to initialize if the message ‘Failed to start nvidia-persistence…ervice -NVIDIA Persistence Daemon” appears during guest VM boot or in the dmesg logs.
[  OK  ] Started dbus.service - D-Bus System Message Bus.
[  OK  ] Finished e2scrub_reap.service - Reclaim ext4 Metadata Check Snapshots.
[  OK  ] Finished sysstat.service - Resets System Activity Logs.
[  OK  ] Started systemd-logind.service - User Login Management.
[FAILED] Failed to start nvidia-persistence.service - NVIDIA Persistence Daemon.
         See 'systemctl status nvidia-persistence.service' for details.
[  OK  ] Finished grub-common.service - Record successful boot for GRUB.
[  OK  ] Started switcheroo-control.service - Switcheroo Control Proxy service.
         Starting grub-initrd-fallback.service - GRUB failed boot detection...
[  OK  ] Started unattended-upgrades.service - Unattended Upgrades Shutdown.
[  OK  ] Started rsyslog.service - System Logging Service.
[  OK  ] Finished grub-initrd-fallback.service - GRUB failed boot detection.
[  OK  ] Started polkit.service - Authorization Manager.
Resolution:
Install Kernel Headers and DKMS:
$ sudo apt update && sudo apt install linux-headers-$(uname -r) dkms
$ sudo dkms autoinstall
$ reboot
After rebooting the guest VM, verify that the driver is loaded, and that the daemon is running:
$sudo nvidia-smi
$sudo systemctl status nvidia-persistenced.service
If the issue persists:
- Remove the NVIDIA drivers and all related dependencies.
- Reinstall the NVIDIA driver
- If reinstalling the driver does not resolve the issue, create a fresh VM and retry the installation.
Resources
For more information, see these resources:
- NVIDIA Deployment Guide for SecureAI
https://docs.nvidia.com/cc-deployment-guide-tdx.pdf - Github page for Intel TDX
https://github.com/canonical/tdx/ - NVIDIA Trusted Computing Solutions
https://docs.nvidia.com/nvtrust/index.html
Trademarks
Lenovo and the Lenovo logo are trademarks or registered trademarks of Lenovo in the United States, other countries, or both. A current list of Lenovo trademarks is available on the Web at https://www.lenovo.com/us/en/legal/copytrade/.
The following terms are trademarks of Lenovo in the United States, other countries, or both:
Lenovo®
ThinkSystem®
The following terms are trademarks of other companies:
AMD and AMD EPYC™ are trademarks of Advanced Micro Devices, Inc.
Intel®, the Intel logo and Xeon® are trademarks of Intel Corporation or its subsidiaries.
Linux® is the trademark of Linus Torvalds in the U.S. and other countries.
Other company, product, or service names may be trademarks or service marks of others.
Configure and Buy
Please select a locale
Full Change History
Changes in the March 27, 2026 update:
- Corrected the VBIOS version for HGX Firmware 1.7.0 - Table 1
First published: March 13, 2026
Course Detail
Employees Only Content
The content in this document with a is only visible to employees who are logged in. Logon using your Lenovo ITcode and password via Lenovo single-signon (SSO).
The author of the document has determined that this content is classified as Lenovo Internal and should not be normally be made available to people who are not employees or contractors. This includes partners, customers, and competitors. The reasons may vary and you should reach out to the authors of the document for clarification, if needed. Be cautious about sharing this content with others as it may contain sensitive information.
Any visitor to the Lenovo Press web site who is not logged on will not be able to see this employee-only content. This content is excluded from search engine indexes and will not appear in any search results.
For all users, including logged-in employees, this employee-only content does not appear in the PDF version of this document.
This functionality is cookie based. The web site will normally remember your login state between browser sessions, however, if you clear cookies at the end of a session or work in an Incognito/Private browser window, then you will need to log in each time.
If you have any questions about this feature of the Lenovo Press web, please email David Watts at dwatts@lenovo.com.


