

Top
Author
Published
23 Sep 2026Form Number
LP2516PDF size
34 pages, 4.5 MBSubscribed to LP2516.
Thank you for your feedback.
Abstract
Lenovo Edge solutions, including the ThinkAgile MX455 V3 and the 1U and 2U rack-mounted ThinkAgile MX V3 and V4 platforms, are well suited for deployment in remote locations, providing customers with a compact, cost-effective hybrid cloud infrastructure solution.
This document describes how to deploy a single-node Azure Local instance on Lenovo ThinkAgile MX systems, using either the Azure portal or an Azure Resource Manager (ARM) template. It is intended for IT personnel who are familiar with Windows Server and hybrid cloud solutions.
Introduction
Microsoft released support for single-node Azure Local instances in order to minimize hardware costs at locations that do not require high resiliency. A single-node instance runs the same Azure Local software stack as a multi-node instance, is deployed and managed through the same Azure Arc control plane, and carries the same subscription and billing model. The difference is that it does so on one machine rather than two or more.
This deployment type is aimed at edge and remote sites — retail stores, branch offices, clinics, restaurants, manufacturing cells, and similar locations — where floor space, power, and budget are constrained, and where the workload can tolerate the site being offline for the time it takes to repair the hardware. Microsoft positions its single-server storage reference pattern for facilities that can tolerate a lower level of resiliency without affecting the business, and cites food service, healthcare, finance, retail, and government sites as typical examples. Lenovo ThinkAgile MX systems suit this profile: they are certified Azure Local configurations whose firmware and device driver levels are validated together and published as the ThinkAgile MX Best Recipe.
A single-node instance is functionally equivalent to a multi-node instance in the following respects:
- It is deployed from the Azure portal or from an Azure Resource Manager template, using the same wizard and the same quickstart template as a multi-node deployment.
- It is registered with Azure Arc, and is monitored, updated, and managed from the Azure portal in the same way.
- It runs the same workloads, including virtual machines, Azure Kubernetes Service (AKS) on Azure Local, and Azure Virtual Desktop (AVD).
- It uses Storage Spaces Direct. Volumes are created with two-way mirror resiliency, and on a single machine the two copies are held on separate drives inside that machine, so a volume survives the loss of a drive but not the loss of the machine.
The differences are concentrated in the hardware and network requirements, and they are best settled before the hardware is ordered:
- Storage drives. A single-server deployment must use one drive type only — either NVMe or SSD. Mixed drive types are not supported. The operating system is installed on a separate RAID-1 boot device that is not part of the storage pool.
- Network intents. A single-node instance uses one Network ATC intent that carries both management and compute traffic. There is no storage intent and no storage traffic, so RDMA is disabled during deployment. Microsoft's reference pattern calls for two teamed ports of at least 1 Gbps, with 10 Gbps recommended, behind a single top-of-rack switch.
- Storage adapters. If a second machine is likely to be added later, install the RDMA adapters up front. In the single-server reference pattern they remain disconnected until that second machine is added.
- A single-node instance is deployed without a quorum witness, because there is no second machine to arbitrate between. A witness has to be configured before the instance can be scaled out.
Scale-out is supported. An Azure Local instance can grow to a maximum of 16 machines, added one at a time. Growing a single-node instance to two machines is performed with the Add-Server PowerShell cmdlet rather than from the Azure portal, and it requires a quorum witness and a storage network intent to be in place first. Each machine that is added must closely match the existing machine in processor type and core count, memory, and drive count, type, and size. Once the second machine joins, volume resiliency becomes a two-way mirror across the two machines and Storage Spaces Direct rebalances the data as a low-priority background task, which can run for several days.
Weigh these characteristics against the workload before committing to a single-node instance. The Notes and considerations section at the end of this document summarizes the operational trade-offs.
This document provides an overview of single-node Azure Local support, the steps in the deployment process, the requirements, and the considerations for this deployment type. The walkthroughs were performed on a Lenovo ThinkAgile MX650 V3 system running Azure Local 2606; other ThinkAgile MX platforms follow the same process. Requirements that Microsoft documents in detail are linked rather than repeated, so that this guide remains accurate as those articles are revised.
Microsoft supports two deployment methods, for both single-node and multi-node deployments:
- Deploy from the Azure portal
- Deploy from an Azure Resource Manager template
Both methods are described in this document.
Prepare for deployment
Perform the following steps before using either of the deployment methods:
Review the Microsoft prerequisites
Read and understand the Microsoft prerequisites for Azure Local deployment:
https://learn.microsoft.com/en-us/azure/azure-local/deploy/deployment-prerequisites
Also read and understand the single-server storage deployment network reference pattern for Azure Local:
https://learn.microsoft.com/en-us/azure/azure-local/plan/single-server-deployment
Read through each of the requirements and make sure that you understand them. Each requirement includes a link to further information.
Prepare Active Directory
The Azure Local Active Directory prerequisites are as follows:
- A dedicated Organizational Unit (OU)
- Blocked Group Policy Object (GPO) inheritance for the designated OU
- An Active Directory user account with full permissions over the OU
Follow the steps in the Microsoft article to prepare Active Directory:
https://learn.microsoft.com/en-us/azure/azure-local/deploy/deployment-prep-active-directory
PowerShell scripts and commands are provided to simplify the process. After you modify the OU parameters in the script from the Microsoft article, run the script. The credentials that the script prompts for belong to the new user it creates in the OU. Running the script in our lab produced the result shown in the following figure.

Figure 1. Output of the New-HciAdObjectsPreCreation script, confirming that the organizational unit, the deployment user, and blocked GPO inheritance were created successfully
Prepare the server
Two tasks prepare the server itself:
- Download and install the Azure Stack HCI operating system
- Update system firmware according to Best Recipe
Download and install the Azure Stack HCI operating system
All ThinkAgile MX Integrated System (IS) and Premier (PR) solutions ship with the operating system preloaded, so customers should not need to perform this step. However, the Microsoft article explains how to download the Azure Stack HCI operating system from the Azure portal if you need to reinstall it.
The following two figures show where the operating system download is found in the Azure portal.
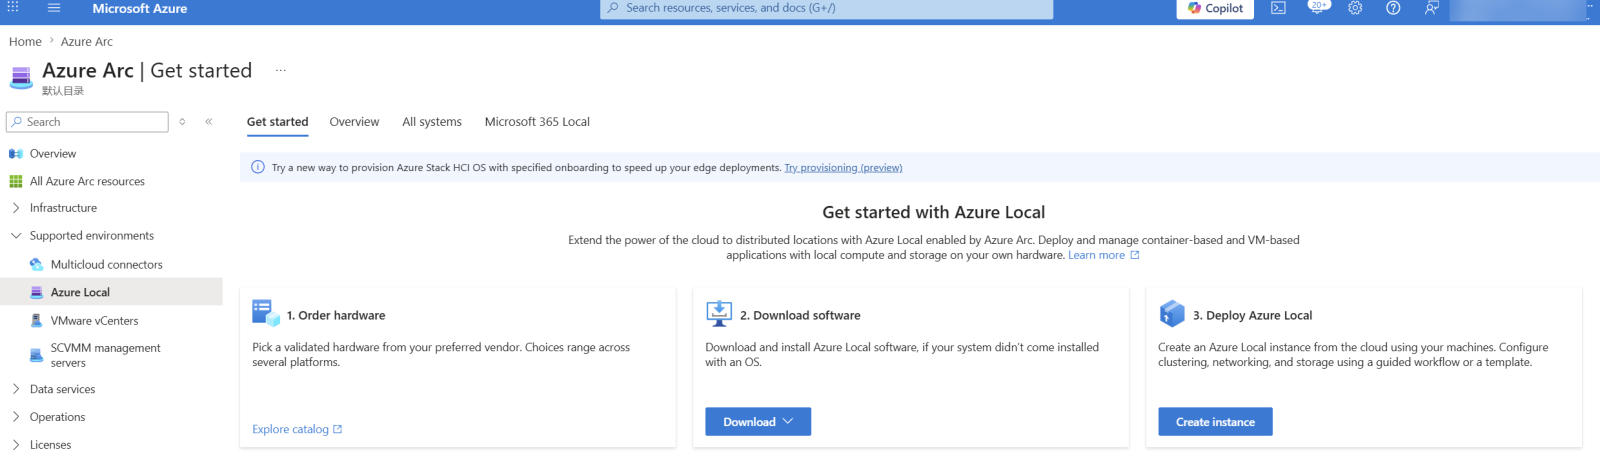
Figure 2. The Azure Arc | Get started page for Azure Local, showing the Order hardware, Download software, and Deploy Azure Local options
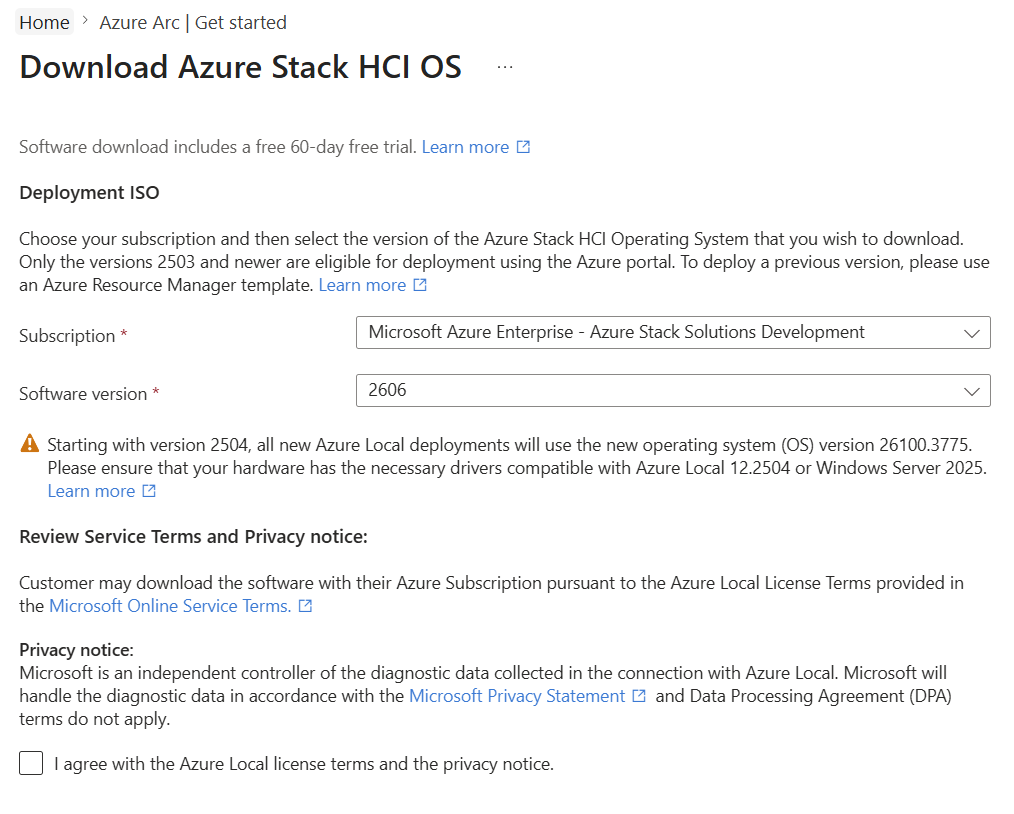
Figure 3. The Download Azure Stack HCI OS page, with the subscription and software version selected
After you download the operating system from the Azure portal, install it on the RAID-1 boot drive, not on one of the storage pool devices. If an operating system was installed previously, delete all existing partitions from the boot drive before you select it for the new installation.
Update system firmware according to Best Recipe
For Lenovo ThinkAgile MX solutions, ensure that the latest Best Recipe firmware and device driver versions are running on the machine. For information about the current ThinkAgile MX Best Recipe, see the following page:
https://datacentersupport.lenovo.com/us/en/solutions/HT507406
To simplify the process of downloading all firmware and device driver update packages for a given ThinkAgile MX Best Recipe, a single zip archive that includes all packages is available from the ThinkAgile MX Updates Repository site, which can be found at the following page: https://thinkagile.lenovo.com/mx
Lenovo offers multiple tools for updating firmware and device drivers, including the Lenovo XClarity™ Integrator for Microsoft Windows Admin Center (LXCI for WAC) and the Lenovo ThinkAgile MX Solution Builder Extension (SBE).
For ThinkAgile MX solutions running Azure Local, we recommend using SBE, which integrates firmware and driver updates directly into the Azure Local update experience. Not every ThinkAgile MX solution supports SBE packages; check the ThinkAgile MX Best Recipe page for your machine type to confirm which update packages are available for your system.
LXCI for WAC lets administrators manage Lenovo servers from Windows Admin Center. Azure Local instances are managed through the LXCI snap-in, which is integrated into the Windows Admin Center instance creation and Cluster-Aware Updating (CAU) functions. Notably, the tool can recognize and apply firmware and device driver updates based on the current ThinkAgile MX Best Recipe.
For more information about LXCI for WAC, see the following page:
https://support.lenovo.com/us/en/solutions/ht507549
Lenovo ThinkAgile MX SBE packages automate updates for system firmware, device drivers, and utility software on Lenovo ThinkAgile MX solutions through the Cluster-Aware Updating (CAU) plug-in. Additional SBE capabilities, such as automatic SBE package downloads and health checks, are provided by a PowerShell module. All update packages follow ThinkAgile MX Best Recipe releases and are delivered in a single compressed ZIP archive. Each SBE package supports specific machine types (MT) and specific Azure Local release versions.
An SBE update package appears automatically as an update option in the Azure portal, and applying it is a matter of clicking the appropriate button. This behavior is the same for all ThinkAgile MX solutions that support SBE packages; there is no longer any difference between Premier (PR) solutions and other ThinkAgile MX solutions.
For more information about SBE, including which solutions are supported, see the following page:
https://pubs.lenovo.com/thinkagile-mx/mx_sbe_overview
Configure the operating system
The portion of the Microsoft article that covers operating system configuration begins here:
https://learn.microsoft.com/en-us/azure/azure-local/deploy/deployment-install-os
After installing the operating system, refer to the “Configure the operating system using SConfig” section of the above article for the configuration steps. The following are some of the guidelines that should be followed:
- Do not install Windows updates using SConfig.
- Starting with Azure Stack HCI 2604, you can domain-join the server before Azure Local deployment. If you choose not to, the server is domain-joined automatically during Azure Local instance creation.
- Configure a single network interface on the server that will become the single-node instance. This interface provides connectivity to Azure Arc during deployment. Ensure that the default gateway is configured on only one NIC per node. This is due to the validation process's expectation of a single default gateway per node.
- The deployment process configures any other network interfaces that are required, based on your input to the deployment wizard.
- Change the computer name to a unique value.
This deployment uses an SBE package, because the target environment is a ThinkAgile MX650 V3 single-node instance. Download the latest available SBE package and copy it to a new folder, C:\SBE. The following figure shows the contents of the SBE folder.
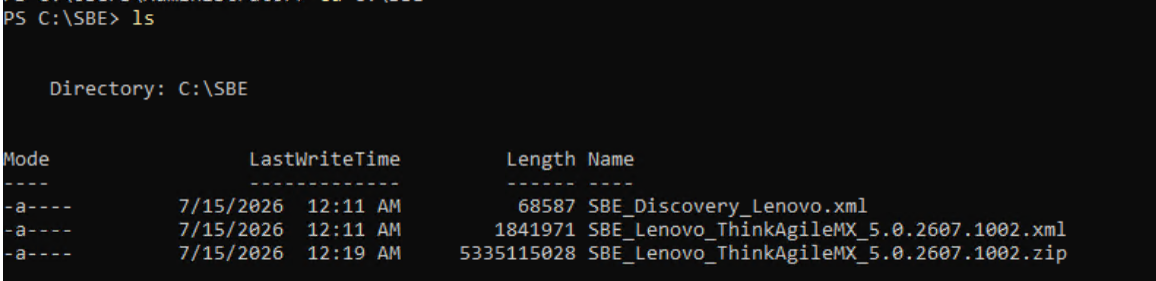
Figure 4. Contents of the C:\SBE folder after downloading the ThinkAgile MX SBE package
Register with Azure Arc
Before deploying the single-node Azure Local instance, you must prepare the Azure environment and establish connectivity through Azure Arc. This process ensures that the required Azure services are available and that the server can be managed and monitored from Azure.
- Register the required resource providers
- Create the resource group in Azure
- Register the server with Azure Arc
Register the required resource providers
Register the required resource providers for your Azure subscription. See the following URL for the list of required resource providers:
https://learn.microsoft.com/en-us/azure/azure-local/deploy/deployment-arc-register-server-permissions
You can register them using PowerShell, as shown in the Microsoft article, or from the Azure portal itself:
- From the Home page of the Azure portal, go to Subscriptions and click the name of the subscription that you want to use.
- In the left pane, open the Settings category and then select Resource providers.
- Choose the resource providers that you want to register.
The figure below shows three of the required resource providers registered for the subscription. More than three are required; this is simply an example of how registered resource providers appear in the Azure portal.
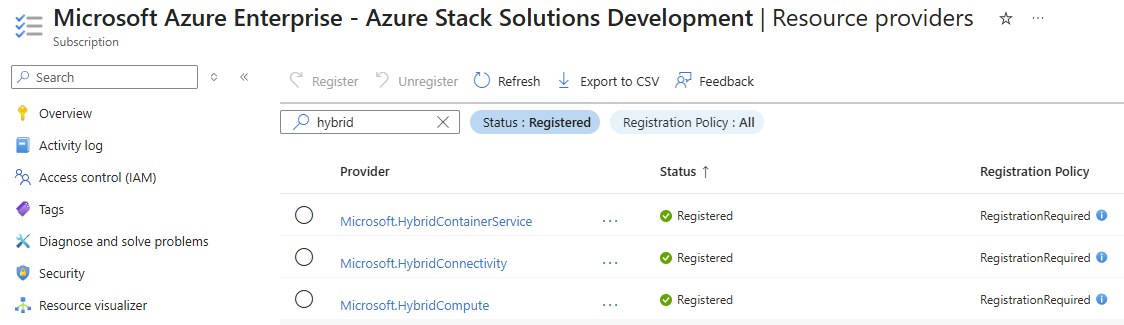
Figure 5. Three of the required resource providers registered for the subscription, filtered on "hybrid"
Create the resource group in Azure
Create the resource group in Azure that you will onboard the server into. Click Resource groups on the Azure portal home page:

Figure 6. Azure services shortcuts on the Azure portal home page, including Resource groups
Click Next if you want to add a tag; otherwise, click Review + create.
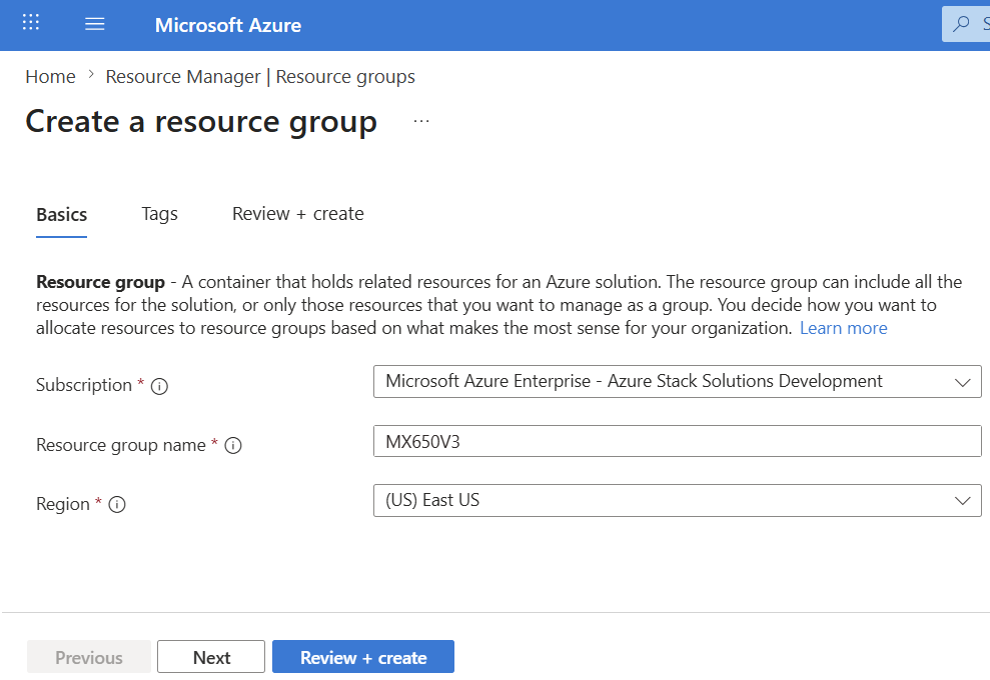
Figure 7. The Basics tab of Create a resource group, with resource group MX650V3 in the East US region
To assign the appropriate permissions to the resource group, see this URL:
https://learn.microsoft.com/en-us/azure/azure-local/deploy/deployment-arc-register-server-permissions
Register the server with Azure Arc
Register the server with Azure Arc, using either of the following methods:
- Register Azure Local with Azure Arc without using Arc gateway (with or without proxy):
https://learn.microsoft.com/en-us/azure/azure-local/deploy/deployment-without-azure-arc-gateway
- Register Azure Local with Azure Arc using Arc gateway (with or without proxy):
https://learn.microsoft.com/en-us/azure/azure-local/deploy/deployment-with-azure-arc-gateway
In this example we followed the guidance in the first method, “Register Azure Local with Azure Arc without using Arc gateway”, without a proxy. The following cmdlets are valid for Azure Local 2606 at the time of publication. Subsequent Azure Local versions and their registration process are subject to change.
$Tenant = ""
$Subscription = ""
$RG = "MX650V3"
$Region = "eastus"
$TargetSolutionVersion = "12.2606.1003.205"

Invoke-AzStackHciArcInitialization -TenantId $Tenant -SubscriptionID $Subscription -ResourceGroup $RG -Region $Region -Cloud "AzureCloud" -TargetSolutionVersion $TargetSolutionVersion
or
$params = @{
 TenantId              = $Tenant
 SubscriptionID        = $Subscription
 ResourceGroup         = $RG
 Region                = $Region
 Cloud                 = "AzureCloud"
 TargetSolutionVersion = $TargetSolutionVersion
}

# Optional: include only when using token-based authentication

if ($ArmAccessToken) {
  $params.ArmAccessToken = $ArmAccessToken
}

Invoke-AzStackHciArcInitialization @params
Replace the parameters with values that are appropriate for your environment and for the Azure Local solution version that you are targeting. If you set $TargetSolutionVersion = "", the deployment uses the latest version available.
You are prompted to authenticate with your Azure account. Follow the instructions to complete the authentication process.
The output of a successful onboarding is shown in the figure below.
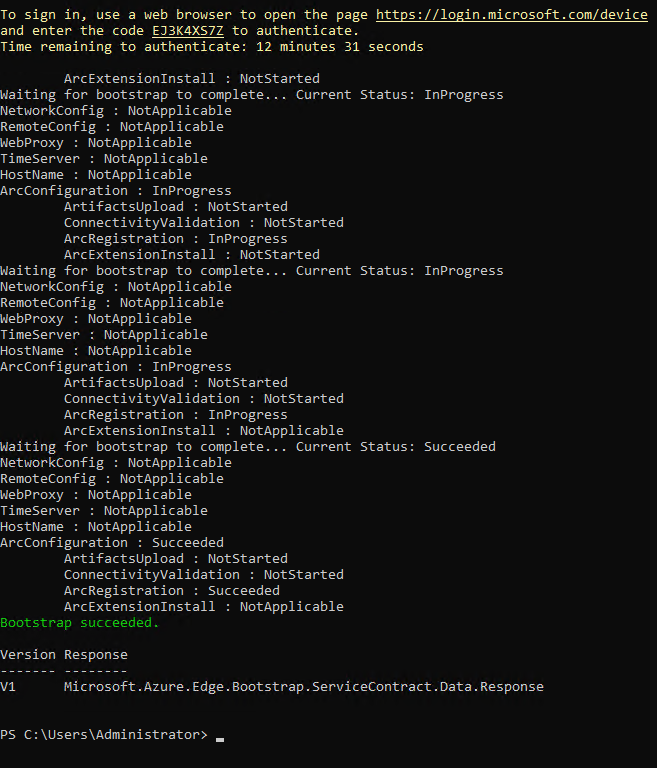
Figure 8. Output of Invoke-AzStackHciArcInitialization showing that the Arc bootstrap succeeded
The registered machine then appears in the resource group, as shown in the figure below.
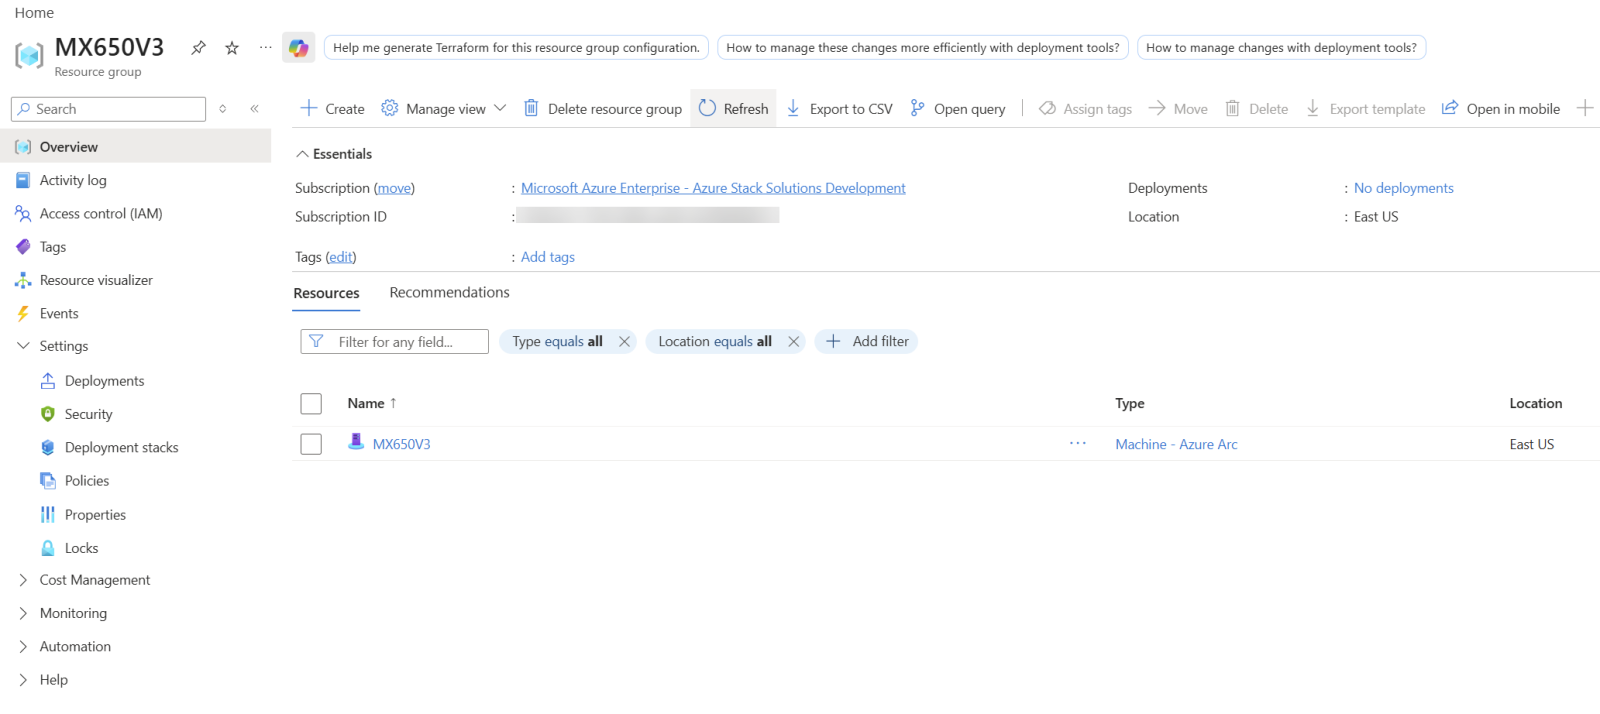
Figure 9. The MX650V3 resource group, showing the registered server as an Azure Arc machine resource
Stage the SBE package
This deployment uses an SBE package, because the target environment is a ThinkAgile MX650 V3 single-node instance. Download the latest available SBE package and copy it to a new folder, C:\SBE.
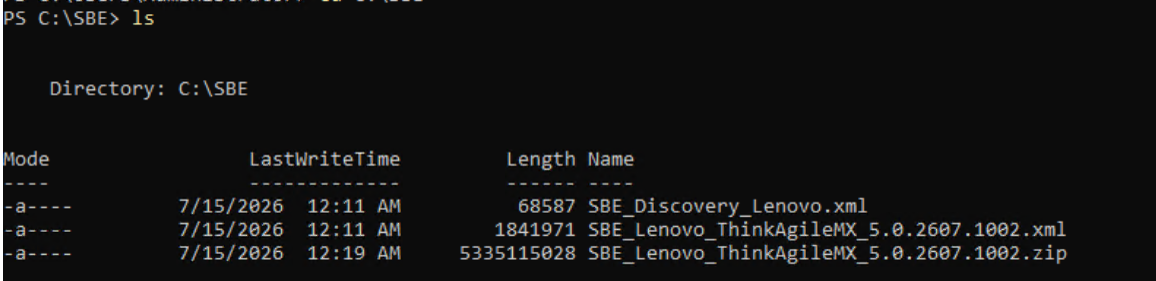
Figure 10. Contents of the C:\SBE folder after downloading the ThinkAgile MX SBE package
Deploy from the Azure portal
Azure Local can be deployed directly from the Azure portal through a guided workflow that validates the selected servers, collects networking and identity settings, and automates cluster configuration and Azure resource creation. The deployment wizard walks you through each required step, helping ensure that the environment meets the prerequisites before deployment begins.
- Go to Azure Arc – Azure Local and click Create instance:
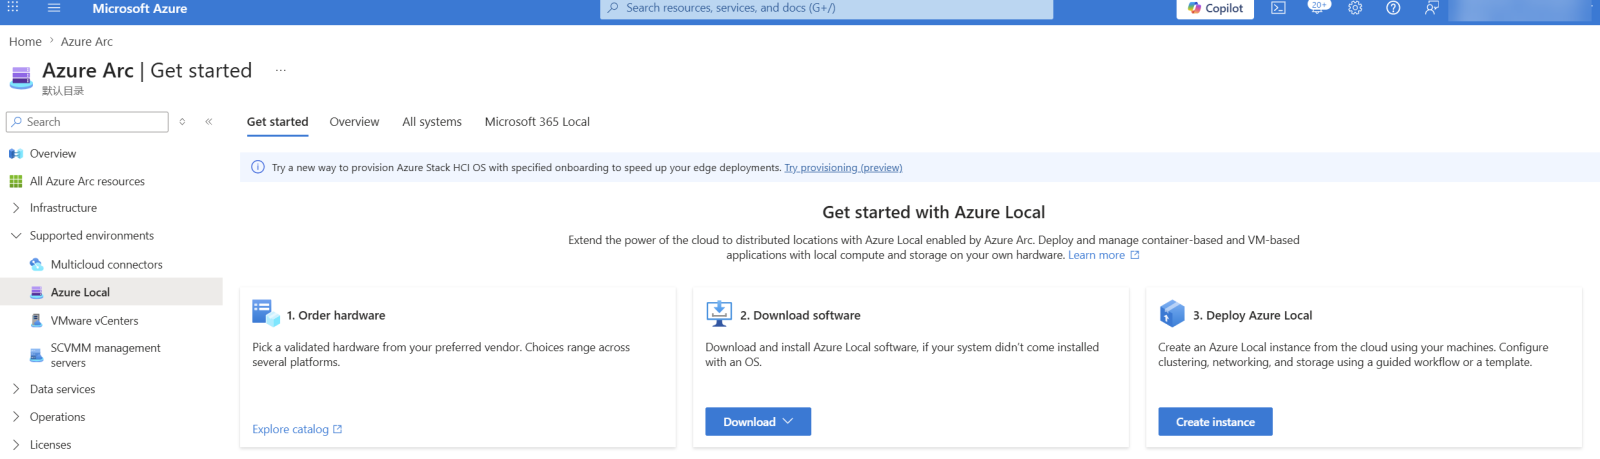
Figure 11. The Azure Arc | Get started page for Azure Local; click Create instance to begin the deployment - Fill in the required information. Add the server by clicking Add machines, select it, and then click Add:
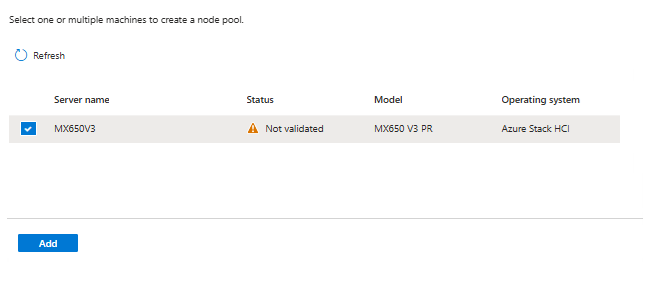
Figure 12. The Add machines pane, with the MX650V3 machine selected for the deployment - Azure installs the required extensions at this point. When the installation finishes successfully, the status changes to Ready. Validate the selected machine, and then either Create a new Key Vault or Select an existing Key Vault.
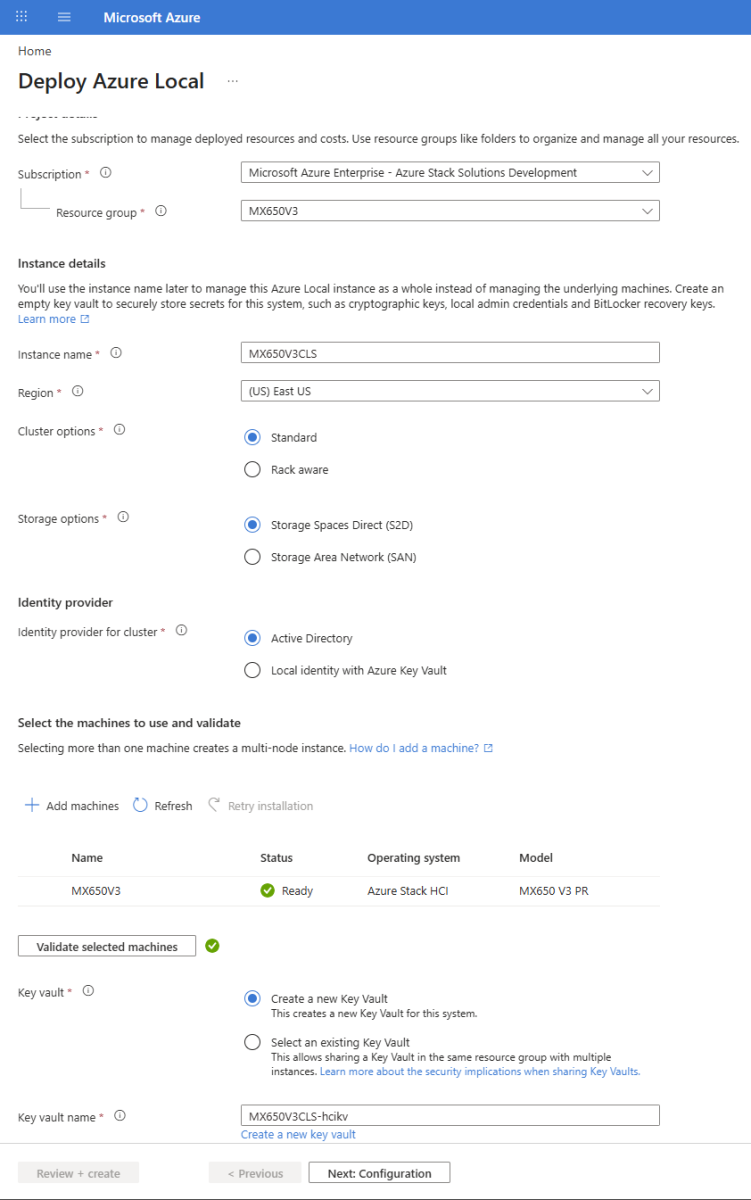
Figure 13. The Basics page of Deploy Azure Local: instance name, region, storage and identity options, the validated machine, and the key vault - When all fields are complete, click Next: Configuration.
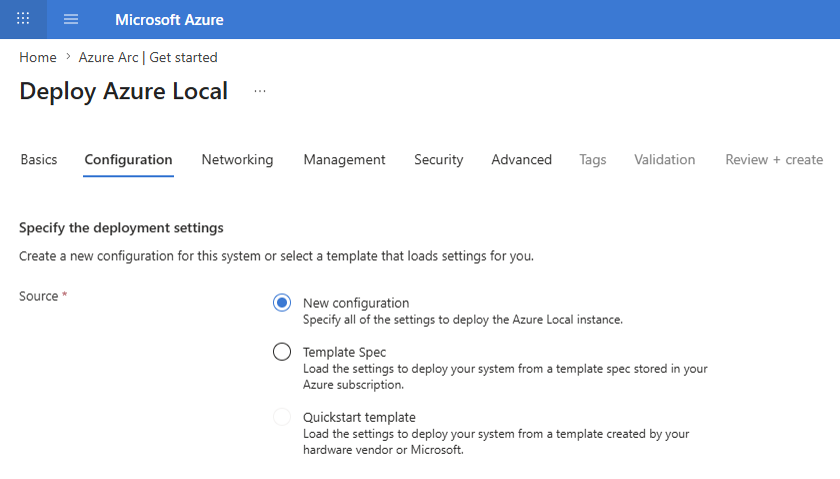
Figure 14. The Configuration page, with New configuration selected as the deployment settings source - On the Configuration page, select the source for the deployment settings. This document uses New configuration. After the deployment finishes, you can save a template of it to use in the future. After you select the source, click Next: Networking.
- Because this is a single-node instance, group Management and Compute traffic in the same network intent and do not create a Storage traffic intent. A single-node deployment doesn't require a dedicated storage network because there is no inter-node storage traffic.
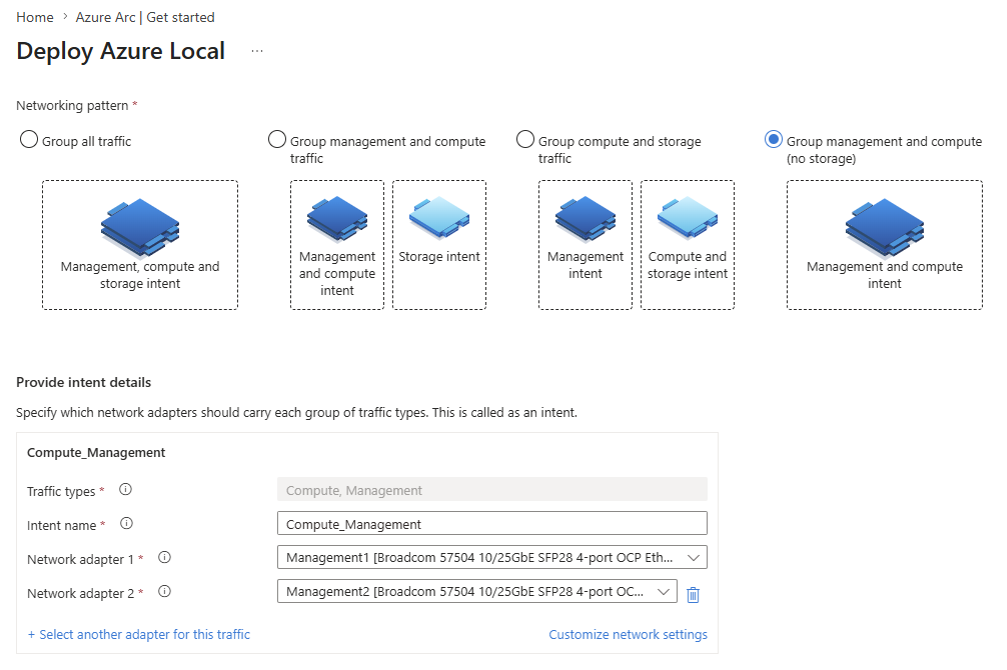
Figure 15. The Networking page, with the "Group management and compute (no storage)" pattern selected and the Compute_Management intent defined - Click Customize network settings and set RDMA protocol to Disabled:
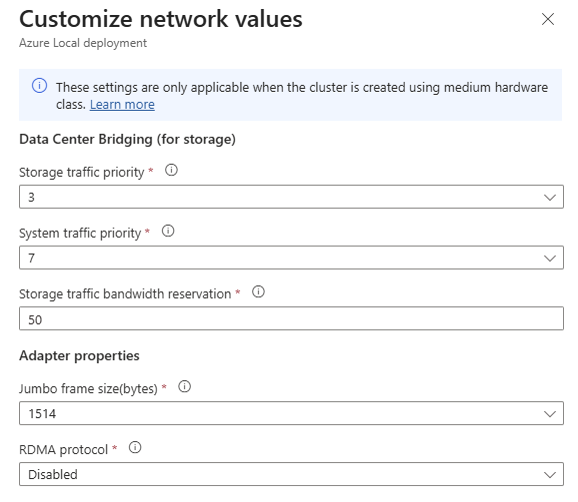
Figure 16. The Customize network values pane, with the RDMA protocol set to Disabled - Enter the details in the Allocate IP addresses to the system and services section of the page.
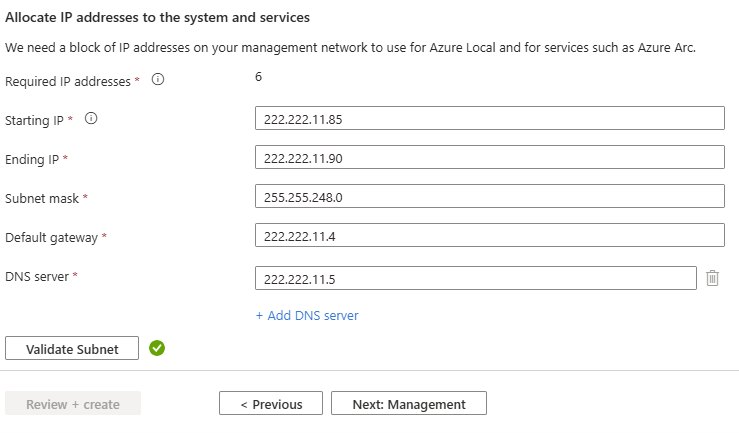
Figure 17. The Allocate IP addresses to the system and services section of the Networking page - When all fields are complete, click Next: Management.
- On the Management page, enter the required custom location, Active Directory domain, OU, and credential details, and then click Next: Security. A single-node instance uses no witness.
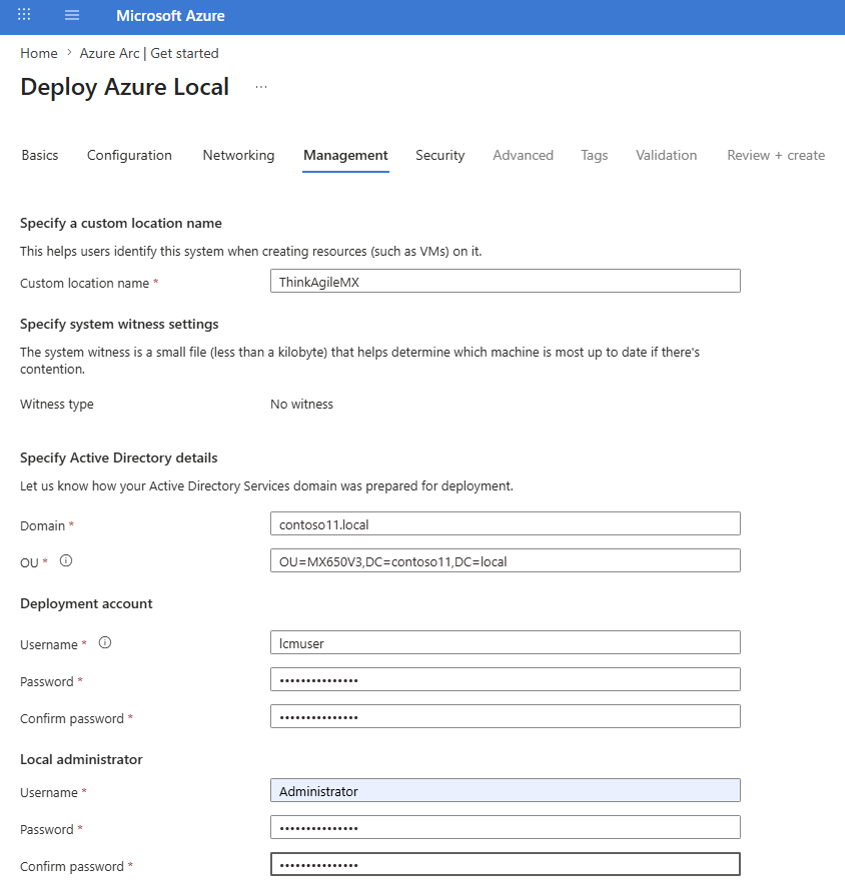
Figure 18. The Management page: custom location, witness setting, Active Directory details, and the deployment and local administrator accounts - On the Security page, leave Security level set to Recommended security settings unless you have a specific reason to change it. Click Next: Advanced to continue.
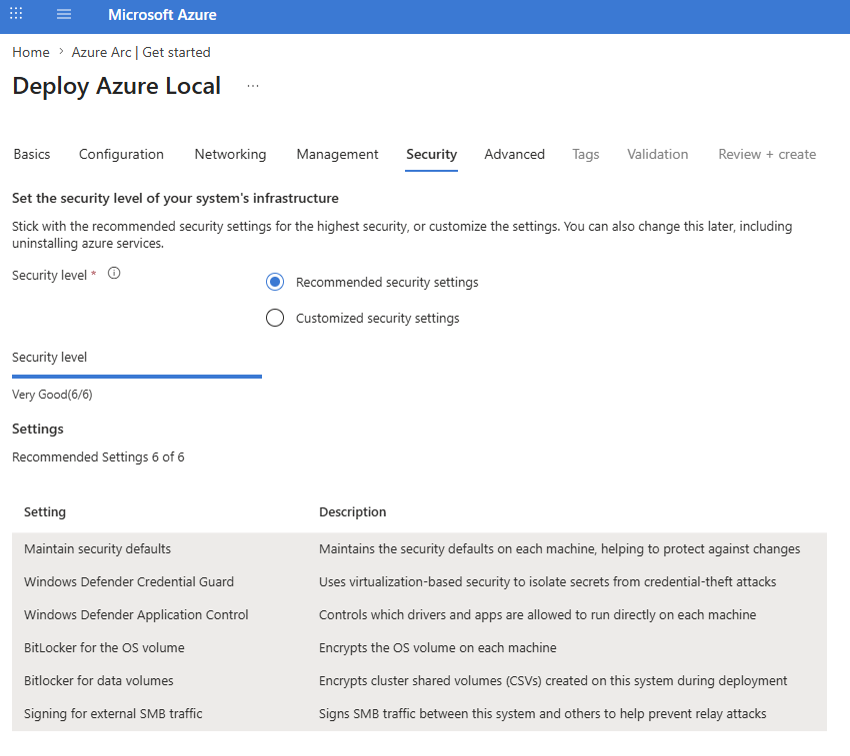
Figure 19. The Security page, with Recommended security settings selected (6 of 6 settings applied) - On the Advanced page, use the recommended option, which creates one workload volume and storage path per machine, together with the required infrastructure volume.
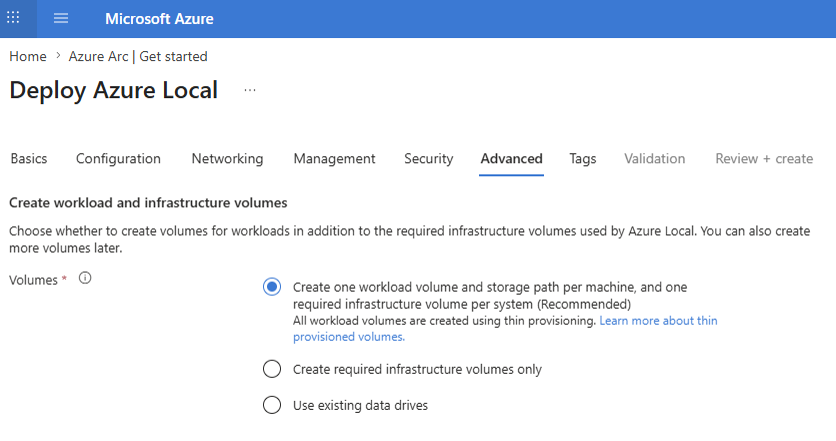
Figure 20. The Advanced page, with the recommended workload and infrastructure volume option selected - On the Tags page you can add tags to help organize the environment and make searching for specific instances more efficient. Tags can also separate billing across different resources or resource groups. Tags are optional. Click Next: Validation to continue.
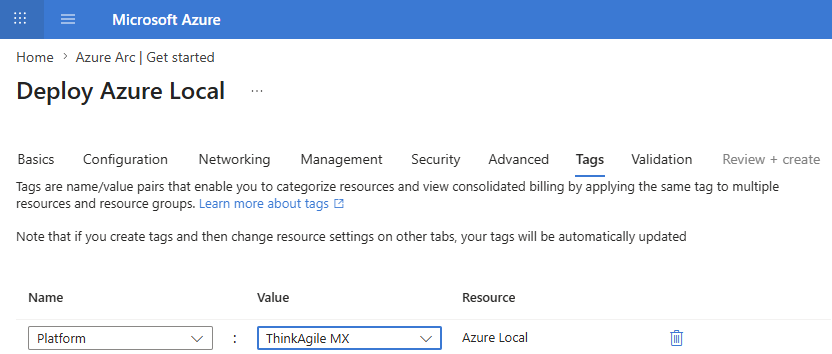
Figure 21. The Tags page, with a Platform = ThinkAgile MX tag applied to the Azure Local resource - On the Validation page, click Start validation, wait for validation to complete, and then click Next: Review + create to continue.
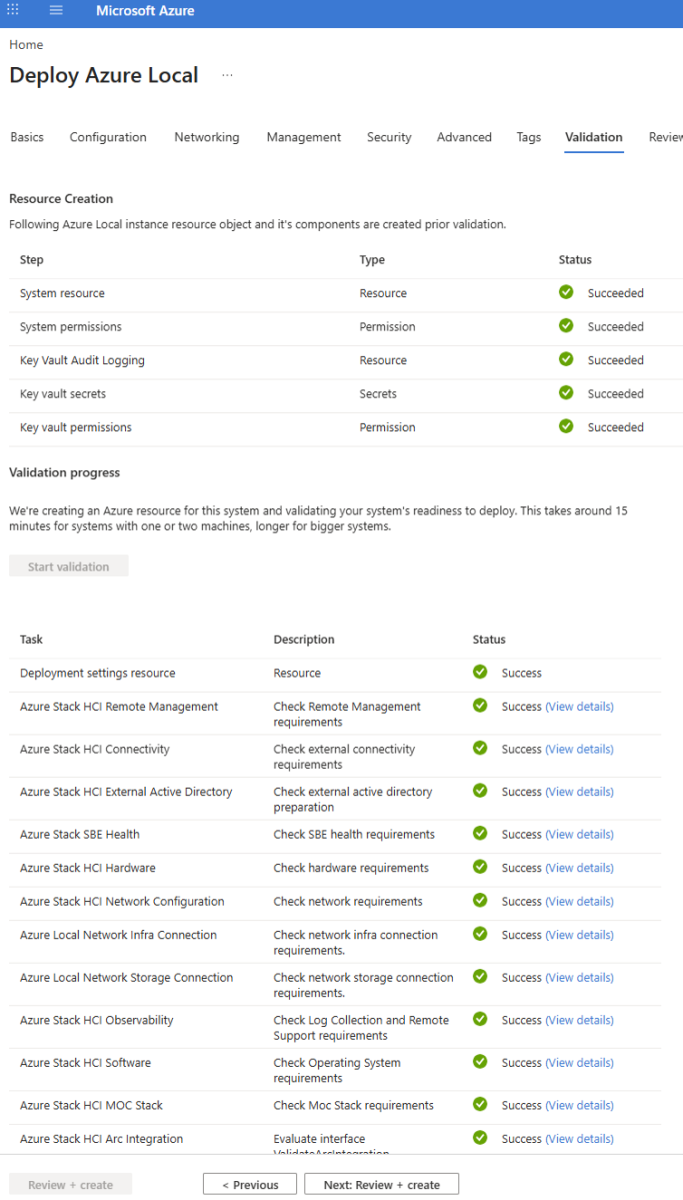
Figure 22. The Validation page, showing resource creation and the validation tasks completed successfully - Deployment begins immediately. You can check the status of the deployment by clicking Refresh.
When the Status column shows Success, deployment of the instance is complete.
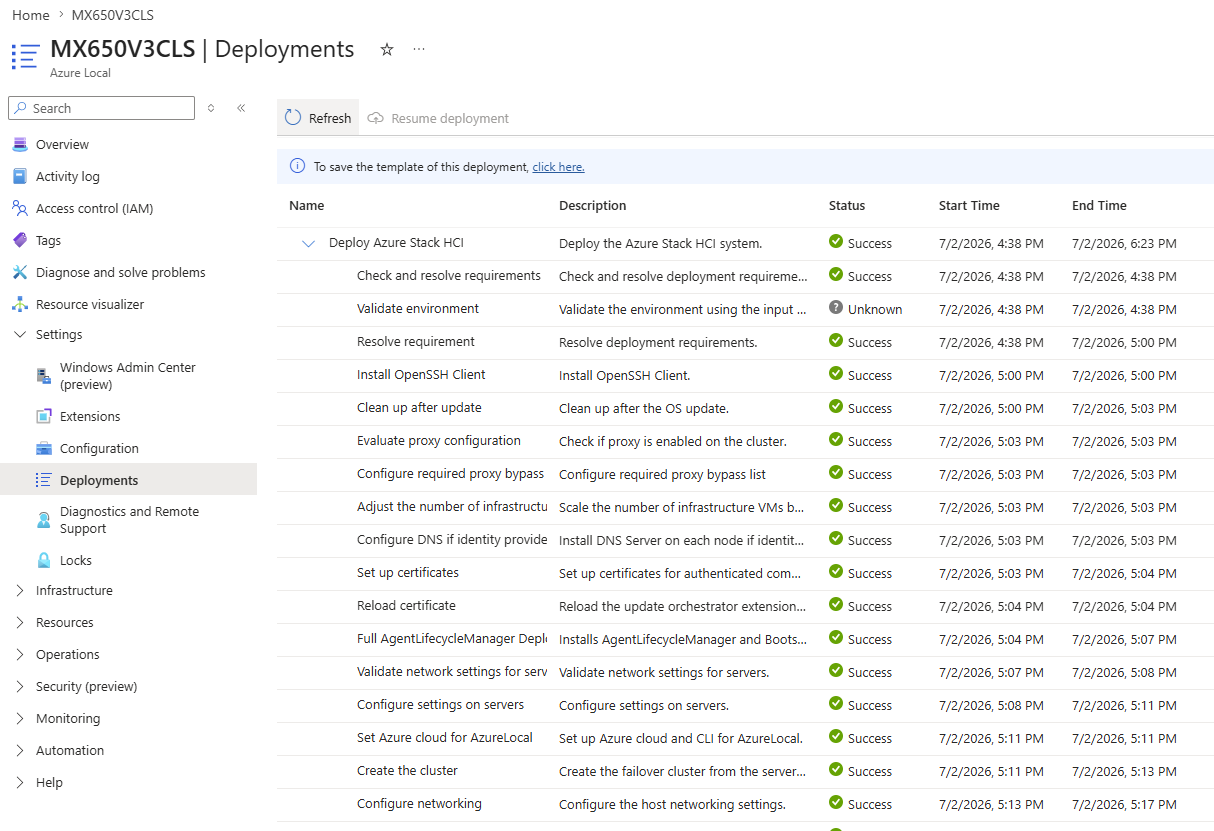
Figure 23. The Deployments blade for the MX650V3CLS instance, showing each deployment step completing successfully.The deployed instance is shown in the figure below.
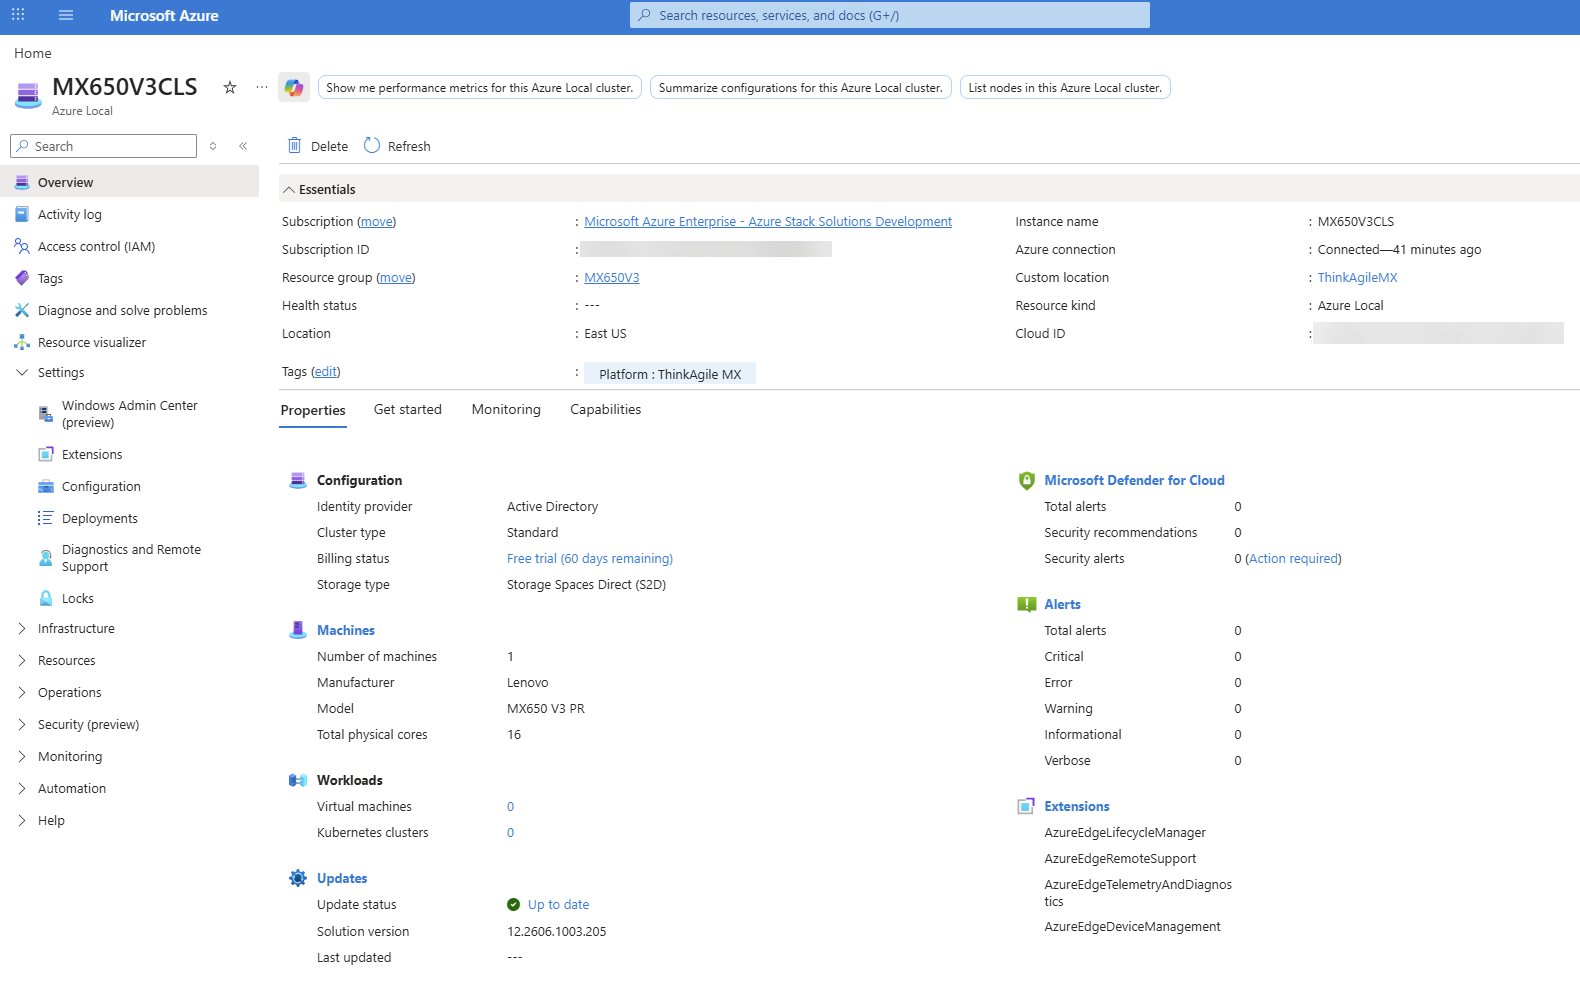
Figure 24. Overview of the deployed MX650V3CLS Azure Local instance, showing a single Lenovo MX650 V3 PR machineYou can save a template of this deployment for future use by clicking the click here link near the top of the page. For future deployments, select the template on the Configuration page instead of the New configuration option.
Deploy from an Azure Resource Manager template
For automated or repeatable deployments, Azure Local can be deployed using an Azure Resource Manager (ARM) template and a corresponding parameters file.
- After registering the machine in the resource group – using the steps in the Register with Azure Arc section – retrieve from your subscription the information that the ARM template deployment requires. At the time of writing, the prerequisite was to obtain the object ID for the Azure Local Resource Provider:
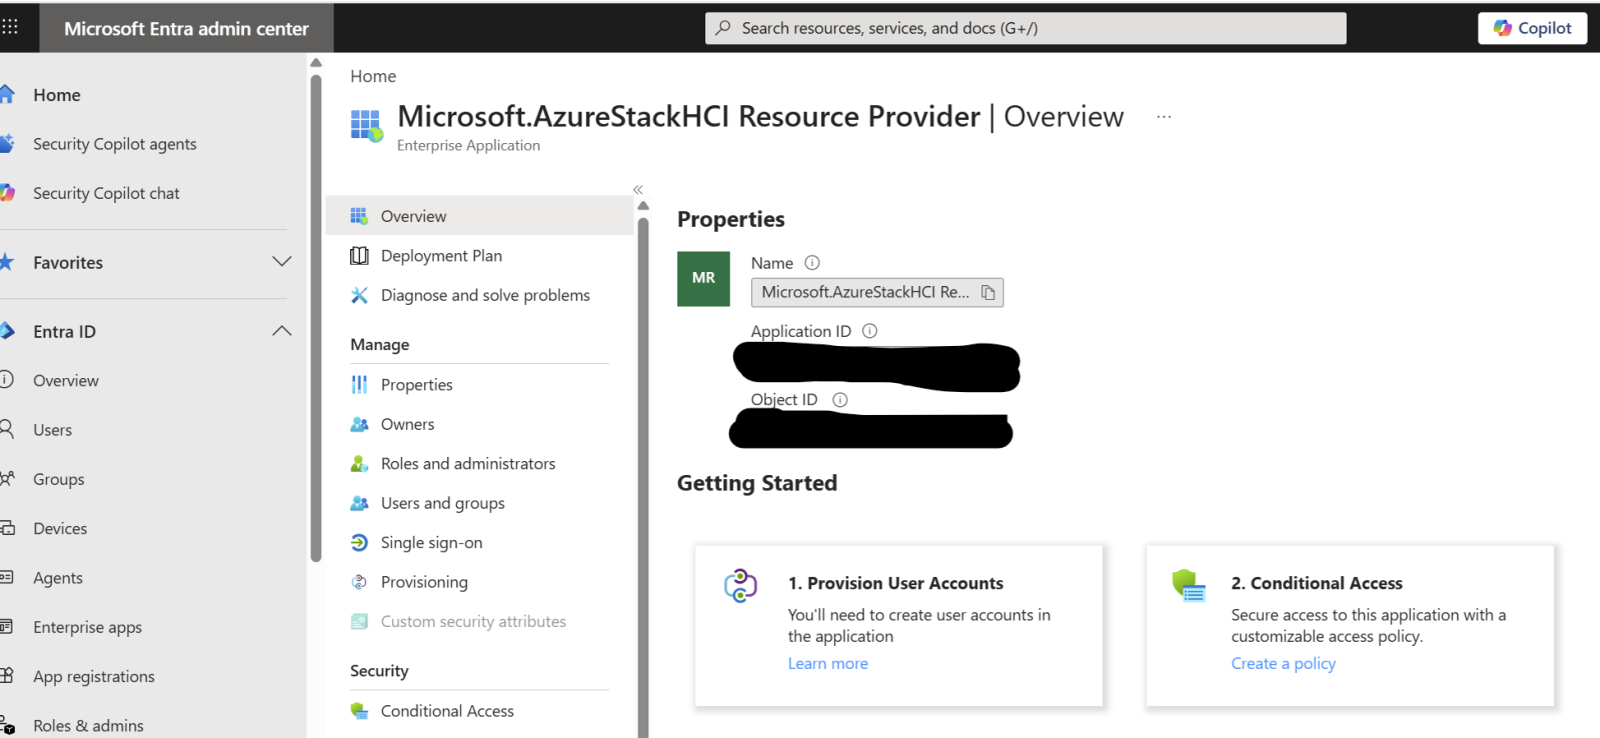
Figure 25. The Microsoft.AzureStackHCI Resource Provider enterprise application in Microsoft Entra ID, where the object ID is foundSee the following URL for the prerequisites:
- In the Azure portal, click Create a resource:

Figure 26. Azure services shortcuts on the Azure portal home page, including Create a resource - Search the Marketplace for Template deployment (deploy using custom templates) and click Create:
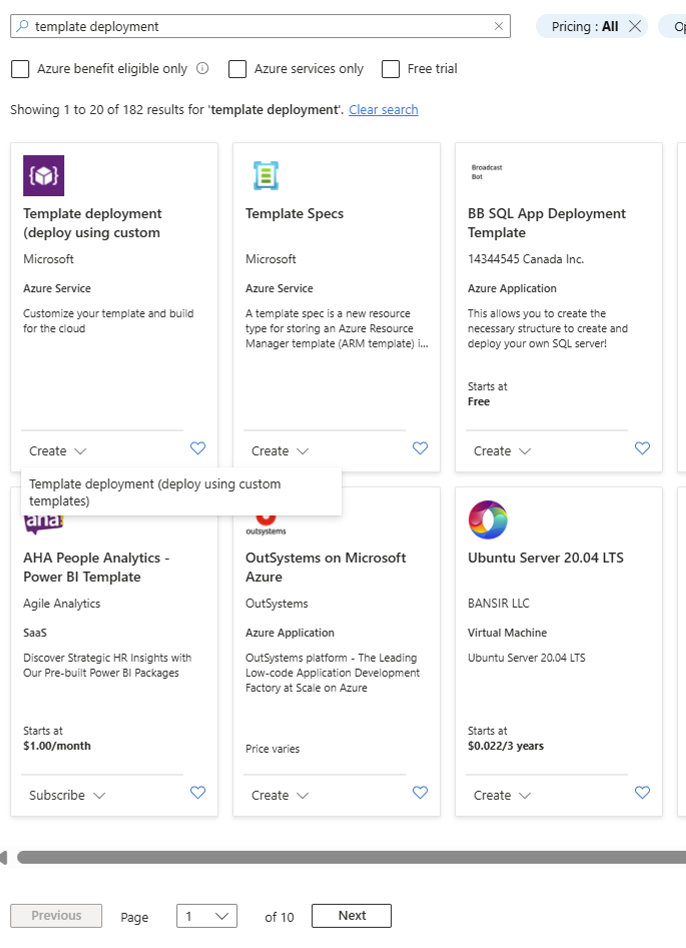
Figure 27. Marketplace search results for "template deployment", showing the Template deployment (deploy using custom templates) tile - In the Custom deployment window, under Select a template, set Template source to Quickstart template.
- Select quickstarts/microsoft.azurestackhci/create-cluster from the drop-down menu and then click Select template:
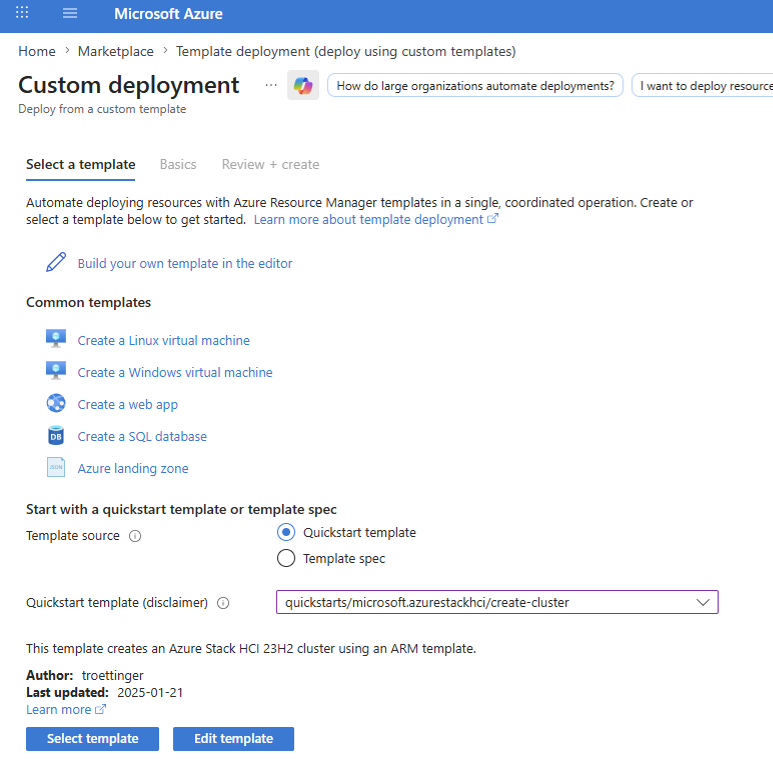
Figure 28. The Select a template tab, with the quickstarts/microsoft.azurestackhci/create-cluster quickstart template selected - Fill in the required parameters, as shown in the next three figures. A cloud witness can be configured during a single-node deployment. Although it does not provide workload availability if the only machine fails, it prepares the Azure Local instance for quorum requirements if a second machine is added later.
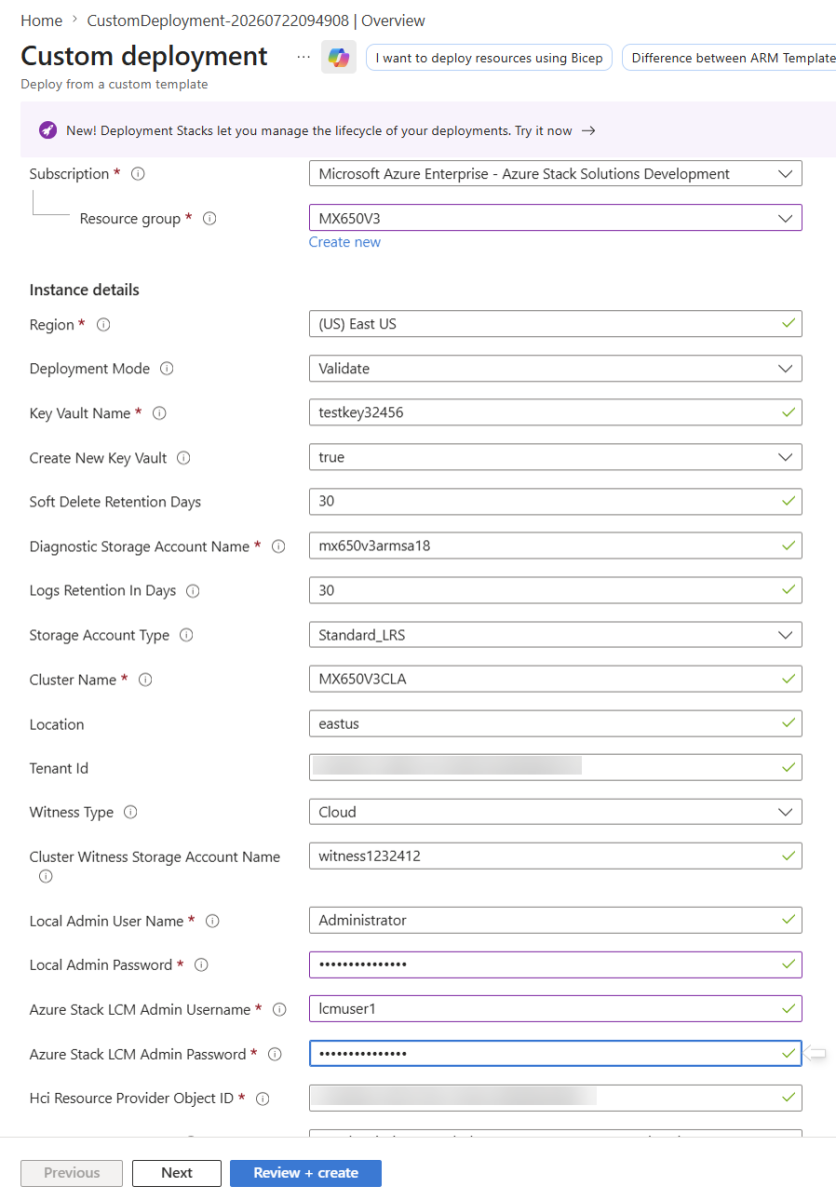
Figure 29. Custom deployment parameters, part 1: subscription, resource group, deployment mode, key vault, diagnostic storage, and administrator accounts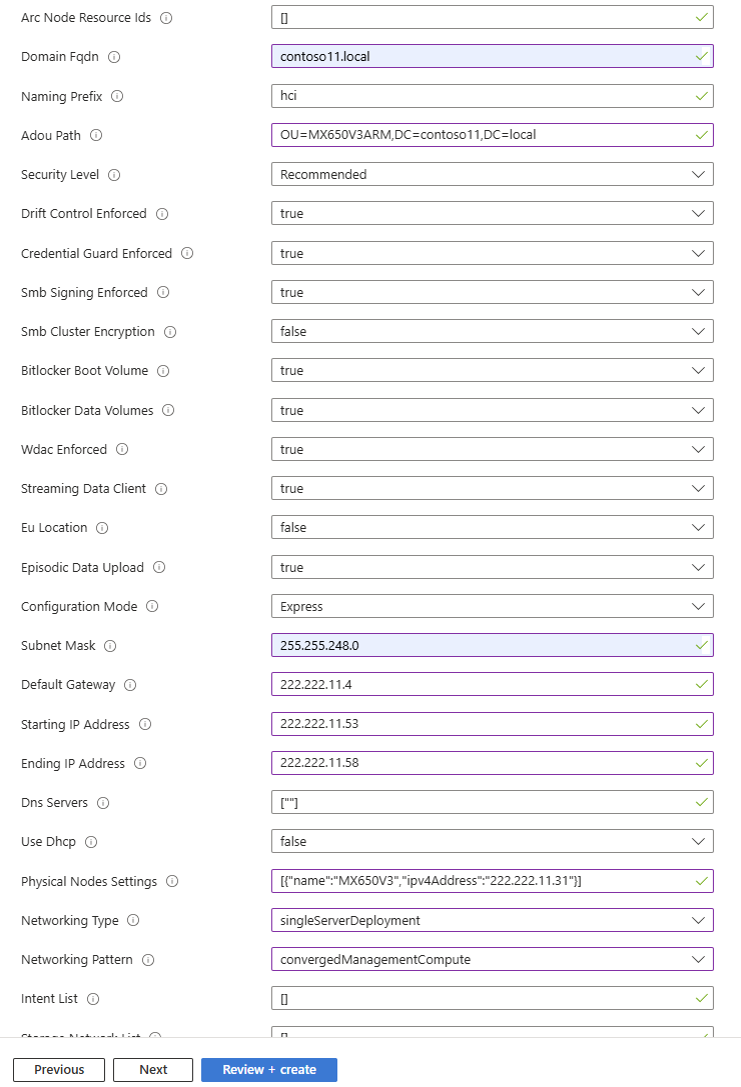
Figure 30. Custom deployment parameters, part 2: Active Directory details, security settings, IP configuration, and the single-server networking type and pattern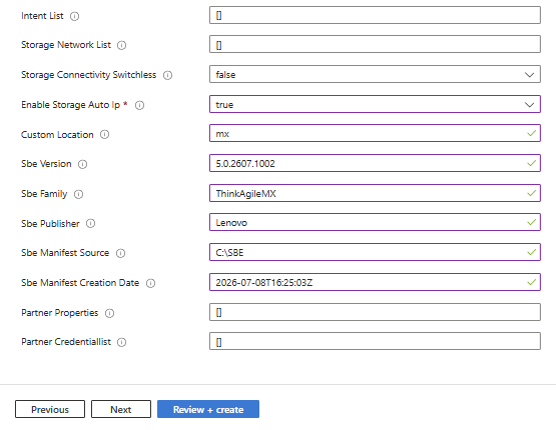
Figure 31. Custom deployment parameters, part 3: storage settings, custom location, and SBE package details - Click Edit parameters so that you can customize your template.
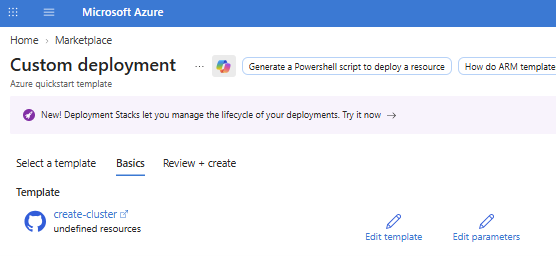
Figure 32. The Basics tab of the custom deployment, with the Edit template and Edit parameters linksIn this example we set the RDMA traffic (networkDirect) to Disabled for the Management_Compute network intent, as shown in the figure below.
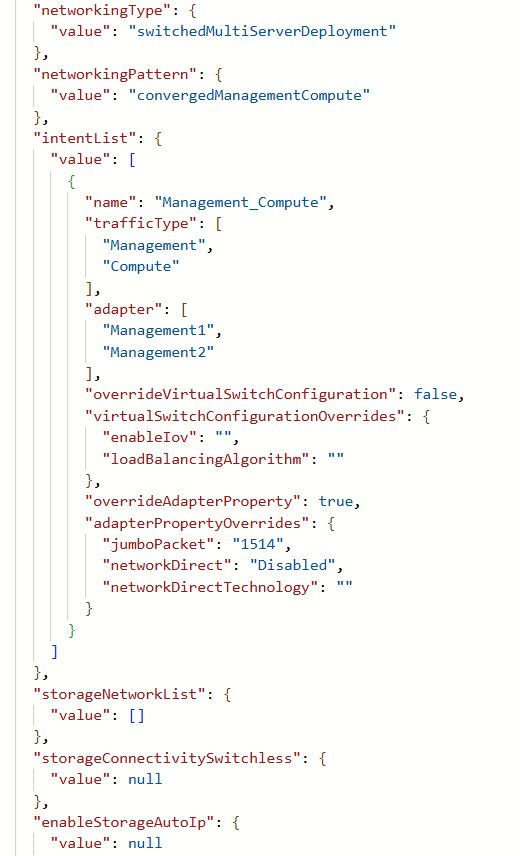
Figure 33. The Edit Parameters view, with networkDirect set to Disabled for the Management_Computeintent. Also, the value of enableStorageAutoIP was set to null. - When all parameters are complete, click Next. Azure runs a quick check of the template. When the check finishes, click Create:
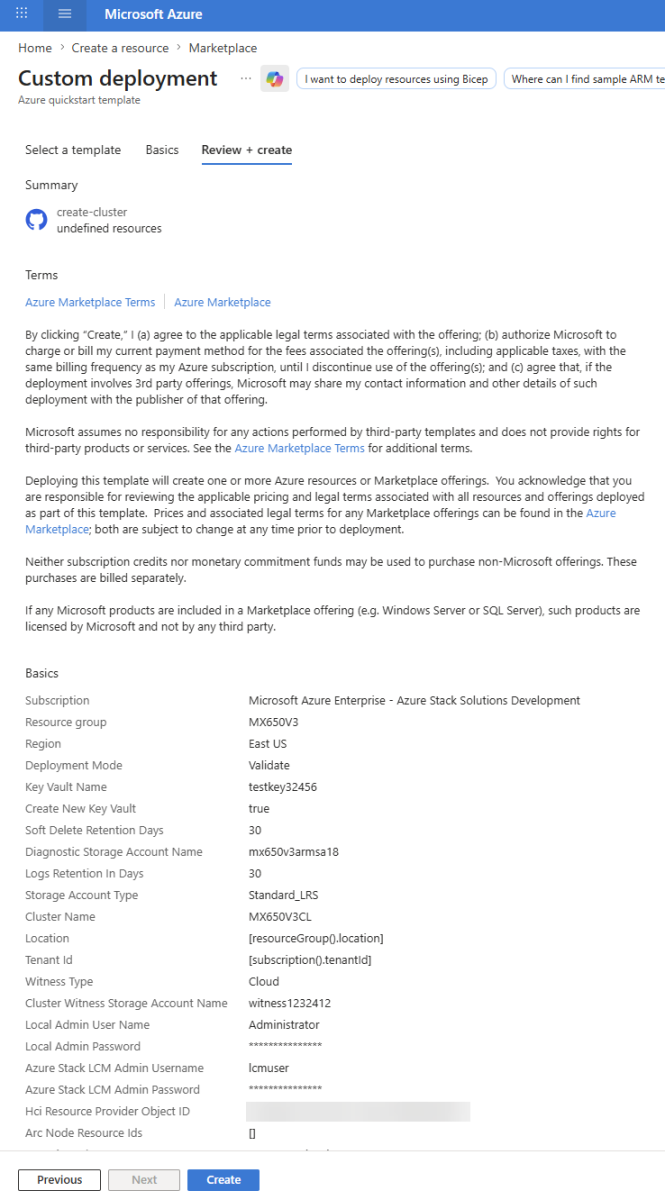
Figure 34. The Review + create tab, with Deployment Mode set to ValidateValidation now begins, because Deployment Mode was set to Validate in the parameters, as shown in the figure below.
The result, as shown in the figure below, confirms that validation was completed successfully.
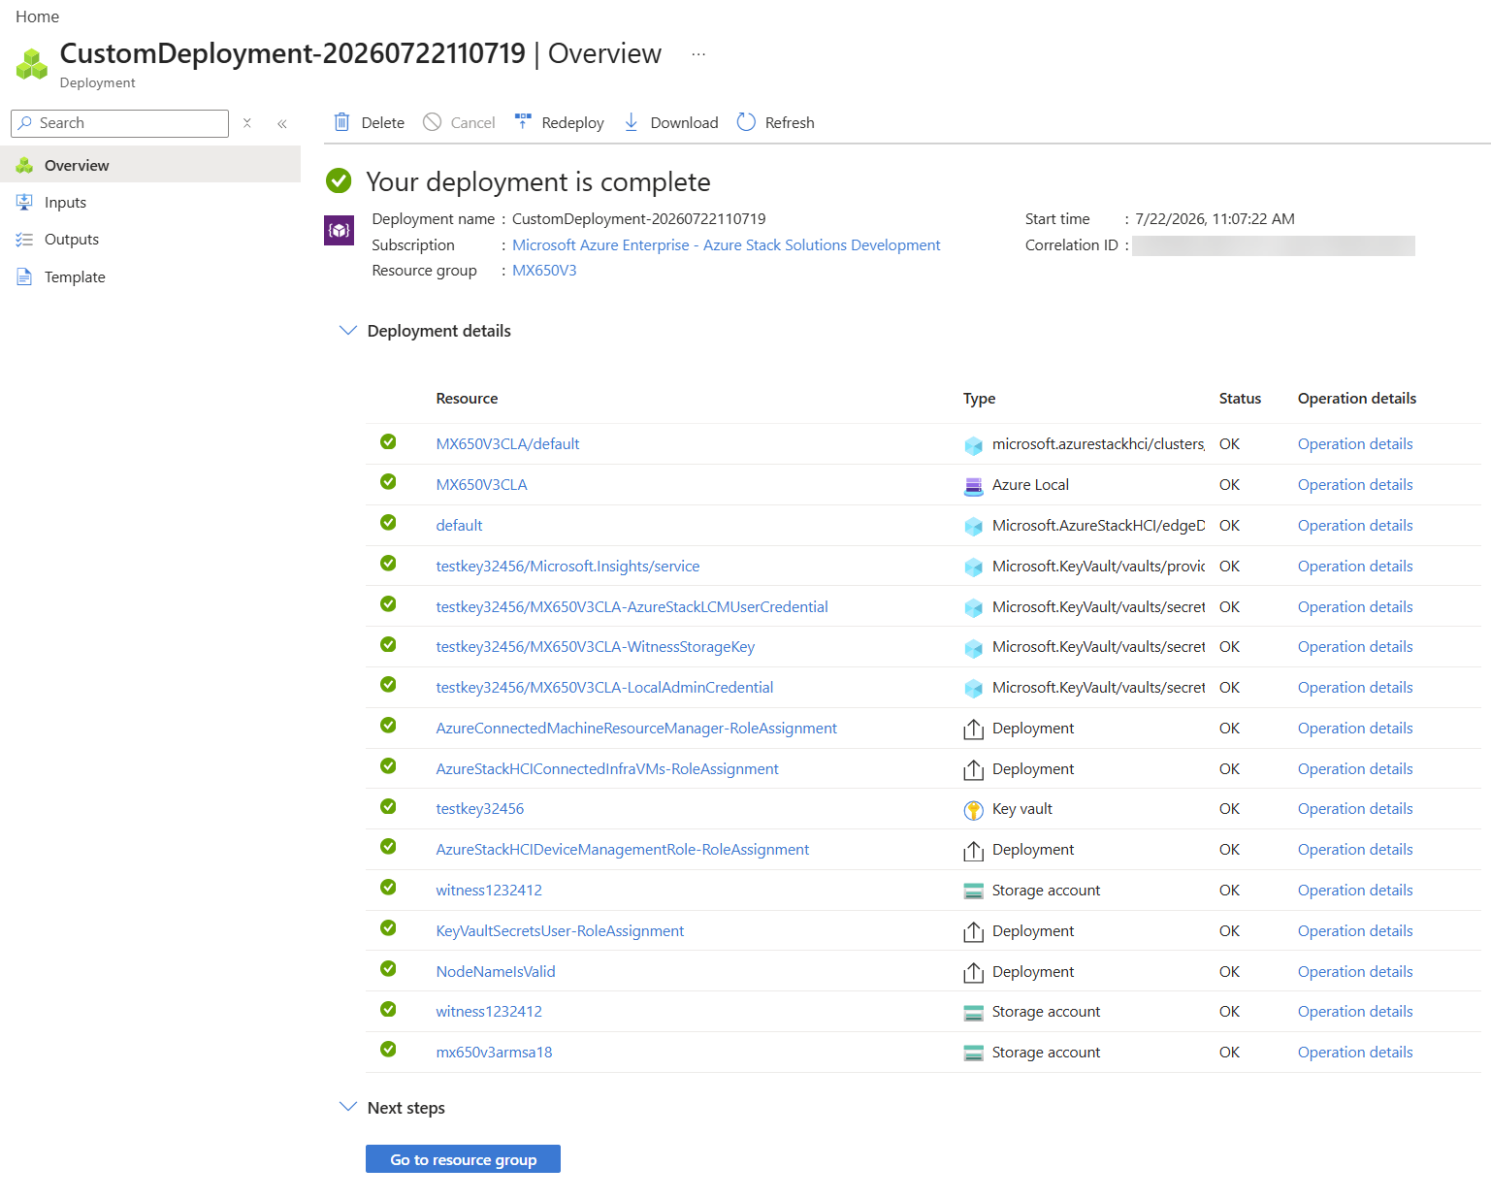
Figure 35. Confirmation that the validation run completed, listing the resources that were created - Click Download to save the template for future deployments.
- Click Redeploy, then set Deployment Mode to Deploy instead of Validate, as shown in the figure below.
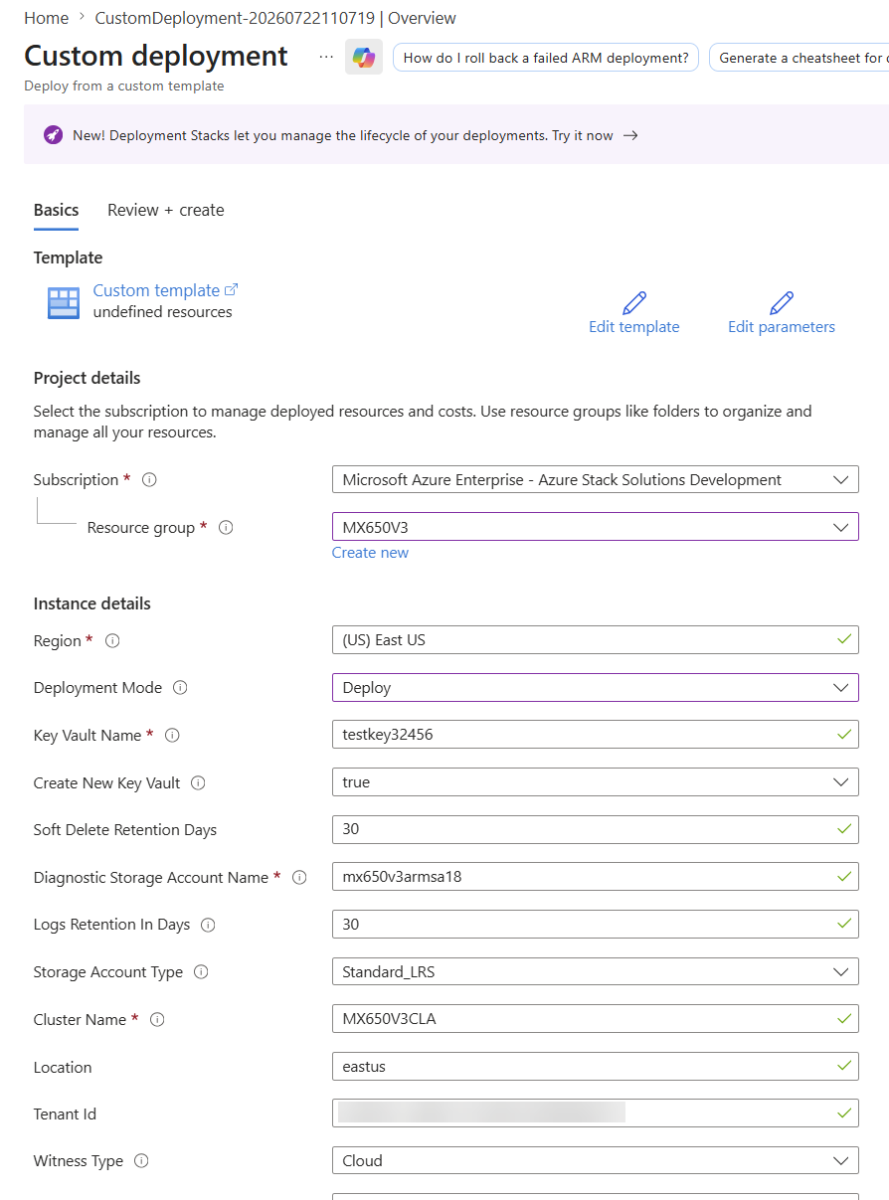
Figure 36. The Basics tab with Deployment Mode changed from Validate to Deploy - Verify that all required fields are completed correctly. You need to re-enter the following information:
- Resource group
- Local administrator password
- Azure Stack LCM administrator username
- Azure Stack LCM administrator password
- Follow the same steps that you took for the validation run, as shown in the figure below.
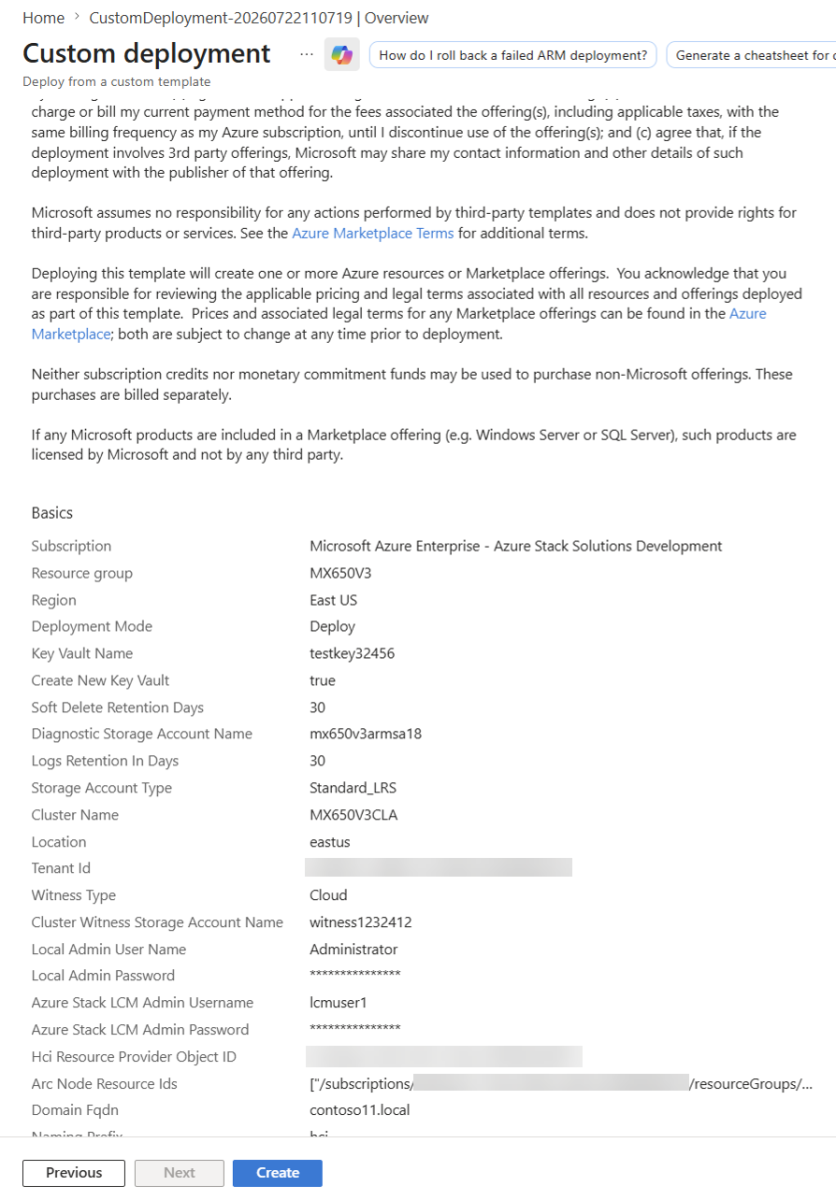
Figure 37. The Review + create summary for the Deploy runDeployment completed successfully, as shown in the figure below.
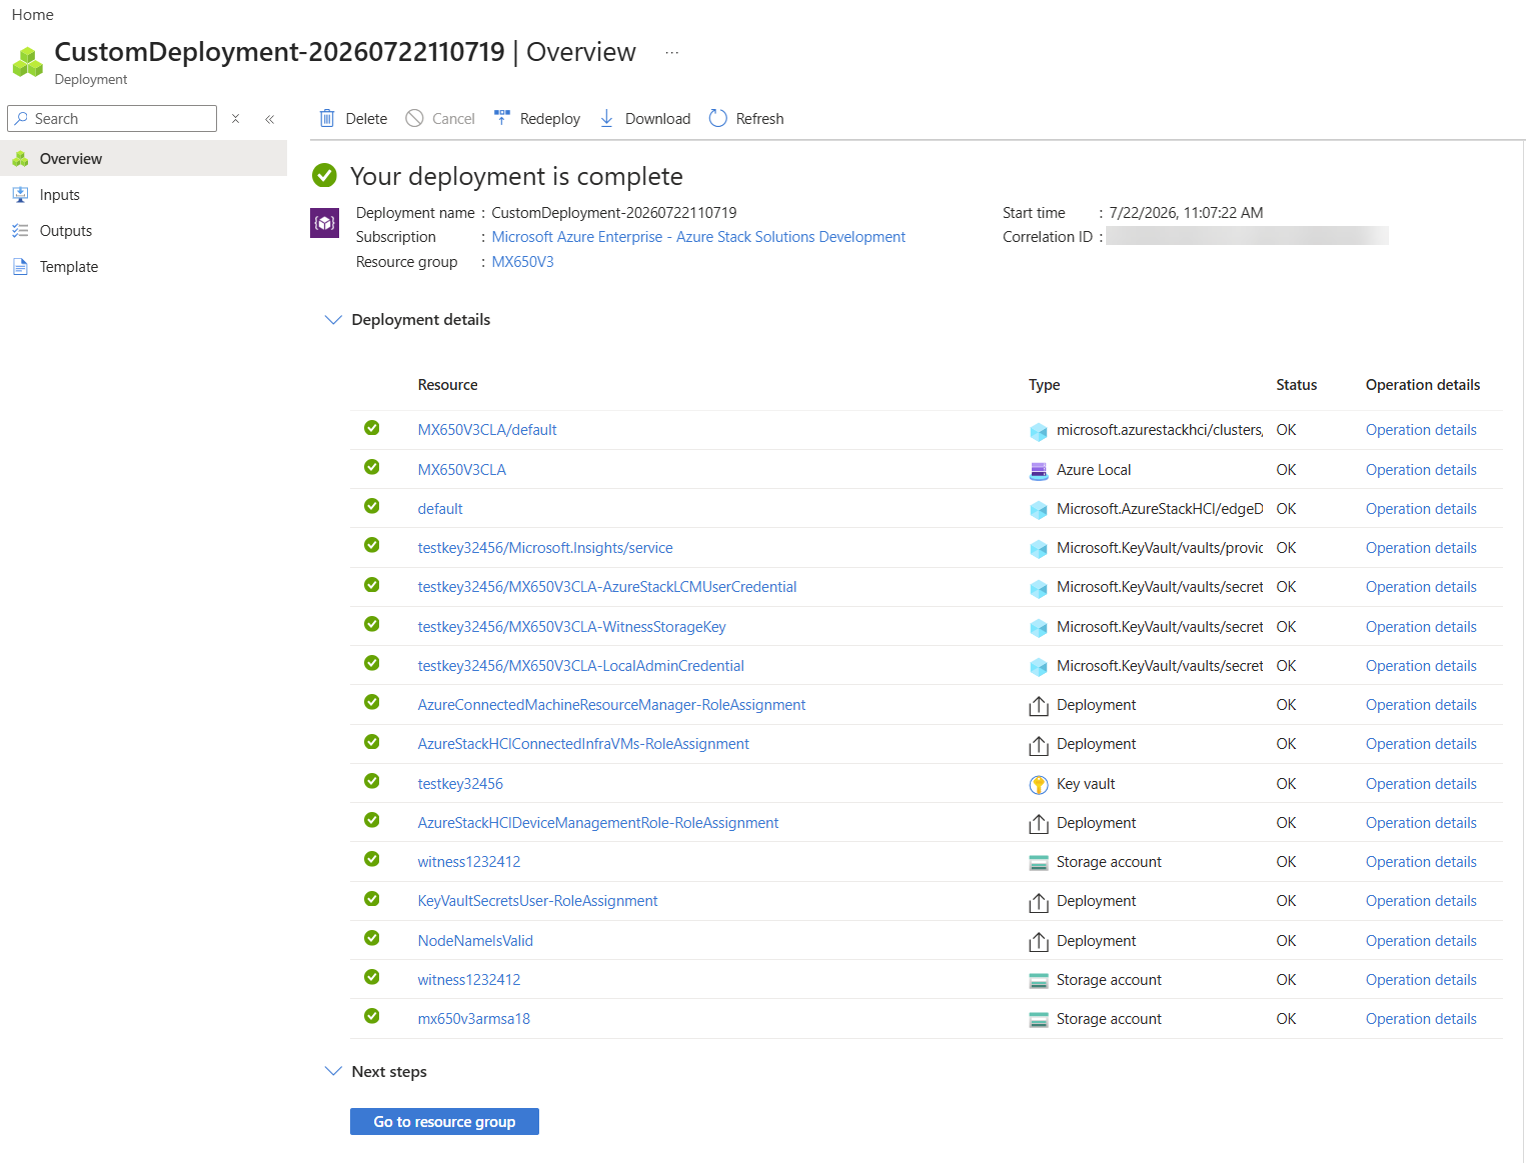
Figure 38. Confirmation that the deployment completed successfullyThe figure below shows the registered machine in the resource group as an Azure Arc-enabled machine.
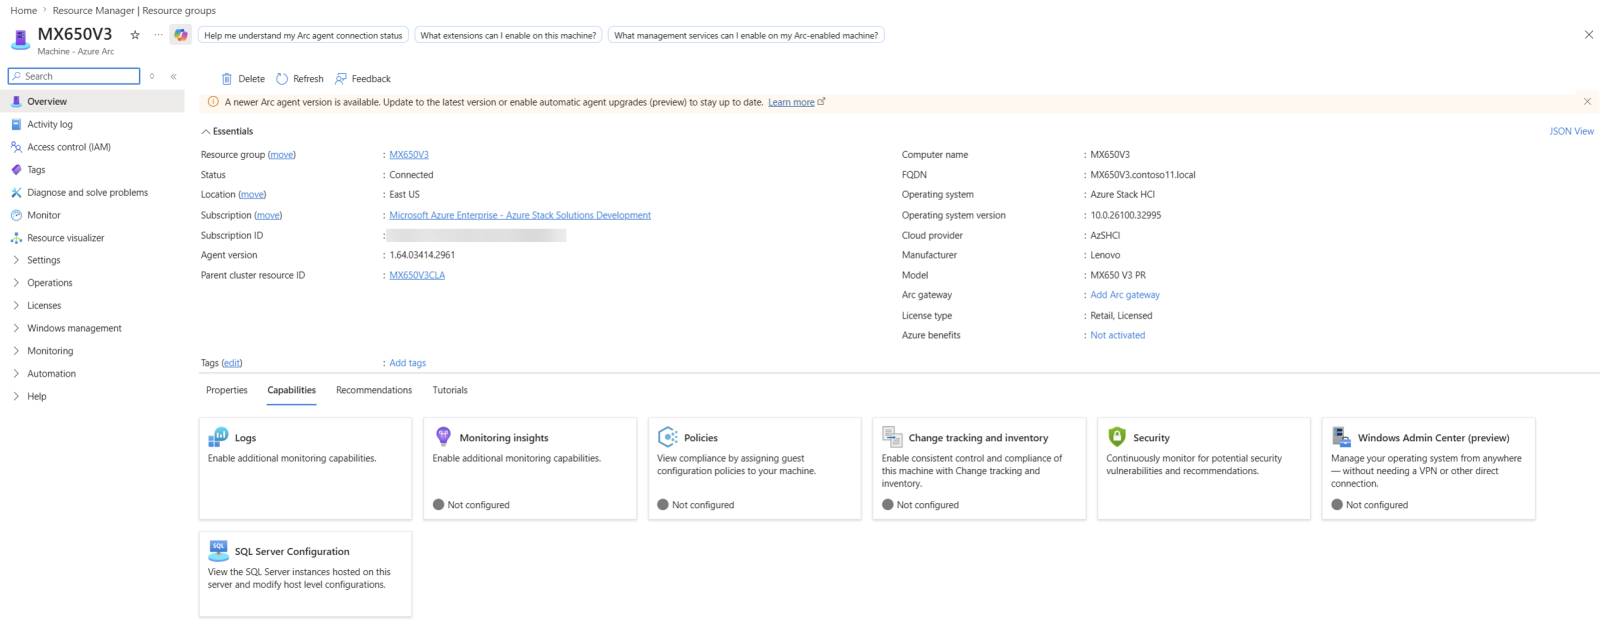
Figure 38. The MX650V3 machine in the resource group, shown as an Azure Arc-enabled machine with its parent instance resource ID
Notes and considerations
Before deploying a single-node instance, analyze the workload carefully. A single-node instance should host only services that can tolerate downtime in the event of a prolonged power failure or a hardware fault, because there is no second machine to fail over to.
Cluster-Aware Updating (CAU) is not available on a single-node instance, because it requires more than one machine to be of any benefit.
Resources
For more information, see these resources:
- Deploy Azure Local on a single server:
https://learn.microsoft.com/en-us/azure/azure-local/plan/single-server-deployment - Azure Local deployment overview:
https://learn.microsoft.com/en-us/azure/azure-local/deploy/deployment-introduction - ThinkAgile MX Best Recipes:
https://datacentersupport.lenovo.com/us/en/solutions/HT507406
Author
Adelina Onofrei is a Microsoft Solutions Engineer, specializing in Azure Local deployments, Azure Local cluster and LXCI testing. Adelina is dedicated to enabling business success through secure, innovative, and reliable solutions based on Azure Local and enterprise cloud technologies.
Trademarks
Lenovo and the Lenovo logo are trademarks or registered trademarks of Lenovo in the United States, other countries, or both. A current list of Lenovo trademarks is available on the Web at https://www.lenovo.com/us/en/legal/copytrade/.
The following terms are trademarks of Lenovo in the United States, other countries, or both:
Lenovo®
ThinkAgile®
XClarity®
The following terms are trademarks of other companies:
Microsoft®, Active Directory®, Azure®, Microsoft Entra®, PowerShell®, Windows Server®, and Windows® are trademarks of Microsoft Corporation in the United States, other countries, or both.
Other company, product, or service names may be trademarks or service marks of others.
Configure and Buy
Please select a locale
Full Change History
Course Detail
Employees Only Content
The content in this document with a is only visible to employees who are logged in. Logon using your Lenovo ITcode and password via Lenovo single-signon (SSO).
The author of the document has determined that this content is classified as Lenovo Internal and should not be normally be made available to people who are not employees or contractors. This includes partners, customers, and competitors. The reasons may vary and you should reach out to the authors of the document for clarification, if needed. Be cautious about sharing this content with others as it may contain sensitive information.
Any visitor to the Lenovo Press web site who is not logged on will not be able to see this employee-only content. This content is excluded from search engine indexes and will not appear in any search results.
For all users, including logged-in employees, this employee-only content does not appear in the PDF version of this document.
This functionality is cookie based. The web site will normally remember your login state between browser sessions, however, if you clear cookies at the end of a session or work in an Incognito/Private browser window, then you will need to log in each time.
If you have any questions about this feature of the Lenovo Press web, please email David Watts at dwatts@lenovo.com.


