

Top
Author
Published
24 Sep 2026Form Number
LP2532PDF size
14 pages, 1.0 MBSubscribed to LP2532.
Thank you for your feedback.
Abstract
Secure Boot is a UEFI firmware security feature developed by the UEFI Consortium designed to ensure that only immutable and digitally signed software is loaded during the boot process. Within VMware ESXi virtual machines, secure boot is implemented via the virtual UEFI (vUEFI) firmware, which validates each boot component using secure boot databases stored in virtual NVRAM. During the boot sequence, the firmware verifies the bootloader (e.g., Windows Boot Manager), which subsequently validates all following components to prevent the execution of untrusted code.
This document provides an overview of secure boot and outlines the procedures for configuring and updating secure boot certificate keys for virtual machines on VMware ESXi 9.1 on Lenovo ThinkSystem servers. This document is intended for IT specialists and IT managers who are familiar with VMware ESXi products.
Introduction
Secure Boot is a UEFI firmware security feature developed by the UEFI Consortium designed to ensure that only immutable and digitally signed software is loaded during the boot process. By leveraging digital signatures, Secure Boot validates the authenticity and origin of the loaded code, thereby guaranteeing its integrity. The VMware ESXi bootloader comprises several UEFI applications and drivers; when Secure Boot is enabled within the firmware, the system will reject any UEFI application or driver that is not cryptographically signed by a trusted key. VMware ESXi supports Secure Boot by ensuring all bootloader components are properly signed and by initiating a verification chain to confirm that the remainder of the ESXi system is signed with a VMware key. These validation measures are implemented to preclude the execution of malicious code and to mitigate threats such as rootkits and bootkits.
Secure Boot for ESXi hosts
Figure 1 illustrates the structure of signatures and keys utilized by Secure Boot. The platform is secured via a Platform Key (PK), which is embedded in the firmware by the Original Equipment Manufacturer (OEM) during the manufacturing process. Key Exchange Keys (KEK) are employed by Secure Boot to regulate access to the databases that manage the execution permissions of firmware. The Authorized Signature Database (db) contains the public keys and certificates of trusted firmware components and operating system loaders. Conversely, the Forbidden Signature Database (dbx) stores hashes of malicious or vulnerable components, as well as compromised keys and certificates, to effectively block the execution of unauthorized code.

Figure 1. Secure Boot Key Structure
Figure 2 illustrates the VMware ESXi secure boot sequence, which indicates the following steps:
- One or more public key certificates enrolled in the UEFI firmware's "db" variable serve as the initial root of trust.
- The UEFI firmware utilizes these keys to validate the cryptographic signature of the ESXi bootloader
- The ESXi bootloader, which incorporates a VMware public key, employs this key to verify the signatures of the kernel and a critical subset of the system, including the Secure Boot VIB verifier.
- The VIB verifier subsequently validates every VIB package installed on the system to ensure integrity.
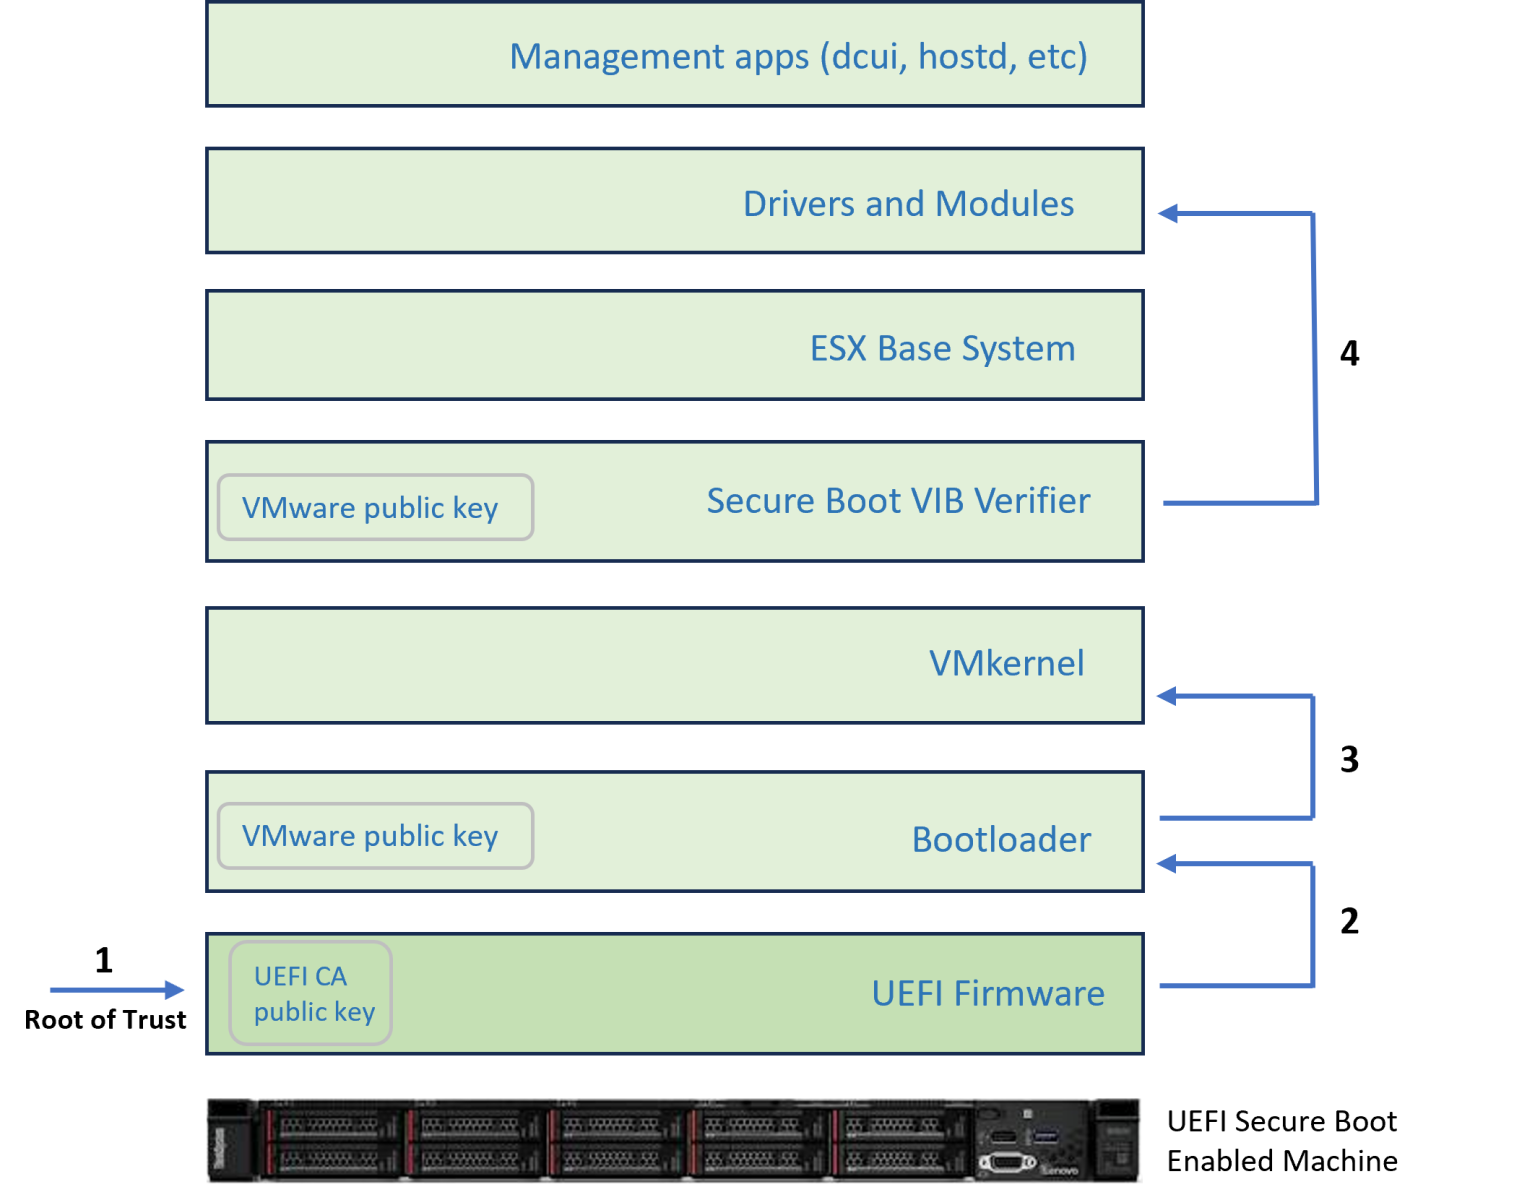
Figure 2. Secure Boot sequence on the ESXi host
Within the ESXi 9.1 environment, the parseSB utility can be utilized to inspect the Secure Boot keys enrolled in the host firmware, as illustrated in Figures 3 and 4.
To display the KEK keys, execute the following command:
# /usr/lib/vmware/uefi/bin/parseSB -u KEK | less
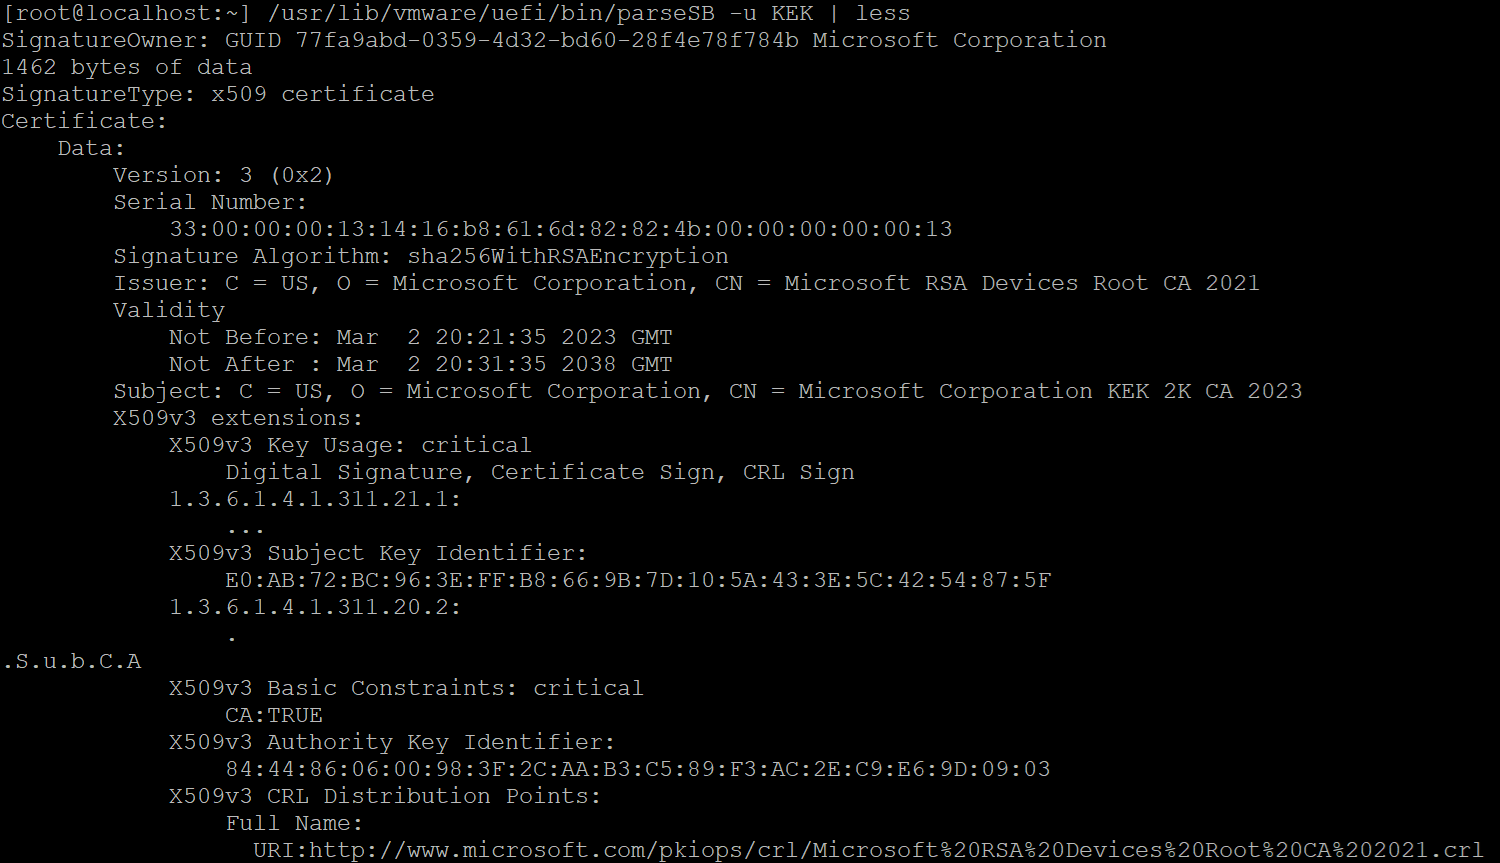
Figure 3. Display KEK certificate keys
To display the db keys, execute the following command:
# /usr/lib/vmware/uefi/bin/parseSB -u db | less
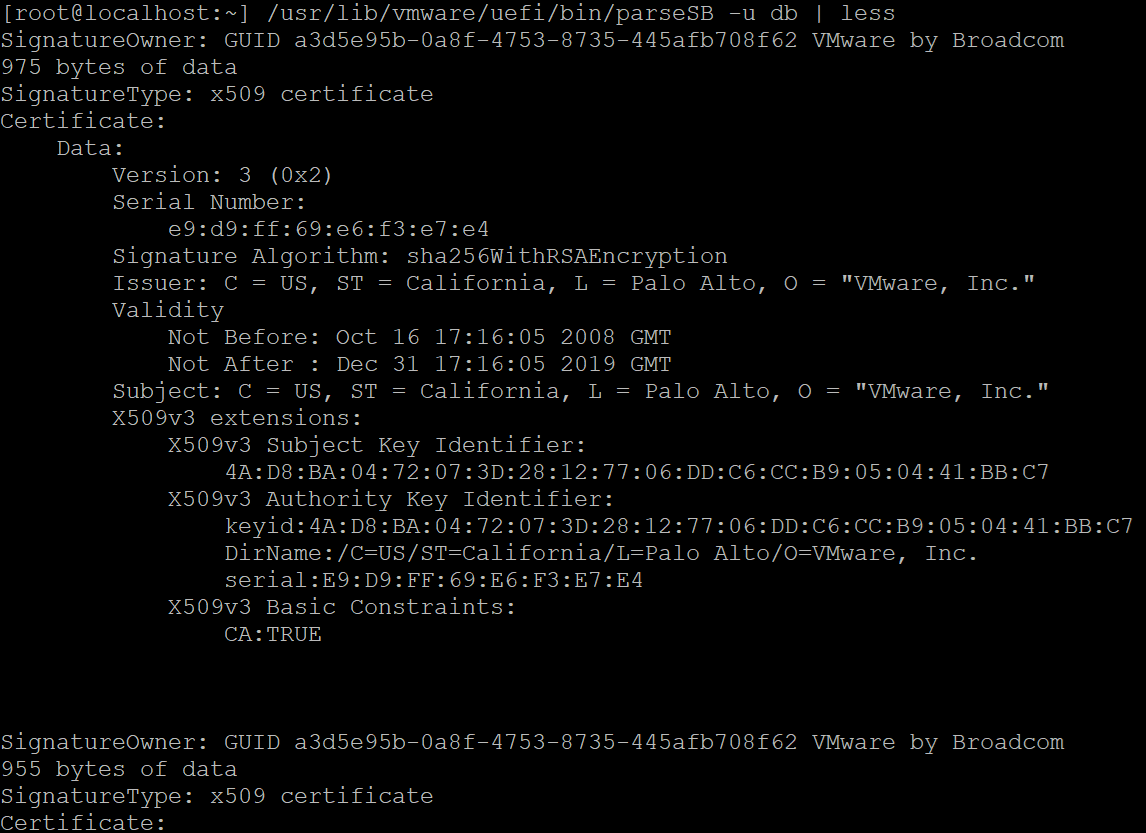
Figure 4. Display db certificate keys
The Microsoft Corporation KEK CA 2011 and Microsoft Corporation UEFI CA 2011 certificates utilized within the DB expired in June 2026. Additionally, the Microsoft Windows Production PCA 2011 certificate is set to expire in October 2026. While the expiration of these 2011 certificates precludes Microsoft from generating new signatures, it does not invalidate existing signatures created prior to the expiration date. To address this, Microsoft has issued the Microsoft UEFI CA 2023 certificates (specifically, the Microsoft UEFI CA 2023 and Microsoft Option ROM UEFI CA 2023) to replace the expiring 2011 UEFI CA certificate.
Lenovo systems proactively incorporate updated UEFI firmware that includes the Microsoft Secure Boot CA 2023 certificates, enabling a seamless transition for customers without the need to disable Secure Boot or perform manual key enrollment.For detailed information regarding the minimum Lenovo UEFI build that supports the Microsoft Secure Boot CA 2023 certificates for each server model, refer to the following Lenovo Press paper, Secure Boot CA 2023 Guide for Azure Local and Windows Server.
VMware has published KB article 434297, which outlines the management of this transition at the physical server layer, and KB article 423893, which provides guidance for the virtual machine layer.
Secure Boot for ESXi virtual machines
With VMware ESXi VMs, Secure Boot is implemented via the virtual UEFI (vUEFI) firmware, which validates each boot component using Secure Boot databases stored in virtual NVRAM. During the boot sequence, the firmware verifies the bootloader (e.g., Windows Boot Manager), which subsequently validates all following components to prevent the execution of untrusted code. Secure Boot can be enabled for a VM only when all prerequisites are satisfied, including the use of EFI firmware, virtual hardware version 14 or later, and a guest operating system that supports UEFI Secure Boot. If these requirements are not met, the Secure Boot option will not be visible within the ESXi Client. Secure Boot certificates are initialized by the host during the initial power-on sequence and remain static throughout the VM's lifecycle unless explicitly updated.
Table 1 details the default certificates present in ESXi 9.1 at the time of VM creation, along with their respective expiration dates.
Secure Boot key management for virtual machines
In this section, we outline the procedures for configuring and updating Secure Boot certificate keys for virtual machines on ESXi 9.1, utilizing either the vUEFI interface or VMX configuration.
The test configuration for the ThinkSystem SR665 V3 is summarized in Table 2.
It is strongly recommended to follow the OS vendor's official guidance when updating secure boot keys. While VMware's update methods—via the vUEFI interface or VMX configuration—are available as fallback options, updating these keys from outside the guest OS may compromise the functionality of security applications (such as Windows BitLocker or Linux LUKS) on vTPM-enabled VMs. This is because such updates modify Secure Boot variables and vTPM measurements without the OS's awareness, potentially triggering security failures.
The certificate keys employed for this demonstration are listed in Table 3.
| Key Name | Variable | File Source |
|---|---|---|
| Windows OEM devices pk | PK | https://go.microsoft.com/fwlink/?linkid=2255361 |
| Microsoft Corporation KEK 2K CA 2023 | KEK | https://go.microsoft.com/fwlink/?linkid=2239775 |
| Windows UEFI CA 2023 | db | https://go.microsoft.com/fwlink/?linkid=2239776 |
| Microsoft UEFI CA 2023 | db | https://go.microsoft.com/fwlink/?linkid=2239872 |
| kernel-signing-ca.cer secureboot-uki-x86_64.cer |
db | From OS RHEL 9.8 under directory /usr/share/doc/kernel-keys/5.14.0-687.5.3.el9_8.x86_64/ |
Management via the vUEFI interface
The following steps describe the procedure for managing Secure Boot keys via the vUEFI interface on an existing RHEL 9.8 VM:
- Download the certificate keys specified in Table 3 and copy the files to a FAT32-formatted USB storage device.
- Attach the USB storage device to the physical host and configure the USB passthrough settings to map the device to the virtual machine.
- Log in to the VMware Host Client, power off the VM, and navigate to Edit Settings. Under the Advanced Parameters tab, add a new configuration parameter by entering uefi.allowAuthBypass as the attribute and TRUE as the value. Click the Add button to save the parameter, as illustrated in Figure 5.
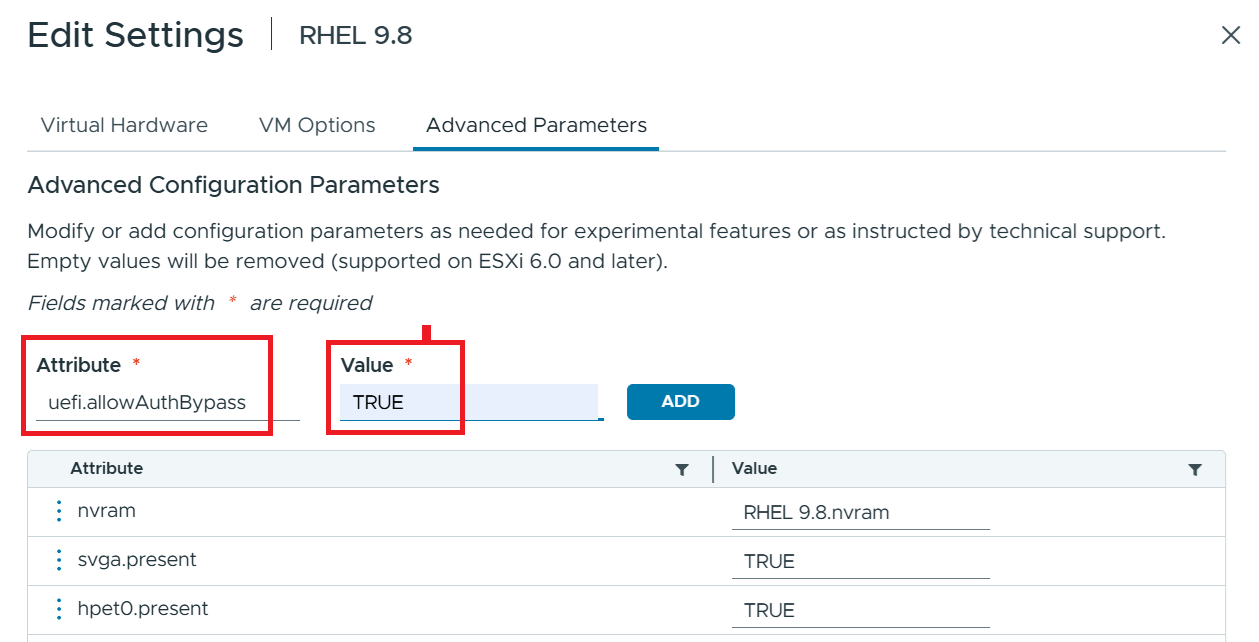
Figure 5. Add “uefi.allowAuthBypass” parameter - Navigate to the VM Options tab and select Boot Options. Enable the "Force EFI setup" option, as illustrated in Figure 6.
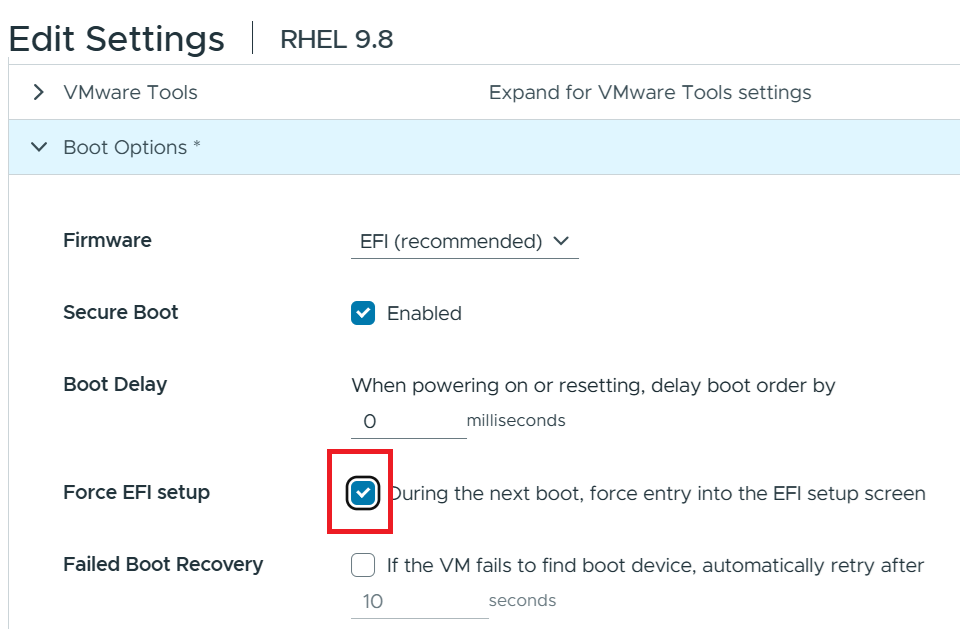
Figure 6. Force EFI setup option - Click OK to save the changes and power on the virtual machine to enter the vUEFI interface.
- Within the vUEFI setup menu, navigate to Enter setup -> Secure Boot Configuration. This menu provides four distinct options for Secure Boot key management, as illustrated in Figure 7.
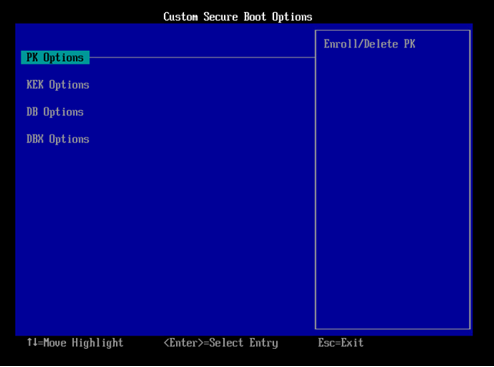
Figure 7. Secure Boot options - To enroll a new Key Exchange Key (KEK), navigate to KEK Options -> Enroll KEK $-> Enroll KEK Using File. Select the appropriate certificate file from the attached USB storage, as illustrated in Figure 8.
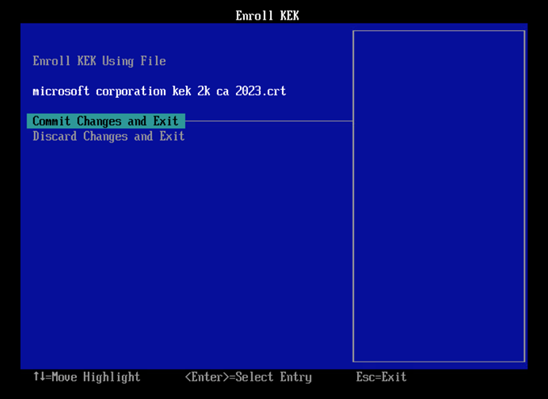
Figure 8. Enroll a KEK key file - The "Commit Changes and Exit" option was selected to persist the modifications to the firmware.
- Steps 6 through 8 were repeated iteratively for each additional certificate key requiring enrollment.
- The VM was shut down, and the uefi.allowAuthBypass parameter was removed from the advanced configuration to ensure the system returned to a secure state.
- Upon powering on the VM, the mokutil utility was employed within the guest operating system to validate the successful application of the updates, as depicted in Figure 9.
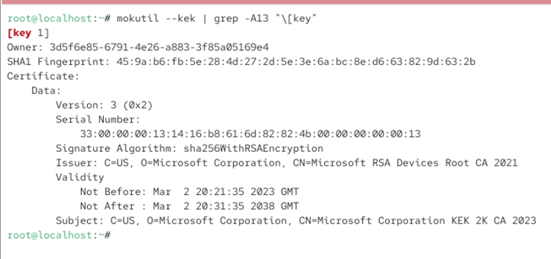
Figure 9. Windows KEK certificate key
Management via VMX configuration
Beginning with ESXi 9.0, users can manage the certificate keys stored in Secure Boot variables (specifically PKDefault, KEKDefault, dbDefault, and dbxDefault) for both newly deployed and existing virtual machines to apply default key sets. For the purpose of this demonstration, dbDefault is used as the primary example.
Table 4 lists the related VMX configuration options and their descriptions.
The following steps describe the procedure for managing Secure Boot keys via VMX configuration parameters on an existing RHEL 9.8 VM:
- Copy the Secure Boot certificate files to the virtual machine's directory on the ESXi datastore (e.g., /vmfs/volumes/datastore1/RHEL 9.8/).
- Log in to the VMware Host Client, select the target VM, and power it off. Navigate to Edit Settings > Advanced Parameters, and enter the parameters as illustrated in Figure 10. These configurations will append the two RHEL certificate keys (kernel-signing-ca.cer and secureboot-uki-x86_64.cer) to the dbDefault Secure Boot variable.
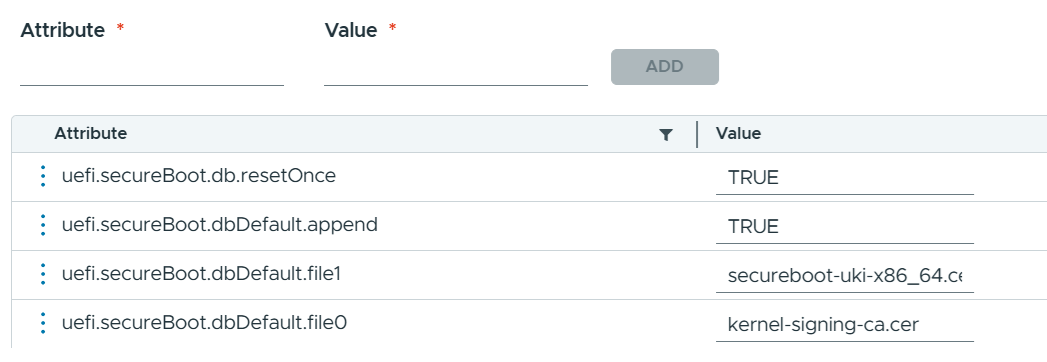
Figure 10. VMX parameters to manage secure boot keys - Power on the virtual machine and execute the mokutil utility within the guest operating system to verify that the changes have taken effect, as illustrated in Figure 11.
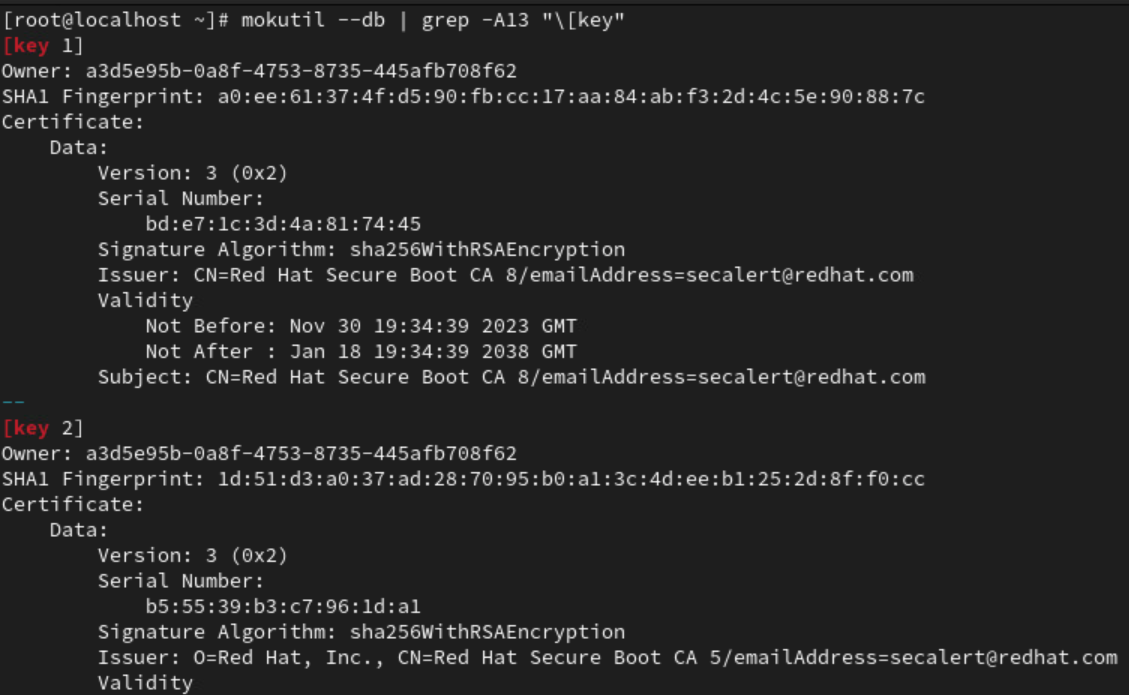
Figure 11. RHEL certificate keys
References
For more information, see these resources:
- Secure Boot Certificate Expirations: Guidance for ESXi Host Secure Boot
https://knowledge.broadcom.com/external/article/434297
- Secure Boot Certificate Expirations and Update Failures in VMware Virtual Machines
https://knowledge.broadcom.com/external/article/423893
- Secure Boot Custom Certificates
https://knowledge.broadcom.com/external/article/377306
- Secure Boot CA 2023 Transition Guide for Windows Server-based Lenovo products.
https://lenovopress.lenovo.com/lp2441 - Updating Windows Boot Manager and WinPE with the Windows UEFI CA 2023 Certificate
https://lenovopress.lenovo.com/lp2353
Author
Alpus Chen is an OS Engineer at the Lenovo Infrastructure Solutions Group in Taipei, Taiwan. As a specialist in Linux and VMware technical support for several years, he is interested in operating system operation and recently focuses on VMware OS.
Trademarks
Lenovo and the Lenovo logo are trademarks or registered trademarks of Lenovo in the United States, other countries, or both. A current list of Lenovo trademarks is available on the Web at https://www.lenovo.com/us/en/legal/copytrade/.
The following terms are trademarks of Lenovo in the United States, other countries, or both:
Lenovo®
ThinkSystem®
The following terms are trademarks of other companies:
AMD®, AMD EPYC®, and EPYC® are trademarks of Advanced Micro Devices, Inc.
Linux® is the trademark of Linus Torvalds in the U.S. and other countries.
Microsoft®, Authenticode®, Azure®, BitLocker®, Windows Server®, and Windows® are trademarks of Microsoft Corporation in the United States, other countries, or both.
Other company, product, or service names may be trademarks or service marks of others.
Configure and Buy
Please select a locale
Full Change History
Course Detail
Employees Only Content
The content in this document with a is only visible to employees who are logged in. Logon using your Lenovo ITcode and password via Lenovo single-signon (SSO).
The author of the document has determined that this content is classified as Lenovo Internal and should not be normally be made available to people who are not employees or contractors. This includes partners, customers, and competitors. The reasons may vary and you should reach out to the authors of the document for clarification, if needed. Be cautious about sharing this content with others as it may contain sensitive information.
Any visitor to the Lenovo Press web site who is not logged on will not be able to see this employee-only content. This content is excluded from search engine indexes and will not appear in any search results.
For all users, including logged-in employees, this employee-only content does not appear in the PDF version of this document.
This functionality is cookie based. The web site will normally remember your login state between browser sessions, however, if you clear cookies at the end of a session or work in an Incognito/Private browser window, then you will need to log in each time.
If you have any questions about this feature of the Lenovo Press web, please email David Watts at dwatts@lenovo.com.


